Sump Pump for Rain Barrel: Your Ultimate Guide to Free Water
Harnessing rainwater with a rain barrel is an eco-friendly and cost-effective way to secure free water for your garden, lawn, or household needs. However, manually dipping buckets or relying on gravity alone can be limiting. Adding a sump pump to your rain barrel setup transforms it into a powerful, on-demand irrigation system, allowing you to distribute water efficiently over greater distances and heights.
In this ultimate guide, we’ll explore the best sump pump options for rain barrels, key features to consider, installation tips, and maintenance advice. Whether you’re a beginner or seasoned rainwater harvester, you’ll discover how to maximize your free water supply while saving time and effort. Let’s dive into making your rain barrel system smarter and more versatile.
You'll Learn About
The Untapped Power in Your Backyard
Collecting rainwater is a rewarding, eco-friendly practice for any home and garden enthusiast. It provides a free source of soft, chemical-free water that your plants will love. However, many soon discover the frustrating limitation of a standard rain barrel: a lack of water pressure.
The gentle trickle from a gravity-fed spigot is fine for filling a watering can, but it makes using a hose, sprinkler, or nozzle nearly impossible. This guide explores the ultimate solution: using a pump to transform your rain barrel from a passive water collector into a powerful, pressurized irrigation system.
Why Your Rain Barrel Is Crying Out for a Pump
A standard rain barrel setup relies solely on gravity. The water pressure you get is directly related to how high the water level is and how elevated the barrel is from the ground. For most setups, this results in a weak flow that severely limits its usefulness.
Adding a pump to your system immediately solves this problem. It introduces active pressure, allowing you to water your garden efficiently, reach distant flower beds, and use modern watering tools. You save time, effort, and can finally make full use of every drop of rainwater you collect.
The Frustration of Gravity-Fed Systems
Without a pump, you face several challenges. Hoses tend to just dribble, making watering a slow and tedious process. Forget about using any kind of sprinkler; there simply isn’t enough force to make them operate correctly.
This low pressure often means you are still tethered to your main water supply, defeating some of the purpose of collecting rain in the first place. The dream of a self-sufficient garden watering system remains just out of reach.
Benefits of a Pressurized Rain Barrel System
Integrating a pump unleashes a world of possibilities. You can use a standard garden hose with an adjustable spray nozzle, giving you control over the water stream. It provides enough force to operate sprinklers, soaker hoses, and even drip irrigation systems effectively.
This newfound power means you can water your entire garden, not just the plants right next to the barrel. It makes gardening more enjoyable and your water conservation efforts far more impactful. Ultimately, it turns your rainwater into a truly viable alternative to municipal water for all your outdoor needs.
Choosing the Right Pump: A Critical Decision
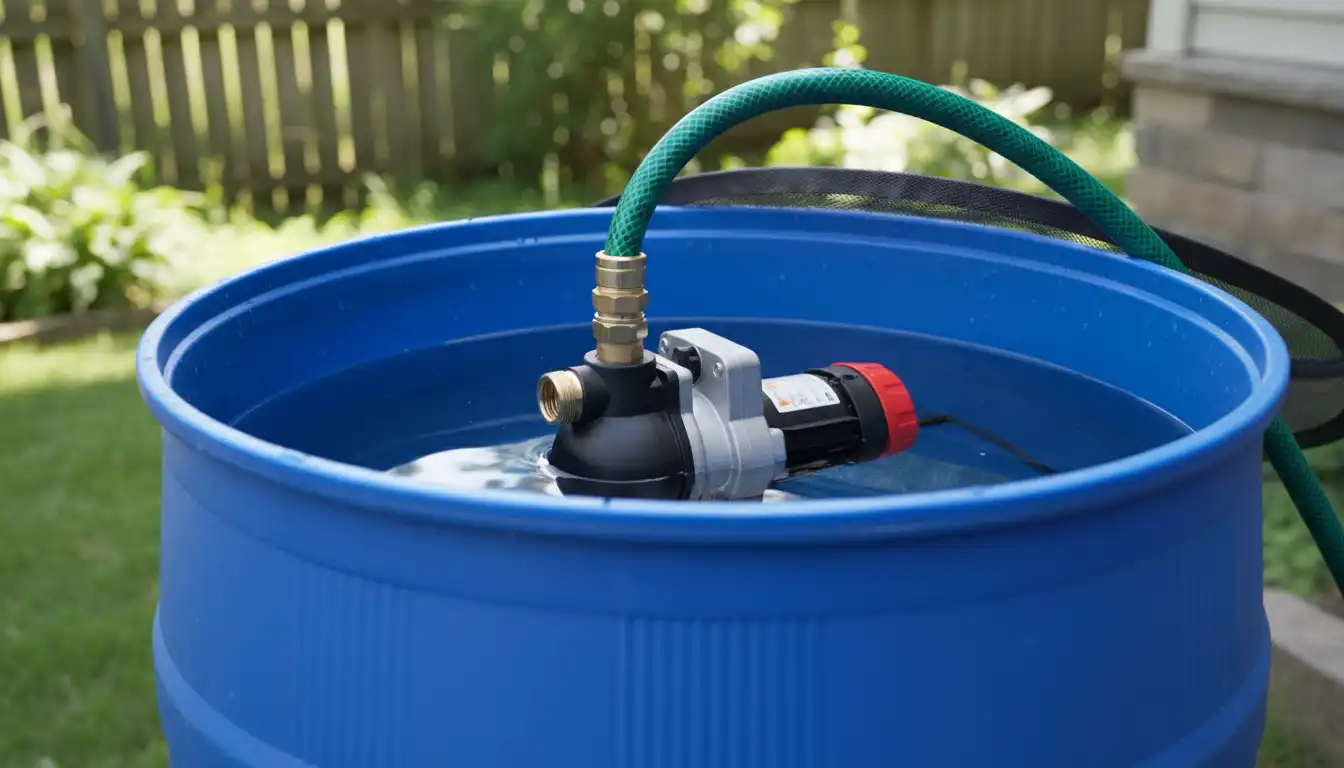
When you start searching, you’ll likely use the term “sump pump rain barrel.” While a sump pump can work, the more appropriate tool for this job is typically a submersible utility pump. Understanding the difference is key to buying the right product and avoiding frustration.
Making the right choice involves balancing power, flow rate, and a few other key specifications. Choosing the right pump involves comparing features to find the best fit for your home and garden, a process similar to when homeowners compare high-end window lines like the Marvin Modern vs. Ultimate series to find the perfect match for their property’s style and needs.
Sump Pump vs. Utility Pump: What’s the Difference?
A sump pump is a specialized pump designed to sit in a sump pit in a basement, automatically turning on via a float switch to prevent flooding. They are built to be robust and handle some solids. However, their automatic switches are not always ideal for on-demand garden watering.
A utility pump, on the other hand, is a multi-purpose workhorse. It’s designed for general water transfer tasks, like draining a pool or, in this case, emptying a rain barrel. They are typically manually operated, giving you full control, and are often more compact and affordable.
Key Factors for Your Rain Barrel Pump
When selecting a utility pump, focus on a few core metrics. Horsepower (HP) indicates the motor’s power; for a single rain barrel, a 1/6 HP or 1/4 HP pump is more than sufficient. You don’t need a powerful engine to water your plants.
Gallons Per Hour (GPH) measures the flow rate. A higher GPH will empty your barrel faster. More important for this application is Max Head Height or “lift,” which tells you how high the pump can push water vertically. Understanding water pressure and height, or ‘head,’ is crucial for your pump, just as considering vertical space is important in home design, like deciding if the shower door should be higher than the shower head.
| Feature | What It Means | Recommendation for Rain Barrels |
|---|---|---|
| Horsepower (HP) | The power of the pump’s motor. | 1/6 HP to 1/4 HP is typically sufficient. |
| Gallons Per Hour (GPH) | The maximum volume of water the pump can move in one hour. | 500-1500 GPH is a good range for garden tasks. |
| Max Head Height (Lift) | The maximum vertical distance the pump can push water. | At least 20-25 feet to ensure good pressure through a 50-foot hose. |
| Intake Type | Where and how the pump draws in water (bottom or side). | A bottom-intake pump with a screen is ideal for maximizing water use. |
| Debris Handling | The size of solid particles the pump can pass without clogging. | Look for a pump that can handle at least 1/8-inch solids. |
Step-by-Step: Setting Up Your Rain Barrel Pump
The installation process is surprisingly simple and requires no special plumbing skills. With the right components and a focus on safety, you can have your pressurized system running in under 15 minutes. The key is to ensure all connections are secure and electrical safety is your top priority.
Follow these steps carefully to ensure a safe and effective setup. Before you know it, you’ll be watering your garden with the satisfying pressure you’ve been missing.
Safety First: Working with Water and Electricity
This is the most critical step. Never compromise on electrical safety. The pump must be plugged into a Ground Fault Circuit Interrupter (GFCI) outlet. This type of outlet is designed to shut off the power instantly if it detects any imbalance in the current, preventing electric shock.
Always use a heavy-duty, outdoor-rated extension cord if the pump’s cord cannot reach the GFCI outlet directly. Keep the plug connection point dry and elevated off the ground. Never handle the pump or its cord with wet hands while it is plugged in.
Your Shopping and Preparation Checklist
Before you begin, gather all your materials. You will need your submersible utility pump, a standard garden hose, and any necessary adapters. Most utility pumps come with a garden hose adapter, but it’s wise to check the packaging.
Ensure your rain barrel water is relatively clean. While pumps have screens, you want to avoid sucking up large amounts of leaves, twigs, or other debris. A quick skim of the water’s surface can prevent future clogs.
Installation in 5 Simple Steps
First, securely attach the garden hose adapter to the threaded outlet port on the top or side of the pump. Second, connect your garden hose to this adapter, making sure the connection is hand-tight to prevent leaks.
Third, gently lower the pump into the rain barrel, allowing it to rest flat on the bottom. Fourth, drape the power cord and the garden hose over the rim or through the top opening of the barrel. Finally, plug the pump into your GFCI-protected outlet, and you are ready to start watering with power.
Beyond the Basics: Advanced Tips and Tricks
Once your basic system is running, you can explore ways to make it even more convenient and effective. With a few simple additions, you can automate your watering schedules, set up highly efficient irrigation systems, and even use your collected rainwater for other household chores.
These advanced strategies will help you maximize the benefits of your pressurized rain barrel. They can save you even more time and water, turning your simple setup into a smart home and garden feature.
Automating Your Watering Schedule
For true hands-off convenience, connect your pump to an outdoor-rated timer or a smart plug. A simple mechanical timer can be set to run the pump for a specific duration each day. This is perfect for running a sprinkler in your vegetable garden while you are at work.
A Wi-Fi-enabled smart plug offers even more control. You can turn the pump on or off from anywhere using your smartphone, allowing you to react to changing weather conditions. This simple piece of tech adds a significant layer of convenience.
Powering a Drip Irrigation System
Drip irrigation and soaker hoses are incredibly efficient ways to water, as they deliver moisture directly to the roots of your plants with minimal evaporation. However, they require a certain amount of pressure to function correctly—pressure that a gravity-fed system cannot provide.
Your new pump is the perfect engine for a drip irrigation network. It provides the steady, consistent pressure needed to ensure water is distributed evenly throughout the entire system. This is an ideal setup for vegetable gardens, raised beds, and delicate flowerbeds.
The Secret to Longevity: Water Quality and Pump Health
Many guides will tell you how to set up your pump, but few discuss the single biggest factor in its long-term health: the quality of the water inside your barrel. Stagnant water is a breeding ground for microscopic life that can wreak havoc on your pump’s internal components.
Understanding and managing this biological factor is the key to ensuring your pump lasts for many seasons. Proactive water management is far easier than reactive pump repair.
The Hidden Threat: Biofilm and Algae
Over time, the water in your barrel can develop algae and a slimy layer on all surfaces known as biofilm. This sticky substance is more than just an aesthetic issue. It can quickly clog the fine mesh of your pump’s intake screen.
More critically, fine particles of this biofilm can be sucked into the pump, where they can coat and jam the impeller, which is the small, fast-spinning part that actually moves the water. This is often the cause of a pump that hums but fails to move water. A clean intake screen is only half the battle.
Proactive Solutions for a Healthier System
The best defense starts before the water even enters the barrel. Installing a first-flush diverter on your downspout is the single most effective upgrade you can make. It diverts the initial flow of water during a storm—which contains the most dirt, pollen, and debris from your roof—away from your barrel.
Another powerful and unique strategy is to improve aeration. Placing a small, inexpensive solar-powered pond aerator in your barrel keeps the water moving. This circulation dramatically inhibits the growth of algae and anaerobic bacteria, keeping the water clearer and reducing the strain on your pump’s filter. Furthermore, instead of placing the pump directly on the barrel floor where sediment collects, set it on two clean bricks to elevate the intake a few inches, ensuring it only draws in the cleanest water.
Maintenance and Troubleshooting Your System
Proper maintenance is essential for keeping your pump operating efficiently and safely for years to come. Thankfully, utility pumps require very little upkeep. A few simple checks during the season and proper winterization are all it takes.
Just like caring for household appliances, such as when you are trying to find parts for a discontinued Bosch dishwasher, regular maintenance on your garden pump is key to its longevity. When problems do arise, they are usually easy to diagnose and fix.
Routine Pump Care and Winterization
Periodically, you should unplug the pump and lift it out of the barrel to inspect the intake screen at the bottom. Use a brush and a hose to clear away any accumulated leaves, algae, or other debris. This will ensure it can always draw in water freely.
Winter storage is non-negotiable. Before the first freeze, you must remove the pump from the barrel. Drain all water from the pump and the hose, and store the pump in a dry, frost-free location like a basement or garage. Allowing water to freeze inside the pump will crack the housing and destroy it.
Solving Common Pump Problems
If your pump is running but no water is coming out, the most likely culprits are a clog in the intake screen or a significant kink in your garden hose. An air bubble trapped in the pump body, known as an airlock, can also cause this. Tilting the pump while it’s submerged can help release the trapped air.
If you experience lower-than-expected pressure, check these same issues first. Also, ensure your hose is not too long and you are not trying to pump the water too high, exceeding the pump’s maximum head height rating. A small leak in the hose or its connection can also be the cause of reduced pressure.
Unleash Your Garden’s Potential
By adding a simple utility pump, you fundamentally change the capability of your rain barrel. You move beyond passive collection and into active, powerful water management. This small investment unlocks the full potential of rainwater harvesting.
You can now water with ease and efficiency, run sprinklers, and maintain a healthier garden, all while conserving a precious natural resource. It’s a simple, empowering upgrade that puts you in control of your garden’s most vital need.