Storm Door Closer Ripped Out? Your Ultimate Repair Guide
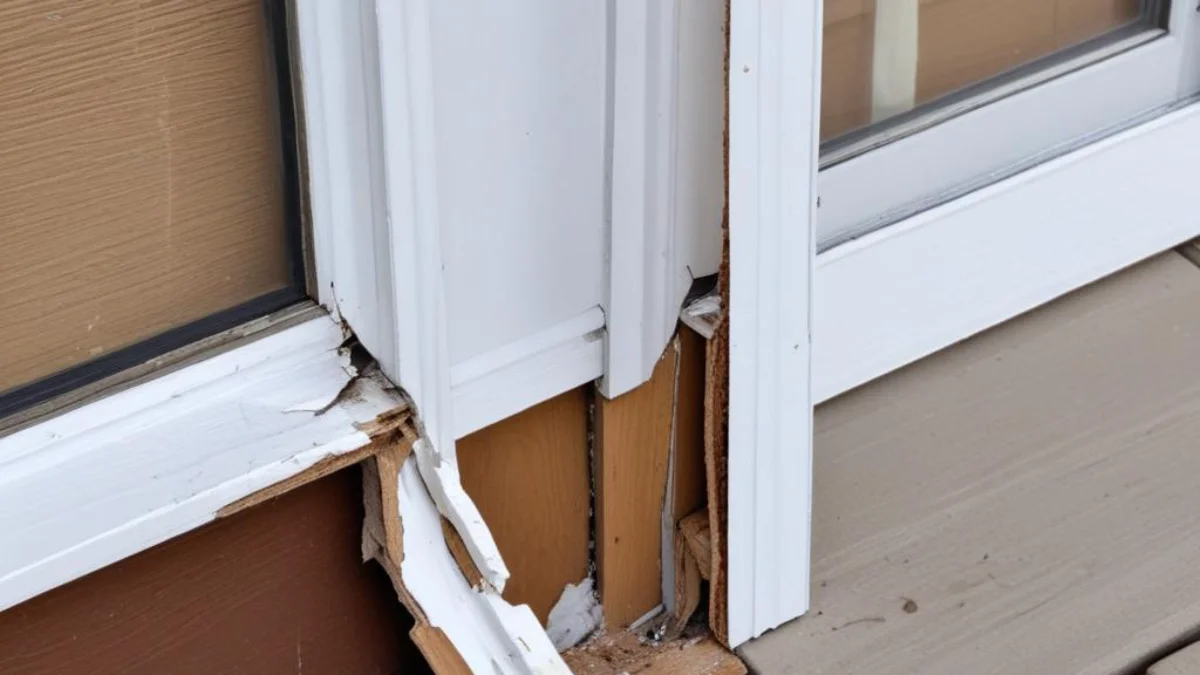
There are few home repair issues as startling and frustrating as a storm door closer ripped out of the door or its frame. One minute, your door is working perfectly, and the next, a gust of wind turns a simple entry into a scene of splintered wood and dangling hardware. This common household problem is not just an eyesore; it compromises your home’s security and energy efficiency. This comprehensive guide will walk you through why this happens and provide detailed, actionable steps to fix it for good.
Understanding the root cause is the first step toward a lasting solution. Homeowners often find themselves repeatedly fixing the same issue because the underlying problem was never addressed. We’ll delve into the common culprits, from improper installation to the sheer force of Mother Nature, ensuring you’re equipped with the knowledge to tackle this repair effectively.
You'll Learn About
Why Your Storm Door Closer Failed So Dramatically
The violent separation of a storm door closer from its mounting surface is typically due to a combination of factors. The force exerted on the small mounting brackets can be immense, especially when amplified by wind. When a strong gust of wind catches an open storm door, it acts like a sail, putting incredible strain on the closer’s attachment points.
Often, the screws provided with a standard storm door closer kit are too short. They may only anchor into the thin wood or aluminum trim of the door frame, not the solid structural framing of the house behind it. Over time, the constant push and pull of the door’s operation can loosen these screws, making them susceptible to being ripped out under sudden stress.
The Culprits: A Closer Look at Common Causes
Several issues can lead to a storm door closer failure. Weak or damaged wood in the door jamb is a primary suspect. If the wood is old, soft, or has any rot, it won’t provide a secure anchor for the screws. Repeated stress will eventually cause the wood fibers to give way, resulting in a ripped-out bracket.
Another frequent cause is an improperly adjusted closer. If the tension is set too high, the door will close with excessive force, putting unnecessary strain on the mounting hardware with every cycle. Conversely, if the tension is too loose, the door may not close completely, leaving it vulnerable to being caught by the wind.
The Definitive Step-by-Step Repair Guide
Fixing a ripped-out storm door closer is a manageable DIY project. With the right tools and a bit of patience, you can restore your door’s function and reinforce it against future damage. This section provides a clear, step-by-step process for a professional-quality repair.
Before you begin, it’s essential to assess the extent of the damage. Is it just stripped screw holes, or is there significant damage to the door frame itself? The repair method will depend on the severity of the problem. For instance, you might notice that there is water under lifeproof flooring near the door, which could indicate a larger issue with sealing and weatherproofing that needs to be addressed.
Step 1: Assess the Damage and Gather Your Tools
First, carefully examine the door, the door jamb, and the closer itself. If the bracket has been torn from a wooden frame, you’ll likely see splintered wood and stripped screw holes. If the frame is metal, the holes may be enlarged or the metal itself might be bent.
You will need a specific set of tools and materials to complete this repair successfully. Having everything on hand before you start will make the process much smoother and more efficient. Proper preparation is key to a successful and lasting repair.
Step 2: Repairing a Damaged Wooden Door Frame
If you’re dealing with splintered wood and stripped screw holes, your first priority is to create a solid surface to mount the new bracket. Simply trying to use the old holes will not work, as they no longer have the integrity to hold a screw securely. You must fill the damaged area to provide a stable foundation.
A high-quality wood filler or epoxy is the best solution for this. These products dry harder than the original wood, creating a durable and long-lasting repair. Avoid using materials like spackle, which are not designed to hold screws under tension.
Start by removing any loose splinters of wood from the damaged area. Mix the two-part wood epoxy according to the manufacturer’s instructions and apply it generously to the holes and any cracks in the wood. Use a putty knife to smooth the surface, ensuring the filler is flush with the door frame. Allow the epoxy to cure completely, which may take several hours. Once cured, sand the area smooth and apply a coat of primer and paint to match the rest of the frame.
Step 3: The Ultimate Fix – Reinforcement and Reinstallation
Once the frame is repaired, the key to preventing a repeat incident is reinforcement. Do not simply screw the bracket back into the repaired area with the old, short screws. This is the most critical step for a permanent solution. You need to ensure the new installation can withstand the forces that caused the initial failure.
The best method is to use longer screws that will penetrate through the door jamb and into the solid wall stud behind it. These longer screws will provide a much more secure anchor point. Additionally, consider using a storm door closer reinforcement bracket. These are metal plates that distribute the force over a larger area, reducing the stress on any single point.
Position the reinforcement bracket (or the original bracket if not using a reinforcement plate) over the repaired area. Mark the new screw locations, making sure they align with the solid wood of the frame. Drill pilot holes to prevent the wood from splitting, then secure the bracket with screws that are at least 2.5 to 3 inches long. This ensures a firm grip into the structural framing of your home. If you’re undertaking multiple home projects, you might also be considering how to tackle other tasks, such as figuring out the best way for how to transport a ladder without a roof rack.
| Tool/Material | Purpose | Pro-Tip |
|---|---|---|
| Drill with Phillips and drill bits | Removing old hardware and drilling new pilot holes. | Use a bit slightly smaller than your screw for a snug fit. |
| Two-part wood epoxy or high-strength wood filler | Repairing damaged wood in the door frame. | Mix thoroughly and overfill slightly to allow for sanding. |
| Putty knife | Applying and smoothing the wood filler. | A flexible blade provides better control. |
| Sandpaper (medium and fine grit) | Smoothing the cured wood filler before painting. | Start with medium grit and finish with fine for a smooth surface. |
| Longer screws (at least 2.5-3 inches) | Securing the bracket into the wall stud. | Choose exterior-grade screws to prevent rust. |
| Storm door closer reinforcement bracket (optional) | Distributing force over a wider area for added strength. | Highly recommended for a permanent fix. |
| New storm door closer kit (if necessary) | Replacing a damaged or old closer mechanism. | Consider a heavy-duty model for windy areas. |
Preventative Measures to Avoid Future Blowouts
After completing the repair, a few preventative measures can help ensure you never have to deal with a ripped-out storm door closer again. Proper maintenance and a few simple additions can make all the difference in the longevity of your storm door installation.
Regularly check the screws on both the door and jamb brackets to ensure they remain tight. The vibrations from the door opening and closing can cause them to loosen over time. A quick check a few times a year can prevent a minor issue from becoming a major repair.
Installing a Wind Chain and Adjusting Your Closer
A wind chain is an inexpensive but highly effective addition to any storm door. This simple device is a small chain with a spring that attaches to the top of the door and the door frame. It prevents the door from opening too wide, acting as a crucial line of defense against strong gusts of wind.
Properly adjusting the tension on your pneumatic closer is also vital. Most closers have an adjustment screw on the end of the cylinder. Turning this screw will control the speed at which the door closes. Adjust it so the door closes smoothly and latches securely without slamming shut. This reduces daily stress on the mounting points. Thinking about home efficiency in other areas? It might be a good time to compare a 92 vs 96 furnace which one is more energy efficient to see if you can save on your heating bills.
When to Call a Professional
While this is a very manageable DIY repair for many homeowners, there are situations where calling a professional is the best course of action. If the damage to your door frame is extensive, or if the frame itself is rotten or severely compromised, a simple patch job may not be sufficient.
A professional handyman or carpenter can assess the structural integrity of the door frame and perform a more substantial repair, which might involve replacing a section of the jamb. If you are not comfortable with the steps outlined or lack the necessary tools, a professional can ensure the job is done correctly and safely, giving you peace of mind that your storm door is secure for years to come.