Staining Oak Cabinets Gray: Your Guide to a Flawless Finish
The dream is a modern, sophisticated kitchen with beautifully stained gray oak cabinets. The reality for many DIYers, however, is a frustrating, blotchy mess that looks more like a mistake than a masterpiece. You followed the steps, but the color is uneven, and hints of the old yellow or red oak are peeking through, creating an ugly, dated look.
This common problem can make you regret ever starting the project. But the issue isn’t your effort; it’s the unique and challenging nature of oak itself. Achieving that perfect, magazine-worthy gray finish is entirely possible with the right knowledge and techniques.
You'll Learn About
Why Is Gray Stain So Difficult on Oak?
Oak is a beautiful, durable wood, but its strong personality fights against a true gray stain. Understanding these challenges is the first step toward overcoming them. You must know your opponent to win the battle.
The two main culprits are oak’s natural undertones and its prominent grain structure. Ignoring these factors is a surefire way to end up with a disappointing result. A successful project requires a strategy that directly addresses these issues from the very beginning.
The Oak Undertone Dilemma: Red vs. White Oak
The most critical factor that many guides overlook is the type of oak you have. Red oak has pink or reddish undertones, while white oak has yellow or golden undertones. Applying a standard gray stain over these colors without correction is like painting on a colored canvas; the base color will always influence the final shade.
A cool-toned gray stain on red oak can turn purple or lavender. The same gray stain on yellow-toned white oak can appear greenish or muddy. This is where many projects fail before the first coat of stain is even dry.
The Porous Grain Problem
Oak has a very open and porous grain. These deep pores soak up stain much more than the denser parts of the wood. This uneven absorption creates a blotchy, inconsistent finish that highlights the grain in a harsh, “zebra-stripe” pattern.
Without the proper preparation, the stain will look dark and saturated in the grain and much lighter on the surrounding surfaces. This is the opposite of the smooth, uniform color you want for a modern look. It’s a classic sign of an amateur finish.
The “Tannin Bleed” Nightmare
Oak is rich in natural chemicals called tannins. When you use water-based products (like some stains and topcoats), the water can pull these tannins to the surface. This can cause yellowish or brownish discoloration that bleeds through your new gray finish, creating stains that are impossible to remove without starting over.
Before You Start: The Non-Negotiable Prep Work
Proper preparation is more than half the battle. Skipping or rushing these prep steps is the single biggest mistake you can make. A perfect gray stain is built on a foundation of meticulous and thorough prep work.
Step 1: Deep Cleaning and Degreasing
Kitchen cabinets are coated in years of grease, cooking oils, and cleaning residues. Stain cannot penetrate a dirty or greasy surface. You must begin with a thorough cleaning using a strong degreasing agent like Trisodium Phosphate (TSP) or a TSP substitute.
Scrub every square inch of the cabinet doors, drawers, and frames. This initial cleaning ensures that you are working with the wood itself, not a layer of grime that will block the stain.
Step 2: The Agony of Sanding (And Why It’s Worth It)
There is no way around it: you must sand off the old finish completely. This means getting down to the bare, raw wood. Any remaining old varnish or lacquer will prevent the new stain from absorbing evenly, causing shiny, mismatched patches.
Start with a medium-grit sandpaper (like 100 or 120-grit) to remove the bulk of the old finish. Then, move to a finer grit (like 150 or 180-grit) to smooth the surface. The goal is a uniformly sanded, raw wood surface ready to accept stain.
Step 3: The Secret Weapon – Pre-Stain Wood Conditioner
Never apply stain to raw oak without first using a pre-stain wood conditioner. This is the crucial step that prevents blotchiness. Wood conditioner is a thin, clear liquid that partially seals the porous wood grain, forcing the stain to absorb more evenly across the entire surface.
Think of it as a primer for stain. It controls absorption, tames the wild grain, and is your best defense against a blotchy finish. Apply a liberal coat, let it penetrate for the time recommended on the can, and wipe off any excess before you begin staining.
Step 4 (The Pro Move): Taming the Grain with Wood Grain Filler
For an ultra-smooth, high-end modern look, consider using a wood grain filler. This product is a paste that you work into the open pores of the oak after sanding. Once it dries, you sand it smooth, creating a glass-like surface.
Filling the grain ensures the stain creates a perfectly uniform color without the heavy, textured look of oak’s natural grain. While optional, this step is the difference between a good DIY result and a truly professional-grade finish. It is essential for achieving a sleek, contemporary aesthetic.
Choosing Your Gray Stain: Gel, Oil, or Water-Based?
The type of stain you choose will have a massive impact on the application process and the final look. Each has distinct advantages and disadvantages, especially when working with a challenging wood like oak.
Your choice will depend on your skill level, the look you want to achieve, and your tolerance for fumes and long dry times. Understanding these differences is key to selecting the right product for your project.
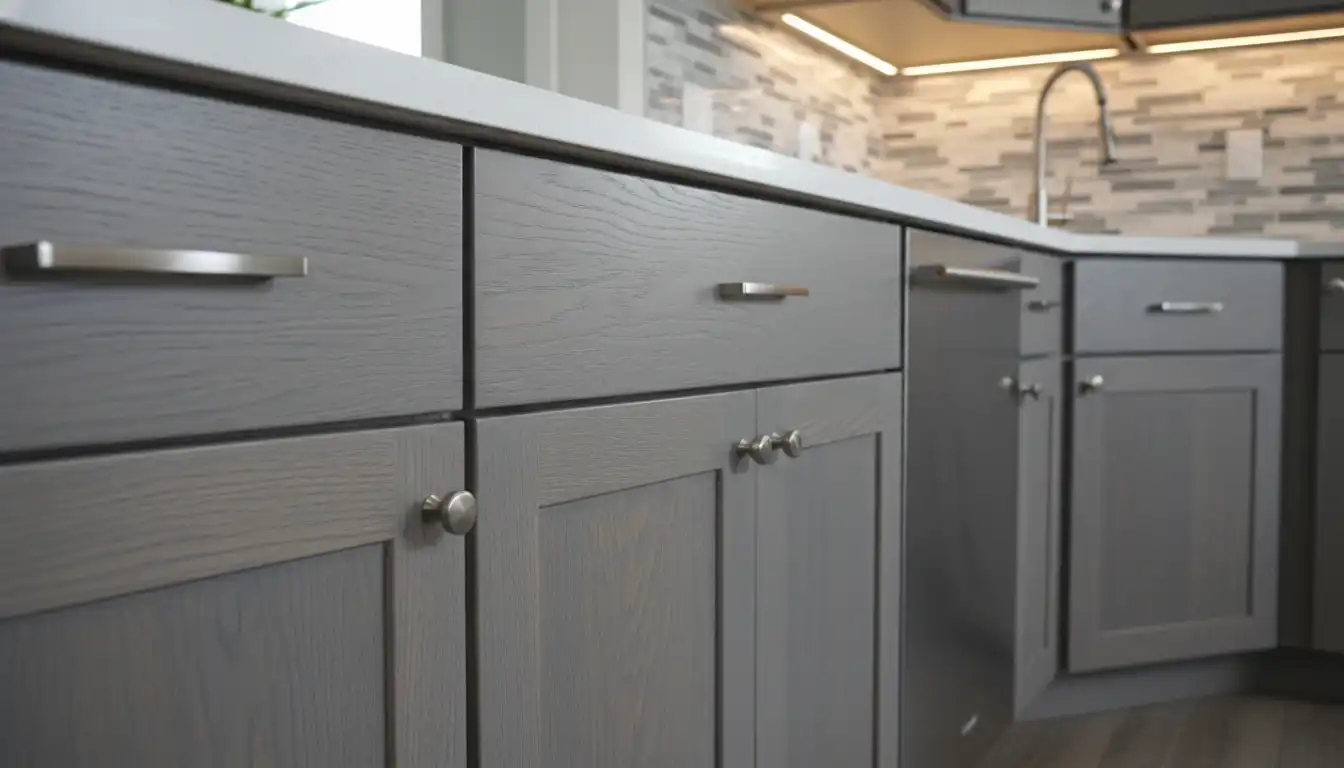
The right stain and preparation can transform dated oak into a modern centerpiece. The visible grain provides texture and character, while the gray color updates the entire kitchen.
Comparing Gray Stain Options
Making an informed decision on the type of stain is crucial for success. This table breaks down the key differences to help you choose the best option for your gray cabinet project.
| Stain Type | Best For | Application | Dry Time | Pros | Cons |
|---|---|---|---|---|---|
| Gel Stain | Beginners; covering heavy grain | Wipe on with a rag | Long (8-24 hours) | Thick formula prevents blotching; minimal drips | Can obscure wood grain; limited color options |
| Oil-Based Stain | Rich, deep color penetration | Rag or brush application | Moderate (4-8 hours) | Enhances natural wood grain; widely available | Prone to blotching without conditioner; strong fumes |
| Water-Based Stain | Fast projects; custom colors | Foam brush or rag application | Fast (1-2 hours) | Low odor; easy cleanup; can be mixed for custom shades | Can raise wood grain; may cause tannin bleed |
The Step-by-Step Staining Process for a Flawless Finish
With your cabinets prepped and your stain selected, it’s time for the transformation. Work methodically, remain patient, and trust the process. Rushing at this stage will undo all your hard prep work.
Testing is Everything
Always test your stain on a scrap piece of oak or the back of a cabinet door first. This allows you to see how the gray color interacts with your specific wood’s undertones. You may find you need a different shade of gray to achieve your desired look.
This test will also help you perfect your application technique before you move on to the highly visible cabinet fronts. Do not skip this step under any circumstances.
Applying the Stain
Work in manageable sections, like a single drawer front or one cabinet door. Apply the stain evenly with a clean rag or foam brush, moving in the direction of the wood grain. Let the stain sit for a few minutes to penetrate the wood.
The key to an even color is in the removal. Use a separate, clean rag to wipe off all the excess stain. Again, wipe in the direction of the grain. The longer you let the stain sit, the darker the color will be, but leaving it too long can result in a sticky, uneven mess.
Building the Color
One coat of stain is often not enough to achieve a deep, saturated gray. It’s better to apply two or three thin coats than one thick, heavy coat. This method gives you far more control over the final color and depth.
Allow each coat to dry completely according to the manufacturer’s instructions before applying the next. Lightly scuffing the surface with a very fine (220-grit) sanding sponge between coats can help the next layer adhere better, but be gentle to avoid removing the color.
The Final Seal: Protecting Your New Gray Cabinets
Stain provides color, not protection. Applying a durable topcoat is mandatory to protect your newly stained cabinets from scratches, moisture, and everyday wear and tear. This final step locks in the color and gives your cabinets a professional, finished sheen.
Choosing the Right Topcoat
For gray-stained cabinets, a water-based polyurethane is the best choice. Oil-based polyurethanes have an amber tint that yellows over time. This yellowing effect will ruin the cool tones of your gray stain, making it look muddy and discolored.
Water-based topcoats dry crystal clear and will not change the color of your stain. Look for a high-quality, non-yellowing water-based polyurethane in your desired sheen (matte, satin, or semi-gloss). Satin is often the most popular choice for a modern cabinet look.
Application Tips for a Streak-Free Topcoat
Apply the topcoat using a high-quality synthetic bristle brush. Use long, even strokes and work in thin coats to avoid drips and brush marks. Apply at least three coats for maximum durability, especially in a high-traffic kitchen environment.
Lightly sand between each coat with 220-grit sandpaper after it has fully dried. This process, known as “denibbing,” removes any tiny dust particles and creates a perfectly smooth surface for the next coat. Wipe away all sanding dust with a tack cloth before reapplying.
Troubleshooting Common Gray Stain Problems
Even with careful preparation, you might encounter issues. Here’s how to diagnose and fix the most common problems when staining oak gray.
Help! My Gray Stain Looks Blue or Purple!
This is the most common complaint. It happens when a cool, blue-based gray stain reacts with the warm yellow or red undertones in the oak. To fix this, you need to neutralize the wood’s base color.
The solution is to use a gray stain with a warmer base, such as a brownish-gray or a greenish-gray. Alternatively, some professionals apply a thin, diluted coat of a green or brown stain first to cancel out the red/yellow tones before applying the gray. Always test to find the right combination.
Why Is My Finish So Blotchy?
A blotchy finish is almost always caused by skipping the pre-stain wood conditioner. The porous grain soaked up too much stain, leaving an uneven result. Unfortunately, there is no easy fix for this after the fact.
The only real solution is to sand the stain off and start the process over again, this time using a generous coat of wood conditioner. It’s a painful lesson, but it’s the only way to get the even finish you want.
Beyond a Simple Stain: Exploring Other Finishes
Staining is a fantastic way to update oak, but it’s not the only option for creating a modern, high-end look. Combining finishes can add depth and personality to your kitchen design.
A project of this scale often makes homeowners think about all their options. For some, this process might lead them to conclude that investing in new cabinets is a better long-term path. If you find yourself exploring that route, reading through some J&K Cabinets reviews can offer valuable perspective on modern, factory-finished solutions.
For those who love a multi-toned aesthetic, a very popular and sophisticated design involves mixing painted and stained surfaces. You could achieve this by pairing your new gray-stained lowers with white painted uppers, for example. To learn more about this approach, explore the possibilities of using painted cabinets with stained doors for a truly custom, designer appearance.
Your Path to Perfect Gray Oak Cabinets
Transforming your oak cabinets with gray stain is an ambitious but highly rewarding project. Success is not found in a single can of stain, but in a methodical process that respects the challenging nature of the wood. By understanding oak’s undertones, committing to meticulous prep work, and choosing the right products, you can achieve a stunning, professional-quality finish.
Don’t let the common pitfalls discourage you. Armed with this knowledge, you can avoid the blotchy, discolored mess that plagues so many DIY attempts and create the modern, elegant kitchen you’ve been dreaming of.