Staining Fiberglass Doors Problems? Your Flawless Finish is Here!
You bought a fiberglass door because you were promised the beauty of wood without the maintenance nightmare. It looks fantastic, but now you want to stain it to match your home’s aesthetic. You were told it would be easy, but the reality is a streaky, blotchy mess that looks more like a mistake than a masterpiece. This is an incredibly common frustration.
Many homeowners find that staining a fiberglass door is far from the simple project they envisioned. Instead of a rich, even finish, they’re left with a door that cheapens their home’s curb appeal. The good news is that these problems are almost always preventable, and a professional, beautiful finish is absolutely achievable. This guide will walk you through solving every common fiberglass door staining problem.
You'll Learn About
Why Your Stained Fiberglass Door Looks So Bad
Understanding the root cause of staining failures is the first step toward a perfect finish. Fiberglass is not wood, and treating it like wood is the primary reason projects go wrong. The material has unique properties that demand a specific approach.
The “Wood Grain” Deception
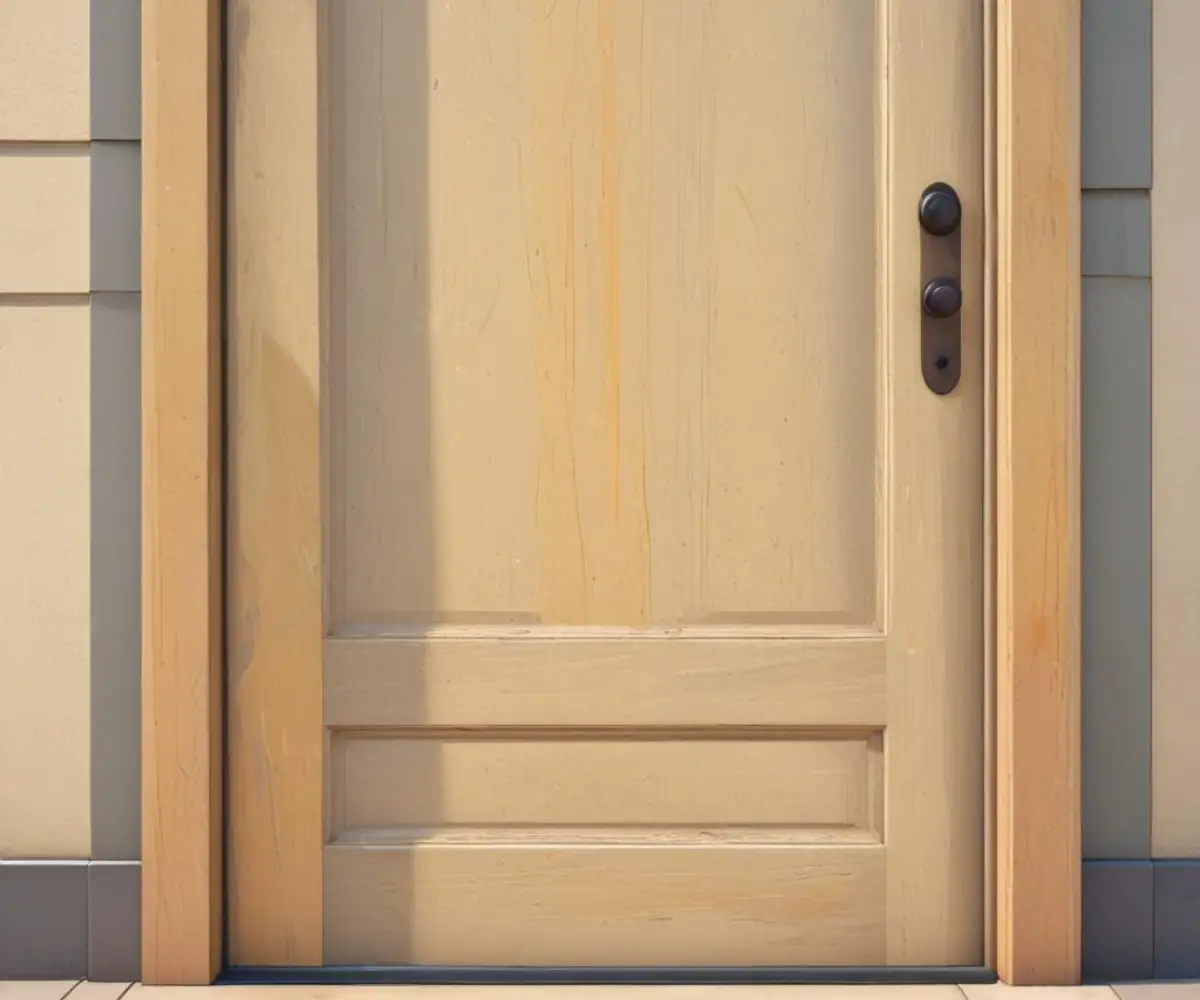
The embossed wood grain on a fiberglass door is purely cosmetic. It’s a texture stamped into the surface, not a porous fiber that naturally absorbs stain like real wood. When you apply a traditional liquid wood stain, it has nowhere to go. It simply pools on the surface, leading to a dark, uneven, and painted-on appearance rather than a translucent, stained look.
This is why achieving depth and a natural look feels so elusive. You aren’t staining wood fibers; you are applying a transparent color to a non-porous surface. The entire technique has to change to accommodate this reality.
Surface Contamination: The Invisible Enemy
Even a brand-new door is not ready for stain right out of the box. Fiberglass doors are covered in release agents from the manufacturing mold. Your hands also leave oils during installation. These invisible contaminants are the ultimate barrier to stain adhesion.
Attempting to stain over this layer is like trying to paint on a greasy surface. The stain will bead up, refuse to stick evenly, and can be easily scratched or wiped away, even after it has “dried.” Proper cleaning is not an optional step; it is the foundation of the entire project.
The Gel Coat Paradox
Most high-quality fiberglass doors have a protective outer layer called a gel coat. This microscopic layer is engineered to be durable and resistant to the elements. Its primary job is to repel moisture, dirt, and UV rays—and unfortunately, it’s also excellent at repelling the very stain you’re trying to apply.
This creates a paradox where the door’s protective features actively work against your finishing efforts. More importantly, the porosity of this gel coat can have microscopic inconsistencies. These tiny variations cause the stain to grab more in some areas and less in others, resulting in the dreaded blotchy finish even when your technique is perfect.
Choosing the Wrong Stain is a Guaranteed Failure
This is arguably the most critical mistake. Standard, thin, penetrating wood stains are designed to be absorbed into wood pores. As established, fiberglass has no pores to absorb them. Using this type of stain will result in a runny, uncontrollable mess.
The correct and only choice for this project is a high-quality, oil-based gel stain. Gel stain is thick, with a consistency like pudding. It doesn’t run and is designed to sit on top of the surface, providing a translucent layer of color without relying on absorption. This gives you complete control over the final look.
Environmental Sabotage
Fiberglass and stain are highly sensitive to temperature and humidity. Attempting to stain in direct, hot sunlight will cause the stain to dry too quickly. This leaves no time to properly work the material, resulting in obvious streaks, lap marks, and a gummy texture.
Conversely, high humidity or cold temperatures will dramatically slow the drying process. This can cause the stain to remain tacky for days, attracting dust and debris and preventing the application of a protective top coat. Always work in the shade and within the temperature and humidity ranges specified by the stain manufacturer.
The Foolproof Method for a Professional Fiberglass Door Stain Finish
Now that you understand the pitfalls, let’s walk through the exact process to get it right. Following these steps methodically will eliminate guesswork and guarantee a finish you can be proud of. Do not skip any steps, no matter how minor they seem.
Step 1: Gather Your Arsenal of Tools and Materials
Using the right tools is just as important as using the right technique. You cannot achieve a high-end finish with low-quality supplies.
- Cleaning: Mineral spirits or a TSP substitute, and clean, lint-free rags.
- Sanding: A 220-grit sanding block or sandpaper.
- Masking: High-quality painter’s tape (like FrogTape or 3M blue tape).
- Stain: A top-tier oil-based gel stain (e.g., Minwax Gel Stain, Old Masters).
- Applicators: A natural bristle brush, a high-quality synthetic brush, foam brushes, and more lint-free rags.
- Top Coat: A high-quality exterior spar urethane with UV inhibitors (oil-based for durability).
- Safety: Nitrile gloves and safety glasses.
Step 2: The Non-Negotiable Preparation Phase
Rushing the prep work will ruin your project. Give this stage the time and attention it deserves. A beautifully stained door is 80% preparation and only 20% application.
First, clean the door thoroughly with mineral spirits on a clean rag. Wipe down every square inch of the surface, including the edges. This removes all factory residues, oils, and dirt. Let it flash off and dry completely.
Next, you must create a microscopic texture for the stain to grip. This is called a “mechanical tooth.” Lightly scuff the entire surface with 220-grit sandpaper. You are not trying to remove the existing finish or smooth the grain; you are just dulling the surface sheen. Wipe away all sanding dust with a rag lightly dampened with mineral spirits.
Finally, use your painter’s tape to meticulously mask off all hardware, glass, and weatherstripping. Press the edges of the tape down firmly to prevent any stain from bleeding underneath.
Step 3: The Art of Applying Gel Stain
This is where your technique matters. Work in manageable sections, following the “grain” of the door. For a typical six-panel door, stain one panel at a time, then the vertical stile next to it, then the next panel, and so on. This prevents lap marks.
Using your natural bristle brush or a clean rag, apply a thin, even coat of gel stain to your first section. The goal is complete coverage. Do not try to get the final color in one thick coat.
Immediately after application, take a clean, lint-free rag and wipe off the excess stain. This is the most crucial part of the process. You are leaving behind only the pigment that has settled into the embossed grain texture. The amount of pressure you use while wiping will determine how light or dark the finish is. Use long, straight strokes that follow the direction of the faux grain.
Step 4: Building Depth and Color
One coat will likely look too light. The key to a rich, deep finish is building color with multiple thin coats. Let the first coat dry completely according to the manufacturer’s directions (usually 6-8 hours).
Apply a second coat using the exact same “apply and wipe” technique. This second coat will deepen the color and even out any inconsistencies from the first. For a very dark finish, a third coat may be necessary, but always allow for proper drying time between coats.
Step 5: Sealing and Protecting Your Work
Stain is just color; it offers no protection from weather or UV rays. Without a top coat, your beautifully stained door will fade and fail within a year. A protective clear coat is absolutely mandatory for exterior doors.
Choose a high-quality exterior-grade spar urethane. This product is designed with UV blockers and flexibility to handle temperature changes. Using an interior polyurethane will lead to yellowing and cracking.
Apply the top coat using a high-quality synthetic brush designed for oil-based finishes. Apply 2-3 thin, even coats, lightly sanding with 320-grit sandpaper between coats (after they are fully cured) for the smoothest possible finish. Ensure you coat all six sides of the door, including the top and bottom edges, to prevent moisture intrusion.
Troubleshooting Common Fiberglass Staining Disasters
Even with careful work, problems can arise. Here’s a quick-reference guide to diagnose and fix the most common issues you might encounter during your project.
| The Problem | The Likely Cause | The Solution |
|---|---|---|
| Streaks and Lap Marks | The stain dried too quickly before it could be blended, or you tried to stain an area that was already partially dry. | Work in smaller, more manageable sections. Maintain a “wet edge” by blending each new section into the previous one while it’s still wet. Apply a small amount of mineral spirits to a rag to try and re-wet and blend the edge. |
| Blotchy, Uneven Color | Improper cleaning or uneven wiping pressure during stain removal. Can also be caused by the door’s inherent gel coat inconsistencies. | Apply another thin coat of gel stain, focusing on the lighter areas. Use very light pressure when wiping to deposit more color and even out the finish. |
| Stain Peels or Scratches Off Easily | The surface was not properly cleaned or scuff-sanded. The stain has no “tooth” to adhere to. | The stain must be completely removed with mineral spirits or a stripper. The door must then be properly cleaned and scuff-sanded from the beginning. There is no shortcut for this. |
| Stain Remains Tacky and Won’t Dry | Applied too thickly, or environmental conditions (high humidity, low temperature) are preventing proper curing. | Increase air circulation with a fan and raise the ambient temperature if possible. If applied too thickly, you may need to try and remove some of the excess with a rag lightly dampened with mineral spirits. |
| The Final Color is Wrong | The color of the stain on the door doesn’t match the sample in the can. | Always test the stain on an inconspicuous area of the door first (like the top edge). Color can be adjusted by adding another coat to darken it or by trying to lift some color with mineral spirits before it cures. |
Pro Tips for a Show-Stopping Finish
Once you’ve mastered the basics, a few advanced techniques can elevate your door from good to professional. These small details make a big difference in the final appearance.
Master the “Dry Brush” Technique
For an even more authentic wood-grain look, you can use a dry brush to add highlights. After applying and wiping your final coat of stain, take an almost completely dry chip brush and lightly drag the tips of the bristles over the surface, following the grain. This technique pulls and pushes the pigment, creating subtle dark and light streaks that mimic real wood.
Utilize a “Conditioner” Coat
For doors that are particularly stubborn or prone to blotching, you can create a makeshift wood conditioner. Mix your gel stain with mineral spirits at a ratio of about 1 part stain to 4 parts mineral spirits. Apply a very thin coat of this mixture to the entire door and wipe it all off immediately. This acts as a sealer coat that can help the full-strength stain coats go on more evenly.
Fixing Mistakes Before They Become Permanent
As long as the gel stain is not fully cured, you have a window to fix errors. Mineral spirits are your best friend. A small amount on a clean rag can be used to blend a lap mark, lighten a dark spot, or completely remove a section that you are unhappy with so you can start it over.
Protecting Your Long-Term Investment
A beautiful front door is a significant investment. Understanding why front doors are so expensive helps in appreciating the need for proper care and maintenance. The high cost of materials, complex construction, and energy-efficient features all contribute to the price, which is a major factor in why doors are so expensive in general. Protecting that investment with a proper finish is absolutely critical.
To keep your newly stained door looking its best, wash it with mild soap and water twice a year. Inspect the top coat annually. If the finish looks dull or worn, especially on areas with high sun exposure, it’s time for a maintenance coat. Simply clean the door, lightly scuff it with a fine-grit sanding sponge, and apply a fresh coat of the same spar urethane you used initially.
Your Perfect Finish Awaits
Staining a fiberglass door can be an intimidating project, fraught with potential problems. However, every issue—from blotches and streaks to peeling and tackiness—stems from a misunderstanding of the material. By abandoning wood-staining habits and embracing the correct process, you can overcome these challenges.
Success hinges on three core principles: meticulous surface preparation, the exclusive use of oil-based gel stain, and protection with a UV-resistant top coat. By following the detailed steps and expert tips laid out in this guide, you are fully equipped to achieve a durable, flawless, and professional-grade finish that will dramatically enhance your home’s curb appeal for years to come.