Solar Tube Placement: The #1 Secret to Flooding Your Home with Free Sunlight
Is there a dark, windowless space in your home that feels perpetually gloomy, forcing you to flick on a light switch even in the middle of a sunny day? Many homeowners struggle with dimly lit hallways, bathrooms, and closets, resigning themselves to the constant use of artificial light and higher energy bills. The problem isn’t a lack of sunshine outside; it’s the challenge of getting that natural light into the core of your home.
This is where solar tubes, or sun tunnels, offer a brilliant solution. But simply installing one isn’t enough. The true secret to transforming a dark space into a bright, welcoming area lies in optimal solar tube placement. Incorrect placement can lead to disappointing light levels, unwanted heat, or even structural complications, turning a smart investment into a frustrating mistake.
This comprehensive guide will illuminate the critical factors you must consider for solar tube placement. We will explore everything from roof orientation to interior room dynamics, ensuring you make the right choices to maximize natural light and enhance your home’s ambiance. Get ready to unlock the full potential of the sun and say goodbye to those gloomy corners for good.
You'll Learn About
Understanding the “Why”: The Critical Importance of Strategic Placement
Before cutting any holes in your roof or ceiling, it’s essential to grasp why placement is paramount. A solar tube is more than just a tube; it’s a daylighting system designed to capture, channel, and diffuse sunlight. Each component, from the rooftop dome to the interior diffuser, relies on a well-planned path to function effectively.
The core issue is that sunlight is not a static resource. Its intensity, angle, and color temperature change throughout the day and across the seasons. Strategic solar tube placement accounts for these variables to deliver consistent, high-quality natural light when and where you need it most, without the common drawbacks of poor planning.
The Science of Sunlight: How Placement Dictates Performance
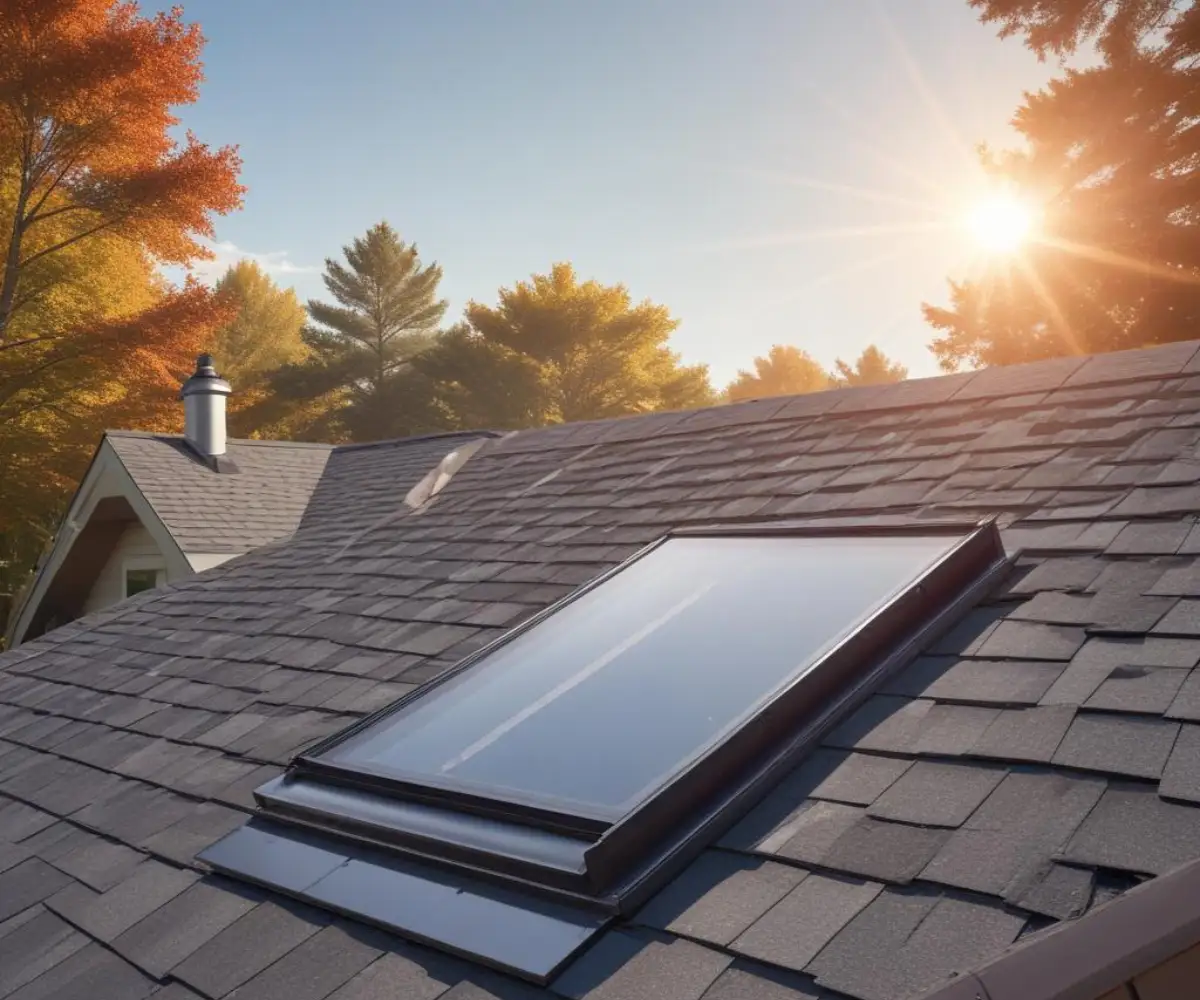
A solar tube’s performance is a direct result of the quantity and quality of light its rooftop dome can capture. The dome is engineered to collect sunlight from multiple angles, but its position on the roof dramatically influences its access to direct sun. Obstructions like tall trees, chimneys, or even the pitch of your own roof can cast shadows, significantly reducing the amount of light that enters the tube.
Furthermore, the journey of the light from the roof to your room is critical. The ideal path is the shortest and straightest one possible. Every bend or angle introduced into the tube, and every extra foot of length, slightly diminishes the light’s intensity. Therefore, planning a direct route through your attic space is just as important as choosing the right spot on the roof.
The Roof Analysis: Finding Your Home’s “Sweet Spot”
The process of perfect solar tube placement begins on your roof. This is where you’ll harness the sun’s power, and making the right choice here will impact everything that follows. A thorough assessment of your roof’s orientation, pitch, and potential obstructions is the first and most crucial step.
North vs. South: The Great Debate of Roof Orientation
For homes in the Northern Hemisphere, a south-facing roof slope is the gold standard for capturing the most direct and consistent sunlight throughout the day. Placing the solar tube’s dome on a southern-facing roof will maximize light collection, especially during the winter months when the sun is lower in the sky. This is the ideal scenario for rooms that require bright, all-day illumination, like kitchens and home offices.
However, don’t despair if a southern exposure isn’t an option. A solar tube can still perform remarkably well on a north-facing roof. While it won’t capture as much direct sun, it will gather a significant amount of ambient light from the sky. On overcast days, the difference between a north and south-facing tube can be minimal. The key takeaway is that while south is optimal, a shorter, straighter tube run to a north-facing roof is often better than a long, convoluted run to a south-facing one.
Mapping the Sun’s Path and Avoiding Obstructions
Before finalizing the exterior placement, take the time to observe how sunlight moves across your roof at different times of the day. Pay close attention to shadows cast by trees, chimneys, plumbing vents, or taller sections of your own house. A spot that is bathed in direct sun at 9 a.m. might be in deep shade by the afternoon.
Your goal is to find a location that receives unobstructed sunlight for the longest possible portion of the day. This simple observation can prevent the common mistake of installing a tube that only performs well for a few hours. This is also a good time to think about long-term maintenance; ensure the dome is placed where it can be safely accessed for occasional cleaning to remove dust and debris that can hinder performance.
The Interior Journey: Planning the Tube’s Path
Once you have identified the best location on your roof, the next phase of planning moves into the attic. The path the solar tube takes from the roof deck to the ceiling of your room is a critical variable in the equation. Minimizing length and bends is the primary objective.
Straight and Short: The Golden Rule of Tube Runs
The reflectivity of modern solar tubes is incredibly high, but it’s not perfect. A small amount of light intensity is lost with every foot the light travels and with every degree it has to turn. For this reason, the shortest, straightest path is always the best. A direct, vertical line from the roof to the ceiling will deliver the maximum amount of light.
Before you start drilling, head into your attic with a tape measure and a flashlight. From your desired interior location, look up towards the roof deck. Identify any obstructions that might be in the way, such as rafters, trusses, HVAC ducts, plumbing pipes, or electrical wiring. Planning a path that navigates around these obstacles with the fewest possible adjustments is key. While flexible tubes offer more versatility in bypassing obstructions, rigid tubes generally deliver more light and should be prioritized whenever a straight run is feasible.
If you encounter significant structural elements, it is always better to slightly adjust the ceiling or roof placement than to introduce multiple sharp bends in the tube. For those tackling complex structural challenges, understanding proper roof modifications is vital, much like the careful work needed when you remove a dish from your roof.
The Impact of Tube Diameter and Length
Solar tubes come in various diameters, typically ranging from 10 to 14 inches for residential use. The size you choose should correspond to the room you are illuminating. A 10-inch tube is often sufficient for a small bathroom or hallway, while a 14-inch tube is better suited for kitchens, living rooms, or larger spaces.
The length of the tube directly correlates with light output. A shorter run will always be brighter than a longer one of the same diameter. If your plan requires a particularly long tube run—for instance, to light a first-floor room in a two-story house—it is essential to use the largest diameter tube possible and opt for a rigid material to maximize light transfer.
Room-by-Room Placement Strategy: Tailoring Light to the Task
The final piece of the placement puzzle is considering the function of the room itself. The ideal spot for a solar tube in a hallway is different from the best location in a kitchen or a walk-in closet. The goal is not just to add light, but to add useful, effective light that enhances the space.
Hallways, Stairwells, and Entryways
These transitional spaces are often the darkest areas of a home and are prime candidates for solar tubes. In a long hallway, placing a single tube in the center can create a dramatic and welcoming pool of light. For very long or L-shaped hallways, using two smaller tubes can provide more even illumination than one large one.
In stairwells, positioning the diffuser over the landing or the center of the staircase improves both aesthetics and safety. It creates a natural focal point and ensures steps are clearly visible during the day, reducing the risk of accidents.
Kitchens and Bathrooms: Task-Oriented Lighting
In kitchens, the placement should be task-oriented. Position the solar tube diffuser over the primary workspace, such as the kitchen island or the countertop area where you do most of your food preparation. This provides bright, direct light right where you need it, reducing the need for under-cabinet lighting during the day. Avoid placing it in the center of the room’s walkway, where it will be less functional.
Bathrooms benefit immensely from the bright, clear light of a solar tube, which renders colors more accurately than many artificial bulbs. Placing the diffuser over the vanity can provide excellent light for grooming tasks. Another popular and effective location is directly over the shower, creating a bright, spa-like experience and helping to make a small, enclosed space feel larger and more open.
Closets, Pantries, and Laundry Rooms
Walk-in closets, pantries, and laundry rooms are often windowless and can be transformed by a solar tube. In a walk-in closet, a centrally located tube makes it easier to distinguish between clothing colors like black and navy blue. In a pantry, it helps you quickly find items without fumbling for a light switch.
For spaces that are rarely seen but require good ventilation, such as under-floor areas, other solutions are needed. Ensuring proper airflow is critical to prevent moisture and decay, a principle that applies to many hidden home spaces, as detailed in guides on ventilation under shed floor.
Advanced Placement Considerations for Maximum Impact
Beyond the basics of roof orientation and tube length, several advanced factors can elevate your solar tube installation from good to great. These considerations involve manipulating the quality of light and integrating the system seamlessly into your home’s design and climate.
Diffusers and Lenses: Shaping the Light
The diffuser is the fixture you see on the ceiling, and it plays a crucial role in how the light is distributed. Standard diffusers provide a soft, even glow. However, you can choose specialty diffusers or lenses to shape the light. A prismatic diffuser, for example, can spread the light over a wider area, which is useful in a larger room. Some systems offer decorative fixtures that make the solar tube look like a traditional ceiling light.
For rooms where direct, intense sunlight might be too much, such as a bedroom or a media room, consider a daylight dimmer. This feature, often an optional add-on, incorporates a butterfly-shaped baffle inside the tube that can be closed via a switch to block the light completely or dim it to a comfortable level.
Climate and Thermal Performance
In very cold climates, a potential concern with any roof penetration is heat loss and condensation. Modern, high-quality solar tubes are designed with thermal breaks and insulated components to minimize these issues. When planning your installation, ensure the tube is well-sealed at both the roof and ceiling levels to prevent air leakage into the attic space. For extreme cold, wrapping the attic portion of the tube with extra insulation is a wise precaution that can prevent condensation from forming.
Conversely, in hot, sunny climates, the concern is unwanted heat gain. Most solar tubes block nearly all UV rays, and because they transmit light rather than heat, they are far more energy-efficient than traditional skylights. However, the sheer intensity of the light can create a warming effect. Choosing a tube with a high-performance dome and diffuser designed to minimize heat transfer is crucial in these environments.
Integrating with Existing Lighting
A solar tube is not meant to replace your electric lights entirely, but to complement them. When placing the ceiling diffuser, consider the layout of your existing recessed lighting or ceiling fixtures. A well-placed solar tube can reduce your reliance on these lights during the day, but you will still need them for nighttime and on very dark, stormy days. Some solar tube models even offer an integrated light kit, allowing a single ceiling fixture to serve as both a natural light diffuser and an electric light source.
This same principle of bringing light to challenging areas can be applied to lower levels of a home. With careful planning, you can even illuminate a dark basement, a topic explored in our guide on using a solar tube for basement spaces.
| Placement Factor | Optimal Choice | Considerations & Compromises |
|---|---|---|
| Roof Orientation (Northern Hemisphere) | South-facing slope | East/West-facing is good. North-facing is acceptable if the tube run is short and straight. |
| Tube Path | Shortest and straightest possible | Minimize bends. Rigid tubes are more efficient than flexible tubes, especially for longer runs. |
| Obstructions (Exterior) | An area with no shade from trees, chimneys, or other structures | Observe sun path throughout the day to find the location with the longest sun exposure. |
| Obstructions (Interior) | Clear path between ceiling joists/trusses | Slightly adjust interior or exterior placement to avoid cutting structural members. |
| Room Placement | Directly over the primary task area (e.g., kitchen island, vanity) or center of a transitional space (e.g., hallway) | Consider the room’s function. The goal is useful light, not just ambient light. |
| Tube Diameter | 14-inch for large rooms; 10-inch for small rooms/hallways | Larger diameter is always better for long runs or rooms needing maximum brightness. |
Conclusion: A Bright Decision Based on Smart Planning
Installing a solar tube is one of the most cost-effective ways to improve your home’s environment, reduce energy consumption, and boost your well-being with the benefits of natural light. However, its success is not left to chance. It is a direct result of thoughtful and strategic planning.
By carefully analyzing your roof, planning the most direct path through your attic, and considering the specific needs of your room, you can ensure your solar tube delivers on its promise. Proper solar tube placement is the difference between a simple roof accessory and a transformative feature that floods your home with brilliant, free, and beautiful sunlight for years to come.