Snowblower Won’t Start After Carb Clean? Here’s the Fix
It is one of the most frustrating experiences for any snowblower owner. You have done the responsible thing, taken the time to meticulously clean the carburetor, and now your machine refuses to start. It feels like a reward for your hard work is just more trouble.
This situation is incredibly common. The good news is that the problem is almost certainly related to the cleaning process itself. You are just a few steps away from a solution.
This comprehensive guide will walk you through the most likely culprits, from simple reassembly errors to hidden issues you might have missed. We will get your snowblower running smoothly again, ready for the next snowfall.
You'll Learn About
Why a “Clean” Carburetor Can Cause a No-Start Problem
The core of the issue often lies in the definition of “clean.” A carburetor that looks shiny on the outside can still have critical blockages or incorrect settings on the inside. The process of disassembly and reassembly introduces numerous opportunities for small mistakes that have big consequences.
Often, the original problem of a clogged jet gets replaced by a new problem, like a leaky gasket or an improperly set float. Understanding these potential pitfalls is the first step in diagnosing and fixing the issue for good.
The Most Common Reassembly Mistakes
The number one reason a snowblower won’t start after a carburetor cleaning is an error made when putting it back together. These components are sensitive and must be installed with precision. Even a slightly misaligned part can prevent the engine from starting.
Carefully review your work and check for these common mistakes. It is often the smallest oversight that causes the biggest headache.
Improperly installed gaskets and seals are a primary cause of post-cleaning failures. A gasket installed upside down can block tiny, essential air or fuel passages. A torn or pinched O-ring on the fuel bowl will cause a fuel leak and prevent the bowl from filling correctly.
Another frequent issue involves the float and needle valve assembly. If the float is installed incorrectly, it may bind against the side of the carburetor bowl, preventing it from moving freely. This will either starve the engine of fuel or cause it to flood, neither of which allows it to run.
Finally, ensure all linkages and springs for the choke and throttle are reconnected in the correct holes and orientation. A misconnected spring can hold the choke open or closed at the wrong time, disrupting the critical air-fuel mixture needed for ignition.
Damage Caused During the Cleaning Process
The tools and techniques you use to clean the carburetor are just as important as the reassembly. It is easy to inadvertently cause damage that prevents the snowblower from starting, turning a simple cleaning job into a more complex repair.
Being gentle and using the correct tools is non-negotiable. Carburetors are made of soft metals like aluminum and brass, which are easily scratched or bent.
A major mistake is using hard metal objects like paper clips or wire to clean out the tiny holes in the jets. These can scratch the inside of the jet, altering its diameter and disrupting the precise flow of fuel. Always use dedicated carburetor cleaning wires or soft nylon bristles.
The tip of the needle valve is another delicate component. It is often made of rubber or a soft synthetic material. Soaking it in harsh chemical cleaners can cause it to swell or degrade, preventing a proper seal and leading to flooding.
Incorrect Carburetor Adjustments
Many carburetors have adjustment screws, typically for idle speed and the idle fuel mixture. If you removed these during cleaning, they must be reset to a baseline setting before you can expect the engine to start. Simply screwing them back in randomly will not work.
These screws control the engine’s performance at low speeds. An incorrect setting can make starting impossible, even if the rest of the carburetor is perfectly clean and assembled.
Before disassembly, it’s a best practice to gently turn the mixture screws clockwise, counting the number of turns until they are lightly seated. Write this number down. When you reassemble, you can return them to this exact starting position.
If you did not count the turns, a common baseline setting is to turn the screw in until it is lightly seated, then back it out 1.5 turns. This is not a final setting but is usually close enough to get the engine to start so you can perform the final adjustments while it is running.
The Ultimate Troubleshooting Guide: From No-Start to Running Smoothly
Now, let’s move from theory to action. This step-by-step process will help you systematically identify and correct the problem. Follow these steps in order and do not skip any, as even the simplest check can be the one that solves your issue.
Patience is key. Rushing the process will only lead to more frustration. Take your time, be methodical, and you will find the root cause.
Step 1: The Basic Pre-Start Checklist
Before you even think about touching the carburetor again, confirm the fundamentals. It is surprisingly common for a coincidental failure to occur, leading you to believe the carburetor is at fault when the real issue lies elsewhere.
First, ensure you have fresh, clean fuel in the tank. If the fuel is more than a month old and wasn’t treated with a stabilizer, it could be the problem. Drain the old fuel and replace it with new, high-quality gasoline.
Next, verify you have a strong spark. Remove the spark plug, re-attach the spark plug wire, and hold the threaded part of the plug against a metal part of the engine block. Pull the starter cord and look for a bright, blue spark. If you see a weak orange spark or no spark at all, the carburetor is not your problem.
Step 2: A Meticulous Carburetor Re-Inspection
This is where you will likely find the culprit. You must carefully re-examine the carburetor assembly. It is helpful to look up a diagram or video of your specific carburetor model to double-check your work.
Check the orientation of the main gasket between the carburetor and the engine. Many have small holes that must align perfectly with passages in the carburetor body. Installing it upside down is a very common and easily-missed mistake.
Ensure the fuel bowl is installed correctly. Some bowls have a recess for the main jet and must be oriented in only one direction. Also, verify that the O-ring or gasket for the bowl is seated perfectly and not pinched, which can cause both fuel and air leaks.
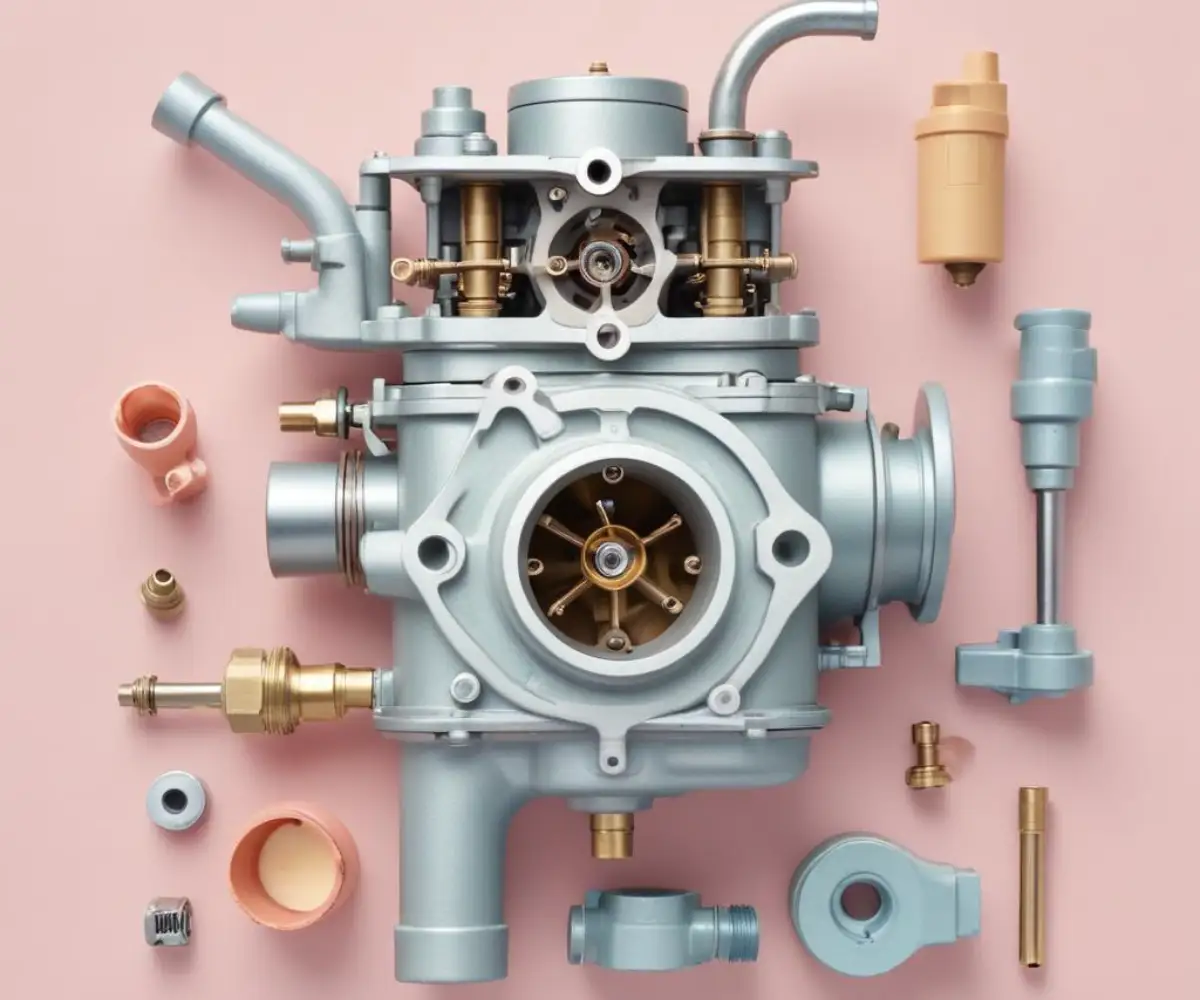
Gently shake the carburetor and listen for the float. You should hear it moving freely. If it is silent, it might be stuck. A stuck float will prevent fuel from entering the carburetor, guaranteeing a no-start condition.
Step 3: Confirming Fuel is Reaching the Carburetor
Even with a clean carb, you will not get far without fuel. You need to verify that gasoline is making its journey from the fuel tank to the carburetor bowl. This simple test rules out issues like a clogged fuel filter or a pinched fuel line.
First, locate the fuel line where it connects to the carburetor inlet. Place a small container underneath and carefully remove the clamp and the line. Fuel should flow freely from the line. If it only drips or doesn’t flow at all, you have a blockage upstream from the carburetor.
If fuel flow to the carburetor is good, the next step is to check if it’s getting into the bowl. Locate the drain screw on the bottom of the carburetor bowl. Loosen it slightly; fuel should begin to drip out. If the bowl is dry, it means the needle valve is stuck closed or the float is jammed.
Step 4: The “Bypass Test” to Isolate the Problem
This is a powerful diagnostic technique used by mechanics to determine if the problem is fuel-related or something else (spark, compression). By manually introducing a fuel source, you can see if the engine will fire at all. This tells you if the core mechanics of the engine are working.
Remove the spark plug. Spray a very small, one-second burst of starting fluid directly into the cylinder. You can also use about a teaspoon of fresh gasoline.
Immediately reinstall the spark plug and try to start the engine. If the engine fires up and runs for a couple of seconds before dying, you have 100% confirmed that your problem is with fuel delivery. This means the carburetor is still the source of the issue. If it does not fire at all, you have a spark or compression problem that needs to be addressed first.
Advanced Diagnostics: Digging Deeper for a Solution
If you have followed all the steps above and the snowblower still refuses to start, the issue is likely more subtle. It is time to look at the components and passages that are often missed during a standard cleaning.
These advanced checks require more attention to detail but are often the key to solving the most stubborn no-start problems. Many DIYers stop before this stage, which is why their problem persists.
The Overlooked Emulsion Tube
Hidden beneath the main jet in many carburetors is a component called the emulsion tube. This brass tube is perforated with tiny, cross-drilled holes that are critical for mixing air and fuel properly before it enters the engine.
These tiny holes can easily remain clogged with varnish even after soaking and spraying the carburetor. You must remove the main jet and then push out the emulsion tube from the top. Clean every single one of its small holes with a proper jet cleaning wire and spray it thoroughly with cleaner.
A blocked emulsion tube is a very common reason for a snowblower to run poorly or not start, especially after sitting with old fuel. Since it is not always visible, it is frequently missed during cleaning.
Checking for Vacuum Leaks
The engine needs a sealed system to draw the fuel and air mixture from the carburetor. An air leak, also known as a vacuum leak, disrupts this process and can prevent the engine from starting. These leaks most often occur at the gaskets sealing the carburetor to the engine.
A simple way to check for a leak is to try starting the engine while spraying short bursts of carb cleaner or starting fluid around the base of the carburetor where it meets the engine. If the engine’s sound changes or it tries to fire up when you spray, you have found your leak.
This indicates that the gasket is either damaged, installed incorrectly, or the carburetor mounting bolts are loose. Replace the gasket and ensure the bolts are tightened to the proper specification.
| Symptom | Likely Cause | Solution |
|---|---|---|
| Engine won’t fire at all | No fuel in bowl or no spark | Check fuel flow; test spark plug for a strong blue spark. |
| Engine fires with starting fluid, but won’t stay running | Fuel delivery problem (clogged jet, reassembly error) | Re-inspect carb assembly; meticulously clean pilot jet and emulsion tube. |
| Fuel leaks from carburetor | Stuck open float, bad needle valve, or bad bowl gasket | Tap the bowl to free the float; check needle tip; replace bowl O-ring. |
| Engine starts but runs rough and surges | Incorrect mixture screw setting or vacuum leak | Reset idle mixture screw to baseline; check for leaks at the carb base. |
| Engine backfires through carburetor | Lean fuel condition or timing issue | Check for blockages in the main jet; ensure flywheel key is not sheared. |
Prevention: How to Avoid This Headache in the Future
Once you have your snowblower running again, the goal is to never repeat this frustrating experience. Proper maintenance and storage habits are the key to ensuring your carburetor stays clean and your engine starts on the first pull, every time.
A few simple steps at the end of the season can save you hours of work at the beginning of the next one. These principles apply to most small engines, regardless of which brand you own. Even when considering different models in a Simplicity vs Ariens snowblower lineup, fuel system care is universal.
Always use fresh, high-quality gasoline with a fuel stabilizer added. Ethanol in modern fuel attracts moisture, which leads to corrosion and varnish buildup. A good stabilizer prevents this degradation.
At the end of the winter season, either run the snowblower completely out of fuel until it stops, or drain the tank and carburetor bowl completely. Never store the machine with untreated fuel in the system. While this guide focuses on carbureted engines, modern machines face different challenges. If you own a newer model, troubleshooting an Ariens EFI snowblower that won’t start involves diagnostics on its fuel injection system instead of a carburetor.
When you do need to perform a cleaning, take photos with your phone at each step of the disassembly process. This provides an invaluable visual guide for reassembly and helps ensure every spring and linkage goes back exactly where it belongs.
Your Snowblower Will Run Again
Facing a snowblower that will not start after you have put in the work to clean its carburetor is disheartening. However, the solution is almost always within reach. The problem is rarely a catastrophic failure, but rather a small, overlooked detail in the cleaning or reassembly process.
By working through the steps outlined in this guide—from the basic checks of fuel and spark to the meticulous inspection of gaskets, jets, and the often-forgotten emulsion tube—you can diagnose and fix the issue. Be patient, be thorough, and you will be rewarded with a smooth-running machine ready to tackle the winter.