Snowblower Belt Slipping? Stop Ignoring These HIDDEN Causes!
There’s nothing more frustrating than heading out to clear a fresh blanket of snow only to have your snowblower quit on you. You push into a drift, the engine roars, but the auger stops spinning and snow stops flying. That high-pitched squeal and the faint smell of burning rubber are unmistakable signs: your snowblower belt is slipping.
A slipping belt is more than just an annoyance; it’s a critical failure that renders your machine useless right when you need it most. It can happen to the drive system, leaving your wheels spinning in place, or to the auger system, preventing you from throwing snow. Understanding the hidden causes is the first step to a reliable, long-term fix.
You'll Learn About
Decoding the Signs: Is Your Belt Really Slipping?
Before you start tearing things apart, it’s essential to confirm that a slipping belt is the true culprit. Several symptoms point directly to this common problem. Being able to recognize them will save you time and ensure you’re fixing the right issue.
The most obvious sign is a loss of function under load. Your snowblower might work perfectly fine on a light dusting of powder, but as soon as you tackle a heavy, wet drift at the end of the driveway, the auger slows down or stops completely. Similarly, the drive wheels might spin on flat ground but give up when trying to push the machine up an incline. Sometimes, you might even notice a snowblower auger not turning and smoking, which is a direct result of friction from a slipping belt.
Key Symptoms of a Slipping Snowblower Belt
Pay close attention to your machine’s behavior. A loss of throwing distance is a classic indicator for the auger belt. If your snowblower used to launch snow across the yard and now it barely clears the chute, the belt is likely losing its grip on the pulleys.
Audible cues are also critical. A high-pitched squeal or screeching sound when you engage the auger or drive is the sound of the rubber belt slipping against the metal pulley. You might also smell burning rubber, a clear sign of excessive friction and heat buildup. In some cases, a severely stretched or damaged belt can cause a noticeable vibration during operation.
The Root Causes: Why Snowblower Belts Really Fail
A slipping belt isn’t just a random occurrence; it’s a symptom of an underlying issue. Simply replacing the belt without addressing the root cause will only lead to another failure down the road. Let’s explore the common and not-so-common reasons your belt is losing its grip.
1. Simple Wear and Tear
The most common cause is simply an old, worn-out belt. Over time, the rubber hardens, cracks, and stretches. The sides of the V-belt, which are the primary contact points with the pulley, can become glazed and smooth. This glazing dramatically reduces friction, causing the belt to slip under even light loads.
Inspect both the auger and drive belts for visible signs of damage like cracks, fraying, or missing chunks. A less obvious but equally important sign is “glazing,” where the sides of the belt appear shiny and polished. If your belt shows any of these signs, replacement is the only solution.
2. Incorrect Belt Tension: The Critical Adjustment
Proper tension is arguably the most crucial factor for belt performance. A belt that is too loose won’t have enough pressure against the pulleys to transmit power effectively. When the engine puts the auger or wheels under load, a loose belt will simply slip. This is a very common reason for a new belt to fail prematurely.
Conversely, a belt that is too tight can cause its own set of problems. Excessive tension puts immense strain on the bearings of the engine crankshaft and the auger/drive shafts. This can lead to premature bearing failure, a much more expensive and complicated repair than replacing a belt. Finding that “just right” tension is key.
3. Moisture, Ice, and Debris
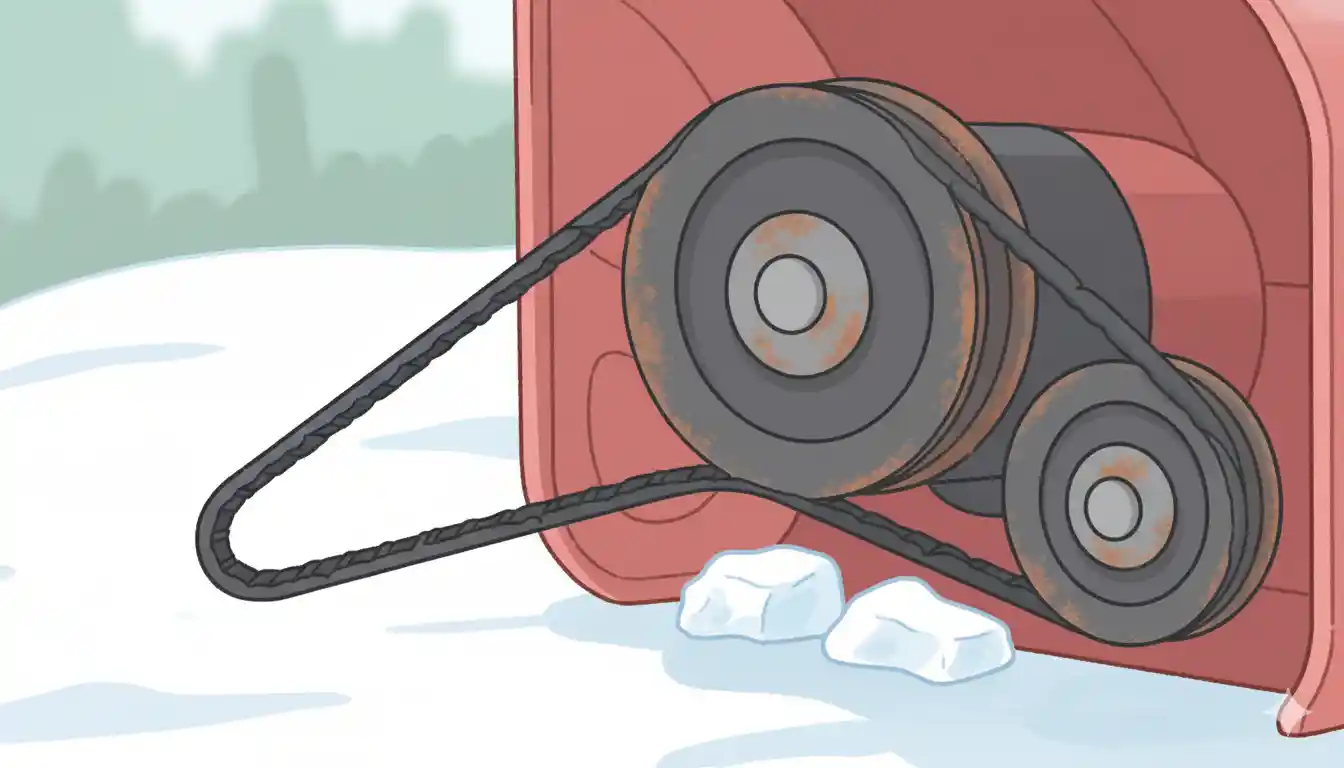
Snowblowers operate in wet, freezing conditions, and this environment can wreak havoc on the belt system. Snow and ice can get packed into the belt cover and onto the pulleys. This moisture acts as a lubricant, reducing friction and causing the belt to slip. If your machine’s impeller is frozen with ice, engaging the auger will cause the belt to burn up almost instantly as the engine pulley spins against the stationary belt.
Always ensure the belt housing is clean and dry before storage. If you suspect a frozen impeller, move the machine to a warm area to thaw completely before attempting to start it and engage the auger. Small sticks or debris can also get lodged in a pulley, preventing the belt from seating correctly and leading to slipping and damage.
4. Pulley Problems: The Overlooked Culprit
Often, the belt gets blamed when the real issue lies with the pulleys. Misaligned pulleys can cause the belt to run at an angle, leading to uneven wear and forcing it to jump off the track. Grab each pulley and check for any side-to-side or up-and-down wobble. Excessive play could indicate a worn bearing or bushing that needs replacement.
Another hidden issue is pulley glazing. Just like the belt, the V-groove of the pulley can become polished and smooth over time, especially if a belt has been slipping for a while. This smooth surface won’t grip even a new belt properly. Use a wire brush or emery cloth to rough up the inside surfaces of the pulley grooves to restore their gripping power.
The Ultimate Fix-It Guide: A Step-by-Step Solution
Now that you’ve diagnosed the problem, it’s time to fix it. This guide will walk you through inspecting, adjusting, and replacing your snowblower belts safely and effectively. For owners of specific models like the Honda HS55, always consult your owner’s manual first, as procedures can vary.
Step 1: Safety First!
Before starting any work, ensure the snowblower is on a level surface. Disconnect the spark plug wire to prevent any chance of an accidental engine start. This is the most important safety step and should never be skipped. Also, if you’ve been running the machine, allow the engine and muffler to cool down completely.
Step 2: Access and Inspect the Belts
The belts are located behind a plastic or metal belt cover. This is typically held on by a few bolts or screws. Remove the cover and set it aside. You will see two belts: the larger one is usually the auger belt, and the smaller one is the drive belt for the wheels.
Perform a thorough visual inspection. Look for cracks, fraying, glazing, and any other signs of wear. Push down on the middle of each belt; there should be very little slack. A loose, floppy belt is a definite sign that adjustment or replacement is needed.
Step 3: Adjusting the Belt Tension
If the belts appear to be in good condition but are simply loose, an adjustment may be all that’s required. Most snowblowers have an idler pulley on a slotted bracket that applies tension when the corresponding lever is engaged. Loosening the idler pulley’s mounting bolt allows you to slide it to increase or decrease tension.
Move the pulley slightly to tighten the belt, then retighten the bolt. Be careful not to overtighten. A good rule of thumb is to have about 1/2 inch of play when you press firmly on the middle of the belt. Engage and disengage the control lever a few times to ensure the mechanism moves freely and provides proper tension.
Step 4: Replacing Worn Belts
If a belt is damaged, replacing it is necessary. It’s often recommended to replace both the auger and drive belts at the same time, especially if they are the same age. Make sure you purchase the correct OEM-specified belt for your model. Automotive belts are not designed for the stresses of a snowblower and will fail quickly.
To remove the old belts, you’ll need to release the tension from the idler pulleys. You may also need to loosen belt keepers or guides. Carefully roll the belts off the engine pulley first, then work them off the larger auger and drive pulleys. On some machines, like certain John Deere 826 snowblowers, you may need to separate the auger housing from the engine frame to get enough clearance.
Step 5: Installing New Belts and Reassembly
Installation is the reverse of removal. Route the new belts around the correct pulleys, paying close attention to their path. Refer to your owner’s manual or a picture you took before disassembly to ensure correct routing. Once the belts are in place, reinstall any belt keepers and set the proper tension using the idler pulleys.
Rotate the pulleys by hand a few times to make sure the belts are seated properly in the grooves and are not rubbing against any components. Once you’re confident everything is aligned correctly, reinstall the belt cover. Reconnect the spark plug wire, start the machine, and test both the auger and drive functions to confirm the repair was successful.
Troubleshooting and Prevention Table
Use this quick-reference table to diagnose and solve common belt-slipping issues, helping you keep your machine running smoothly all winter.
| Symptom | Likely Cause | Solution |
|---|---|---|
| High-pitched squeal when engaging auger/drive | Loose or worn belt | Inspect belt for wear. Adjust tension or replace belt if damaged. |
| Auger stops spinning in heavy snow | Slipping auger belt | Check belt tension and condition. Clean pulleys of debris or ice. |
| Smell of burning rubber | Severe belt slippage; possibly a seized component | Immediately disengage. Check for frozen impeller or jammed auger. Inspect belt for damage. |
| Belt keeps coming off | Pulley misalignment or worn bearings | Check pulleys for wobble. Ensure they are aligned. Inspect pulley bearings for wear. |
| Wheels won’t turn under load | Slipping drive belt | Inspect drive belt condition and tension. Ensure friction disc is clean and not contaminated with oil. |
Beyond the Basics: Advanced Tips for a Bulletproof System
To truly master your machine, it’s worth understanding factors that go beyond simple tension and wear. The interaction between components is complex, and addressing subtle issues can prevent future headaches.
One often-overlooked area is the idler arm spring. This spring provides the force for the idler pulley to tension the belt. Over years of use, this spring can weaken, providing insufficient tension even if the pulley is adjusted correctly. If you’ve adjusted the tensioner to its maximum setting and the belt is still loose, consider replacing the tensioner spring.
Finally, always use genuine factory belts. Aftermarket belts from an auto parts store may have the same dimensions but are constructed differently. Snowblower belts are designed to handle the specific clutching action of idler pulleys and the harsh, cold environment. Using the wrong type of belt is a guaranteed recipe for premature failure.