Snow Blower Belt Slipping? Here’s the Ultimate Fix to Regain Power
There are few things more frustrating than heading out to clear a driveway buried in snow only to have your snow blower fail. The engine roars to life, but when it meets the snowdrift, the auger stops spinning, or the wheels refuse to grip. This common winter headache often points to one culprit: a slipping snow blower belt.
A belt that fails to transfer power from the engine to the auger or the wheels renders your machine useless. Understanding how to diagnose and fix this issue is crucial for keeping your snow blower in peak fighting condition throughout the winter.
You'll Learn About
Why a Slipping Snow Blower Belt Is a Problem You Can’t Ignore
A slipping belt is more than just an inconvenience; it’s a sign that your machine is losing efficiency and heading for a breakdown. When a belt slips, it fails to properly turn the pulleys that operate the auger (for throwing snow) and the drive system (for moving the machine). This leads to a dramatic loss of performance, forcing you to work harder and longer in the cold.
Ignoring a slipping belt can cause a cascade of other problems. The friction from a slipping belt generates intense heat, which can quickly degrade the rubber, leading to glazing, cracking, and eventual breakage. This same heat and vibration can also cause premature wear on expensive components like pulleys and bearings, turning a simple fix into a costly repair.
The Telltale Signs: How to Know Your Snow Blower Belt is Slipping
Before a belt fails completely, it will usually give off several warning signs. Being able to recognize these symptoms allows you to address the problem before you’re stranded mid-blizzard. Pay close attention to these common indicators of a slipping belt.
Screeching or Squealing Noises
One of the most common signs of a slipping belt is a high-pitched screeching or squealing sound, especially when you engage the auger or drive system. This noise is caused by the belt losing traction and rubbing against the metal pulley grooves at high speed. While it might happen intermittently at first, it will become more frequent as the belt condition worsens.
Burning Rubber Smell
That unmistakable smell of burning rubber is a dead giveaway. The intense friction from a slipping belt generates enough heat to literally burn the surface of the belt. If you smell this, shut down the machine immediately and inspect the belt for damage and glazing (a shiny, hardened surface).
Reduced Throwing Distance
If your snow blower suddenly can’t throw snow as far as it used to, a slipping auger belt is a likely cause. The belt isn’t transferring enough power to the auger and impeller to spin them at the required speed. The engine may sound fine, but the machine’s performance will be noticeably weaker, especially in heavy, wet snow.
Loss of Drive Power
Similarly, if your self-propelled snow blower struggles to move forward, especially up an incline or through deep snow, the drive belt may be slipping. You might notice the machine lurching or failing to maintain a consistent speed. This indicates the wheels aren’t receiving steady power from the engine.
Uncovering the Root Cause: Top Reasons Your Belt is Slipping
To permanently fix a slipping belt, you must first identify the underlying cause. Simply replacing a belt without addressing the root problem will only lead to another failure. Here are the most common reasons why snow blower belts start to slip.
1. Normal Wear and Tear
Belts are consumable parts made of rubber compounds that degrade over time. After several seasons of use, exposure to cold temperatures, and constant friction, a belt will naturally stretch, crack, and lose its grip. Look for visible signs of damage like fraying, cracks, or a glazed, shiny surface on the sides of the belt.
2. Incorrect Belt Tension
The single most common cause of belt slippage is improper tension. A belt that is too loose won’t have enough grip on the pulleys and will slip under any significant load. Conversely, a belt that is too tight puts excessive strain on the bearings of the engine and auger shafts, which can lead to major component failure.
3. Contamination from Oil, Grease, or Water
For a belt to work correctly, the pulleys and the belt itself must be clean and dry. Any substance like oil, grease, or even moisture that gets between the belt and the pulley will act as a lubricant, causing immediate and severe slippage. This can happen from a small engine leak or from snow melting inside the belt housing.
4. Worn or Misaligned Pulleys
The pulleys that the belts ride on can also be a source of problems. If the V-shaped grooves of a pulley become worn or rusty, they won’t provide a proper surface for the belt to grip. Furthermore, if the pulleys are not perfectly aligned with each other, the belt will be forced to run at an angle, causing excessive edge wear, fraying, and a high likelihood of it jumping off the pulley entirely.
5. Using the Wrong Replacement Belt
Not all V-belts are created equal. Using a standard automotive belt instead of a heavy-duty, OEM-specified snow blower belt is a recipe for failure. Automotive belts are not designed to handle the specific load and temperature demands of a snow blower, and even a slight difference in length or width can prevent it from seating correctly in the pulleys.
The Step-by-Step Guide to Fixing a Slipping Snow Blower Belt
Fixing a slipping belt is a straightforward job that most homeowners can handle with basic tools. Following these steps will help you safely diagnose the problem and perform the correct repair, whether it’s a simple adjustment or a full replacement.
Step 1: Safety First!
Before beginning any work, your safety is paramount. Always disconnect the spark plug wire and secure it away from the spark plug. This prevents any possibility of the engine accidentally starting while you are working. If you need to tilt the snow blower, it’s also a good idea to drain the fuel tank to prevent spills.
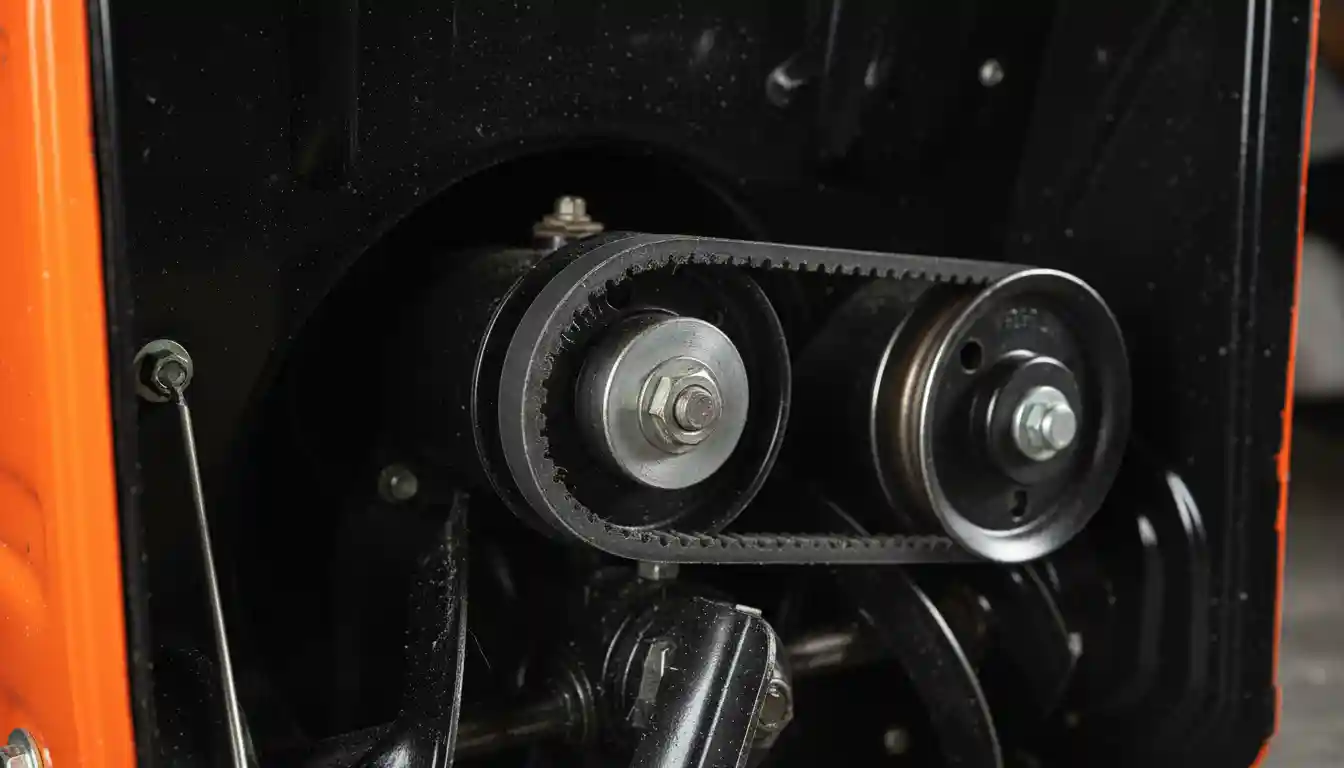
Step 2: Access and Inspect the Belts
The belts are located behind a plastic or metal cover, typically on the front of the engine housing. Remove the bolts or screws holding this cover in place to expose the auger and drive belts. With the cover off, perform a thorough visual inspection of both belts and the surrounding components.
Check the belts for any signs of wear as mentioned earlier (cracks, glazing, fraying). Also, inspect the pulleys for rust, debris, or damage. Check the idler pulley—the smaller pulley on a spring-loaded arm that applies tension—to ensure it spins freely and its arm moves smoothly.
Step 3: Adjusting Belt Tension
If the belt appears to be in good condition but is simply loose, an adjustment may solve the problem. Many snow blowers have an adjustable idler pulley or a cable adjustment that allows you to increase tension. Often, the idler pulley is mounted in a slotted hole; by loosening its mounting bolt, you can slide it to apply more pressure against the belt. Always consult your owner’s manual for the specific adjustment procedure for your model.
When adjusting, aim for about 1/2 inch of deflection when you press firmly on the belt at its longest span. Be careful not to overtighten the belt, as this can cause serious damage to bearings.
Step 4: Cleaning Pulleys and Belts
If you find oil or grease on the belt or pulleys, cleaning them thoroughly is essential. Use a rag with a degreaser to wipe down the inside grooves of each pulley and the surfaces of the belt. Ensure everything is completely dry before reassembling the machine. If the source of the oil is a leak, that issue must be addressed to prevent the problem from recurring.
Step 5: Replacing a Worn-Out Belt
If the belt is damaged, glazed, or stretched beyond the limits of adjustment, replacement is the only option. To replace it, you will need to release all tension, typically by pushing against the idler pulley arm. Carefully note the path the old belt takes around the pulleys before removing it; taking a photo with your phone is a great way to ensure you route the new one correctly.
You may need to tip the snow blower forward to access the lower pulleys and remove a frame panel underneath. Once the old belt is off, loop the new one into place, ensuring it is properly seated in every pulley groove. Some models, like those from Ariens, can have specific procedures, so if you’re experiencing issues where a drive belt keeps coming off, specific guidance may be needed. For more details on this, you can look into common Ariens drive belt woes.
Choosing the Right Replacement Belt: An OEM vs. Aftermarket Breakdown
When it’s time to buy a new belt, you’ll face the choice between an Original Equipment Manufacturer (OEM) belt and a less expensive aftermarket version. While saving money is tempting, it’s important to understand the differences.
| Feature | OEM Belts | Aftermarket Belts |
|---|---|---|
| Fit & Performance | Guaranteed to be the exact size, width, and angle for your machine, ensuring perfect fit and optimal power transfer. | May have slight variations in size that can lead to poor fit, slippage, or premature failure. |
| Durability & Materials | Made from specific rubber compounds designed to withstand the cold and high torque of a snow blower. Often reinforced for longevity. | Often made from general-purpose rubber that can become brittle in the cold and may not be as durable under heavy loads. |
| Cost | Typically more expensive upfront. | Significantly cheaper and widely available. |
| Warranty | Usually backed by the manufacturer’s warranty. | Warranty coverage varies widely and can be difficult to claim. |
Proactive Maintenance: How to Prevent Your Belt from Slipping Again
Once you’ve fixed your slipping belt, a few preventative measures can keep the problem from returning. Regular maintenance is the key to reliability, especially for powerful machines like a John Deere 1332DDE that place high demands on their components.
Before each winter season, remove the belt cover and inspect the condition and tension of your belts. Clean any dust or debris out of the housing and from the pulley grooves. When storing your snow blower for the off-season, keep it in a clean, dry location to prevent rust on the pulleys and moisture damage to the belts.
One often overlooked aspect of belt health is engine alignment. Over years of use and vibration, the bolts holding the engine to the frame can loosen slightly, causing a subtle but critical misalignment between the engine pulley and the auger/drive pulleys. Check that the engine is securely mounted and that its pulley is perfectly parallel with the transmission pulleys. This small check can prevent chronic belt fraying and slipping issues that adjustments alone can’t fix.
Conclusion: Regain Control of Your Snow Clearing
A slipping snow blower belt is a common but fixable problem that can bring your winter chores to a halt. By understanding the signs, identifying the root cause, and performing the correct adjustments or replacement, you can restore your machine’s power and reliability. Whether you’re operating a compact walk-behind model like a Bobcat snowblower or a larger unit, proper belt maintenance is non-negotiable.
Remember to prioritize safety, use the correct replacement parts, and perform regular inspections. A well-maintained belt system ensures your snow blower will be ready to tackle whatever winter throws your way, allowing you to clear snow quickly and efficiently.