Slide-In Range Sticks Out? Your Pro Fix for a Flush Finish
You’ve invested in a beautiful new slide-in range, envisioning a seamless, integrated look for your kitchen. But after installation, you’re left with a frustrating reality: the appliance juts out from the cabinets, disrupting the clean lines you wanted to achieve. This common problem can make an expensive appliance look cheap and poorly fitted, but rest assured, it is almost always fixable.
Understanding the root cause is the first step toward achieving that flawless, built-in appearance. From simple measurement discrepancies to hidden obstructions behind the wall, we will guide you through diagnosing and solving the issue for good. Get ready to transform your kitchen from looking “almost right” to absolutely perfect.
You'll Learn About
Why Your Slide-In Range Isn’t So “Slide-In”
The term “slide-in” suggests an effortless fit, but several factors can prevent your range from sitting flush with the surrounding cabinetry. Identifying the specific culprit is crucial for applying the correct fix. Often, the problem isn’t the range itself, but the space it’s intended to occupy.
The Measurement Mismatch: Cabinet Depth vs. Range Depth
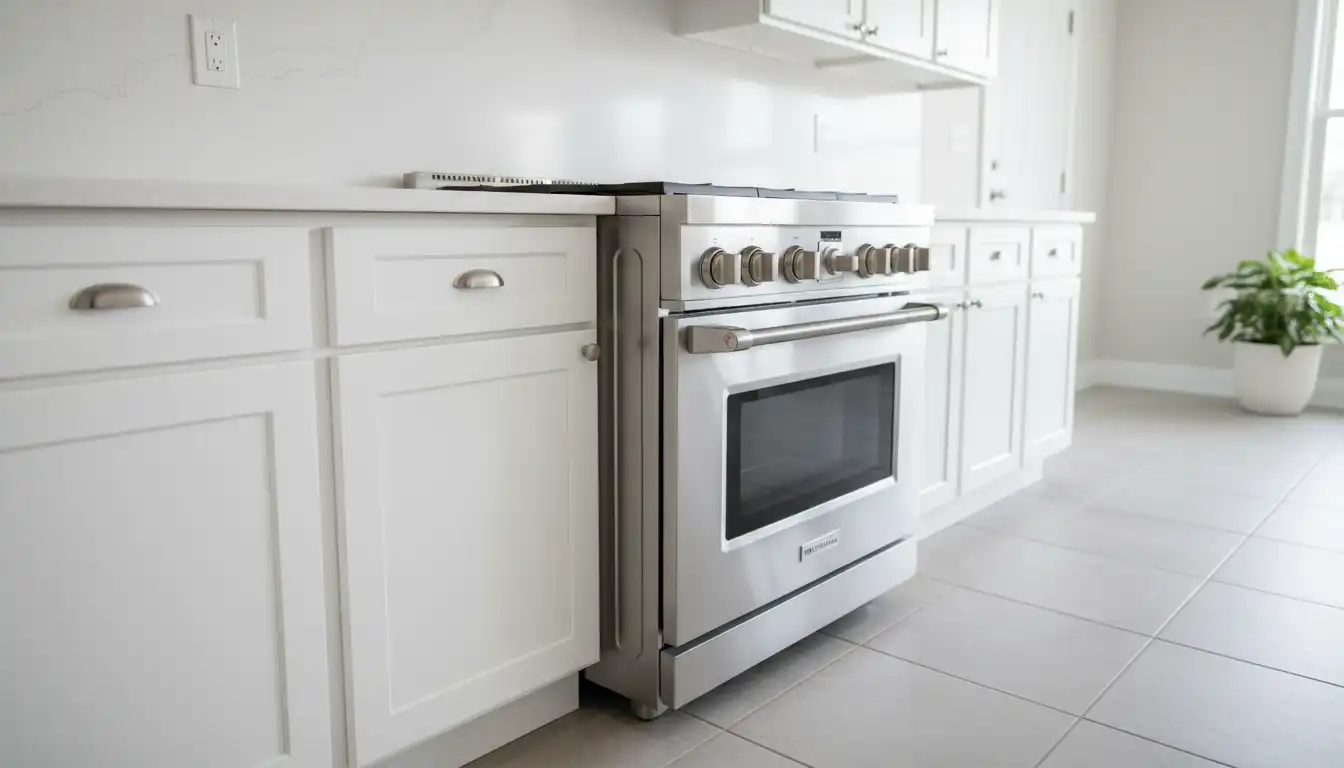
The most frequent cause of a protruding range is a simple dimensional conflict. Standard kitchen base cabinets are typically 24 inches deep, but the total depth of slide-in ranges can vary, often measuring between 25 to 27 inches once the door and handles are included. This discrepancy is intentional, as the oven door should protrude slightly to prevent heat from damaging the adjacent cabinet faces.
However, the main body of the range should be flush with the cabinet boxes. If the entire unit, including the sides, is sticking out, it points to an obstruction or a cutout that is too shallow. Always consult the manufacturer’s specification sheet for the required “cutout depth” before installation.
The Hidden Culprits: Wall Obstructions
What you can’t see behind the range is often the source of the problem. Utilities like gas lines and electrical receptacles are necessary, but their placement can prevent the appliance from sliding all the way back. A standard surface-mounted electrical outlet can protrude an inch or more from the wall, physically blocking the range.
Similarly, a gas pipe and shut-off valve that are not positioned within the recessed area on the back of the range will act as a barrier. Modern ranges are designed with specific clearances for these utilities; if your home’s connections fall outside this designated space, the range will inevitably stick out.
The Unseen Saboteur: The Anti-Tip Bracket
The anti-tip bracket is a critical safety feature designed to prevent the range from tipping forward when weight is applied to an open oven door. This small metal piece is secured to the floor or wall, and one of the range’s rear leveling feet must slide into it.
If the bracket is installed even slightly out of position—too far forward or to the side—it will block the foot instead of engaging it. This prevents the range from moving back the final, crucial inch or two, causing it to stick out from the cabinets.
Baseboard and Wall Imperfections
Sometimes, the issue is as simple as a piece of thick baseboard molding at the bottom of the wall. The lower rear of the range may be hitting the molding, preventing a flush fit. Likewise, walls that are not perfectly plumb or have bows can create unexpected obstructions that stop the appliance from seating properly.
The Blueprint for a Flawless Fit: Your Step-by-Step Solution
Achieving a professional, integrated look requires a methodical approach. By addressing measurements, obstructions, and installation details, you can systematically eliminate the gap and get your slide-in range to fit perfectly. Follow these steps to diagnose and resolve the issue.
Step 1: Precision Measurement is Non-Negotiable
Before making any adjustments, you need accurate data. Pull the range out and measure the depth of the opening from the back wall to the front face of the cabinets. Do this at several points to check for inconsistencies.
Next, consult your range’s installation manual or the online specification sheet. Find the required “cutout depth” and compare it to your measurement. This will tell you exactly how much space you’re missing and help you understand the scale of the problem.
| Component | Standard Dimension | Key Consideration for Flush Fit |
|---|---|---|
| Cabinet Depth | 24 inches | This is the depth of the cabinet box only; it does not include doors or countertop overhang. |
| Countertop Depth | 25 – 25.5 inches | The countertop should slightly overhang the cabinets. The range’s cooktop lip is designed to overlap this. |
| Range Body Depth | 23.5 – 24.5 inches | The main body of the range should align with the cabinet boxes for a built-in look. |
| Overall Range Depth | 25 – 28 inches | This includes the door and handles. It’s normal for the door and handle to protrude past the cabinets. |
| Required Cutout Depth | Varies (Check Specs) | This is the most critical measurement from the manufacturer for ensuring a proper fit against the wall. |
Step 2: Dealing with Wall Obstructions
If you’ve identified a gas line or electrical outlet as the obstruction, you have a clear path forward. Hiring a licensed electrician or plumber is strongly recommended for this step. They can relocate the utilities to align with the recessed area on the back of your range.
Ask the electrician to install a recessed range outlet. These outlets are set back into the wall, providing the extra inch of clearance needed for a flush fit. This is a common and highly effective solution that resolves one of the most frequent installation problems.
Step 3: Creating a Wall Recess for Extra Clearance
For a truly custom solution when utilities cannot be moved easily, or you need just a little more space, you can create a recessed niche in the drywall behind the range. This technique is a trade secret for achieving a perfectly flush installation, especially in older homes with unpredictable wall construction.
After turning off all relevant breakers, carefully mark a section of the drywall behind the range that aligns with the protruding part of the appliance. Use a stud finder to ensure you are not cutting into wall studs. Cut out the marked section of drywall to expose the wall cavity, providing several extra inches of clearance for the back of the range to slide into.
Step 4: Correcting the Anti-Tip Bracket Installation
If you suspect the anti-tip bracket is the issue, check its placement against the template provided in the installation manual. The instructions will specify the exact distance from the wall where the bracket should be mounted to properly engage the range’s foot.
If it’s installed incorrectly, simply unscrew the bracket and reposition it according to the manufacturer’s guide. Once reinstalled, you should be able to feel the foot slide securely into the bracket as you push the range back, confirming it is no longer an obstruction.
Advanced Solutions for Tricky Installations
Sometimes the standard fixes aren’t enough, especially in kitchens with custom or older, non-standard elements. If your range still protrudes, it may be time to consider issues with the surrounding countertops or cabinets themselves.
When the Countertop is the Problem
A countertop that is too deep or has a thick decorative edge can interfere with the range. A common issue arises when a piece of the countertop material is installed as a backsplash or a filler piece behind the range. This piece can prevent the range from sliding back fully.
Depending on the material, this strip may be removable. For materials like granite, solving this may require professional help, as improper removal could damage the main countertop. Thinking about how materials fit together is key to a flawless kitchen, and a challenge like granite matching can be complex if a piece needs to be altered.
Choosing the Right Slide-In Range to Avoid Problems
Prevention is often the best cure. When shopping for a new appliance, pay close attention to the installation specifications before you buy. Some models are specifically designed with deeper recesses in the back to accommodate a wider range of utility placements.
Reading reviews can also provide insight into potential installation challenges. An in-depth analysis, like this Fisher Paykel induction range review, can reveal details about fit and finish that you won’t find on a spec sheet. Ultimately, selecting an appliance that is well-suited to your existing kitchen layout can save you significant time and effort.
Achieving a Seamless Look
The goal of a slide-in range is to create a fluid, continuous surface from cabinet to appliance to countertop. When properly installed, it elevates the entire look of the kitchen. This principle of seamless integration is the same one that guides the desire to have the countertop flush with the cabinet.
Achieving this look requires attention to detail across all elements. Ensuring your range is properly leveled is the final, crucial step. Use a spirit level on the cooktop and adjust the feet as needed until the appliance is perfectly level and sits at the correct height relative to your countertops.
The Final Push: Ensuring a Perfect and Safe Installation
You have measured, adjusted, and addressed all obstructions. The final step is to slide the range back into place, ensuring every component aligns perfectly. As you push it back, listen and feel for any resistance. The unit should slide smoothly until the back is against the wall or safely within its new recessed niche.
Most importantly, double-check that the anti-tip bracket is fully engaged. Gently try to tilt the range forward; there should be immediate resistance. This confirms the appliance is secure and your kitchen is not only beautiful but safe for everyone in your home.
Achieving That High-End, Integrated Kitchen Look
A slide-in range that sticks out can be a major eyesore, but it’s a problem with clear and actionable solutions. By methodically working through potential issues—from simple measurements to hidden obstructions—you can achieve the clean, professional finish you desire.
With careful planning and a bit of effort, your range will no longer be a source of frustration. Instead, it will be a perfectly integrated centerpiece of a stunning and highly functional kitchen.