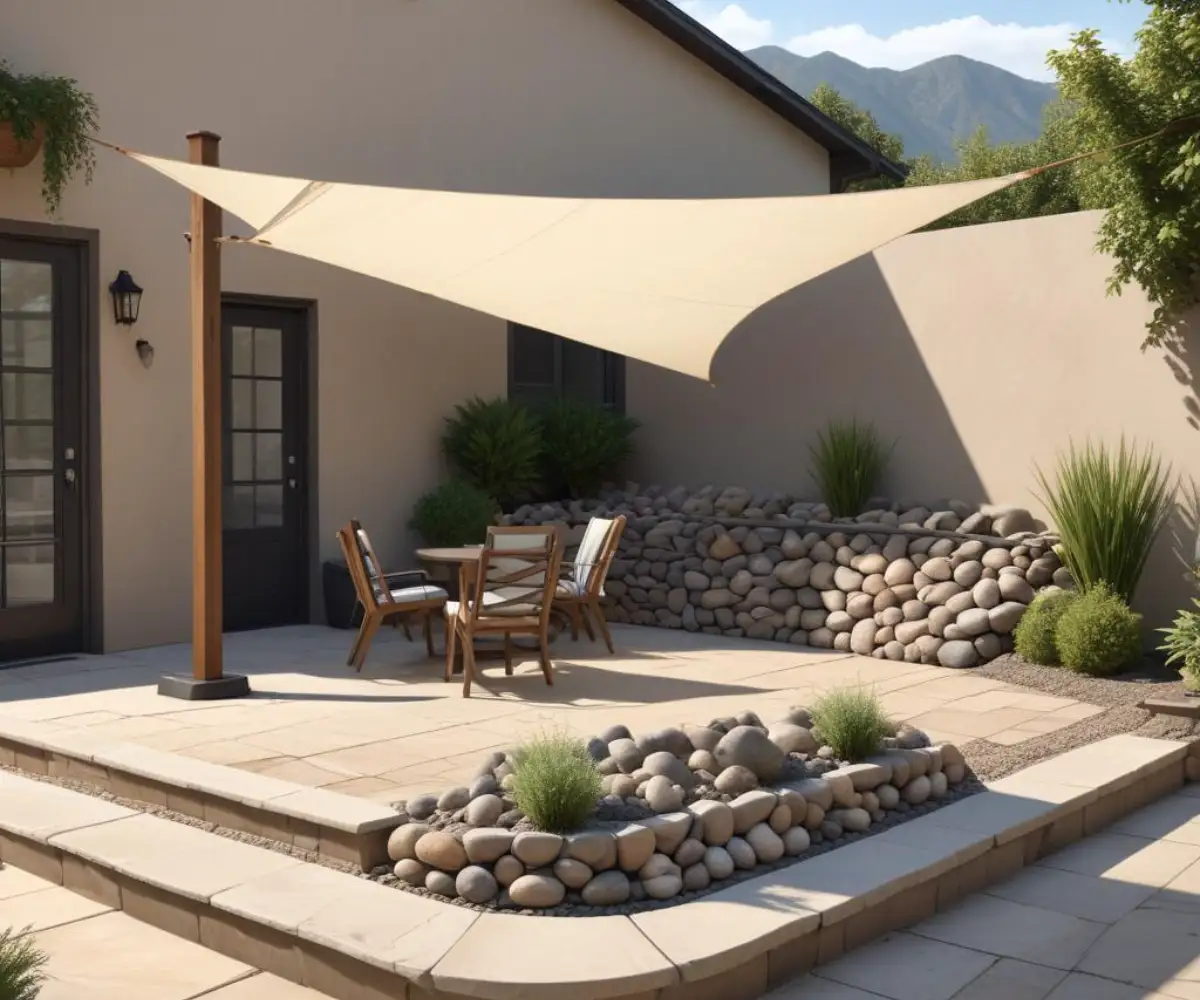
Shade Sail Posts in Pots: The Genius Hack You’re Doing Wrong
You crave the cool, elegant shade of a sail over your patio, but there’s a problem. You can’t—or won’t—dig massive holes in your beautiful stonework, concrete slab, or rented backyard. The “shade sail posts in pots” method seems like the perfect, non-permanent solution, but many attempts end in disaster: leaning posts, snapped lines, and even dangerous tipovers in the first gust of wind.
The core issue isn’t the idea itself, but the execution. Most people drastically underestimate the incredible forces a shade sail generates. It’s not just a piece of fabric; it’s a wind-catching sail that can exert hundreds of pounds of lateral force on its anchor points, turning your stylish planter into a dangerous projectile.
You'll Learn About
Why Your Potted Post Will Fail (And How to Prevent It)
Simply filling a large pot with dirt and rocks is a recipe for failure. The secret to a safe, stable, and long-lasting installation lies in understanding the physics of leverage and counterweight. Without the right balance of mass, density, and structural integrity, your project is doomed from the start.
This guide moves beyond simple DIY tips to provide an engineering-based approach. We’ll explore the critical mistakes most people make and deliver a foolproof blueprint for creating a potted shade sail post that is both beautiful and brutally effective against the elements.
The Hidden Forces at Play: More Than Just Weight
A shade sail acts like a kite, catching the wind and creating immense uplift and lateral pull. The height of your post acts as a lever, multiplying this force at the base. An 8-foot post with 100 pounds of force at the top is trying to lever a much greater force against its base.
This is where most installations go wrong. A pot filled with soil, which is relatively low in density and can become waterlogged or dry out, simply doesn’t provide the monolithic, unmoving anchor required. The post will inevitably start to wobble, creating a hazard long before it completely fails. A wobbly post is a sign of imminent danger, an issue often seen even with traditional installations that a proper shade sail 4×4 post fix can address, but in a pot, the entire foundation is compromised.
Mistake #1: Choosing the Wrong Pot
Not all pots are created equal. The ideal container must have two key features: a massive weight capacity and, most importantly, a wide, stable base. Tall, narrow, or tapered pots are exceptionally prone to tipping over, regardless of how much weight you put inside them.
Look for commercial-grade planters, half whiskey barrels, or concrete pots with a base that is at least as wide as its height. Drainage is also crucial. Without adequate drainage holes, water will accumulate, potentially damaging the post, compromising the concrete, and creating a soggy, unstable mess.
The Indestructible Potted Post: A Step-by-Step Blueprint
Building a secure potted post requires a multi-layered approach that combines drainage, immense weight, and rigid internal structure. This isn’t just about filling a bucket; it’s about creating a miniature, above-ground footing that can withstand the elements.
Step 1: Calculate Your Counterweight Needs
The single most critical factor is the total weight of your planter base. This is determined by the size of your shade sail and the height of your post. Taller posts and larger sails require exponentially more weight to remain stable.
Our table below provides a conservative estimate for the minimum required weight per post, assuming a properly installed post in the center of a wide-based pot. Always err on the side of more weight for safety.
| Shade Sail Size (Largest Dimension) | Post Height Above Ground | Minimum Required Weight Per Pot |
|---|---|---|
| Up to 8 feet (2.4m) | 8 feet (2.4m) | 250+ lbs (115+ kg) |
| 8 to 12 feet (2.4 – 3.7m) | 8 feet (2.4m) | 350+ lbs (160+ kg) |
| 8 to 12 feet (2.4 – 3.7m) | 10 feet (3m) | 450+ lbs (205+ kg) |
| 12 to 16 feet (3.7 – 4.9m) | 10 feet (3m) | 600+ lbs (270+ kg) – Professional consultation advised |
Step 2: Selecting the Right Post Material
While wood posts are common, steel posts are vastly superior for this application. A 4×4 or 6×6 pressure-treated wood post can work, but steel offers far greater rigidity and won’t bend or crack under the constant tension. A 3-4 inch diameter, thick-walled steel post is ideal.
Regardless of material, ensure the post is long enough to be embedded deep within your concrete core while still reaching your desired height. A significant portion of the post’s stability comes from being encased in concrete inside the pot.
Step 3: The Ultimate Counterweight Cocktail
This is the secret to creating an immovable base. Layer your materials thoughtfully for drainage, stability, and aesthetics.
1. The Drainage Layer: Start with a 3-4 inch layer of coarse gravel or river rock at the bottom of the pot. Ensure your drainage holes are clear. This prevents water from pooling around the base of your post and concrete.
2. The Concrete Core: Place your post in the center of the pot. Use braces to ensure it is perfectly plumb (vertical). Mix and pour high-strength concrete (e.g., Quikrete 5000) into the pot, filling it to about 75% of its total volume. For heavy-duty applications, consider adding rebar to the concrete mix for extra reinforcement.
3. The Finishing Layer: After the concrete has fully cured (allow at least 48-72 hours), you can add a decorative top layer. This could be decorative river rocks, which add more weight, or a layer of potting soil for shallow-rooted, drought-tolerant plants like succulents. This softens the look and integrates the planter into your garden design.
Step 4: Hardware and Tensioning
Use only marine-grade stainless steel hardware (eyebolts, turnbuckles, carabiners). Drill completely through your post for the eyebolt and secure it with a large washer and nut on the other side. Do not use screw-in eye hooks, as they can pull out under tension.
When attaching the sail, use turnbuckles on at least two corners to achieve a tight, even tension. The sail should be taut with no sagging. A properly tensioned sail is better able to handle wind, whereas a loose sail will flap violently, increasing the stress on the posts.
Advanced Strategies for a Fail-Safe System
For those in high-wind areas or with larger sails, additional measures provide peace of mind. The goal is to create a system that is not only strong but also manageable during severe weather.
Embrace Quick-Release Hardware
The safest shade sail is one that has been taken down before a storm. Using high-quality carabiners or quick-release shackles at each corner allows you to quickly and easily remove the sail when you know high winds are approaching. This single step can prevent catastrophic failure.
For ultimate convenience and wind management, a retractable system offers unparalleled benefits. Solutions like the Shaderunner® provide robust, engineered shade that can be extended or retracted in moments, eliminating the risk of wind damage entirely.
Avoiding Underground Surprises
One of the primary benefits of the potted post method is avoiding excavation. This means you don’t have to worry about hitting buried utility lines like water or gas pipes. Accidentally hitting a utility line can be a costly and dangerous mistake. Just as you’d want to avoid a surprise invoice after a plumbing emergency and wondering do plumbers send a bill in the mail, using pots circumvents this entire risk from the outset.
Your Non-Permanent Shade Solution, Built to Last
Installing shade sail posts in pots is a brilliant solution for modern outdoor living, offering flexibility where permanent structures are not feasible. However, it is a project where “good enough” can be dangerous. The difference between a wobbly, hazardous post and a secure, stylish anchor lies entirely in the details.
By respecting the immense power of the wind, investing in the right materials, and prioritizing a heavy, stable base with a solid concrete core, you can create a safe and effective shade solution. Don’t take shortcuts; build it right, and enjoy your cool, shaded oasis for years to come.
Frequently Asked Questions
Can you safely put shade sail posts in pots?
Yes, but it requires caution as shade sails create significant tension and catch the wind. The pot must be sufficiently large and extremely heavy to act as a proper anchor and prevent the post from tipping over, which could cause damage or injury. This method is best suited for smaller sails in areas not prone to high winds.
What is the best way to secure a shade sail post in a pot?
The most effective method is to set the post in quick-setting concrete poured directly into the planter. Center the post in a large, sturdy pot, ensure it is level, and then fill the container with concrete to create a heavy, stable base. Some people add a layer of decorative river rocks or potting soil on top for a finished look.
What size and weight should the potted base be?
A larger and heavier base is always better for stability. It is estimated that each planter should weigh at least 250-300 lbs to adequately support the post under tension. For the pot itself, choose a large and robust one, such as a half oak whiskey barrel or a cedar tub that is at least 2 feet tall.
What are the advantages of using pots for shade sail posts?
Using pots offers a non-permanent, portable solution, which is ideal for renters or for patios and decks where digging is not possible. This method allows for more flexibility in placement and avoids creating permanent concrete footings in your yard. Aesthetically, the planters can also be integrated into your garden design.
Are there any disadvantages to this method?
The primary disadvantage is the risk of the post tipping over in moderate to high winds if the base is not heavy enough. The substantial weight required can make the planters difficult to move, and the overall cost can sometimes exceed that of a permanent in-ground installation. Additionally, plastic planters may crack under the stress and weight.
