Self-Leveling Compound Not Flat? Here’s the Ugly Truth & How to Fix It
You poured a river of gray sludge, trusting the “self-leveling” promise on the bag. You envisioned a perfectly flat, glassy surface ready for your new flooring. Instead, you’re left staring at a lumpy, bumpy, wavy mess that looks worse than what you started with.
This is the nightmare scenario for countless DIYers and even some pros. The truth is, self-leveling compound is a fantastic product, but its name is a bit of a marketing fib. It doesn’t magically level itself; it needs your help to get there.
You'll Learn About
The Nightmare Scenario: Why “Self-Leveling” Compound Fails
You followed the instructions, but your floor is a disaster. Before you can fix it, you need to understand what went wrong. Several critical errors can turn your smooth-floor dreams into a bumpy reality.
From the way you mix it to the temperature of the room, every detail matters. Ignoring these factors is a direct path to an uneven finish, wasting both your time and money.
Mistake #1: Improper Mixing – The Lumpy Catastrophe
The number one cause of failure is a bad mix. It’s a science, not a suggestion. Adding too much water is a common and devastating mistake.
Too much water weakens the compound, causing the heavier aggregates to sink while the lighter materials float. This separation results in a weak, soft, and uneven surface. Conversely, not enough water creates a thick, clumpy paste that can’t flow and level out properly.
Mistake #2: Rushing the Prep Work – A Recipe for Disaster
Self-leveling compound needs a perfect canvas to work its magic. Proper surface preparation is non-negotiable. Any dust, oil, grease, or debris left on the subfloor will prevent the compound from bonding correctly, leading to peeling and an uneven finish.
Furthermore, you must use a primer. The primer seals the subfloor, preventing it from sucking water out of the leveling compound too quickly. A thirsty, unprimed subfloor will ruin the flow and cause the compound to dry before it has a chance to settle.
Mistake #3: Wrong Tools, Wrong Results
This is not a job for a simple bucket and stick. To get a professional finish, you need professional tools. A low-speed drill mixer (under 300 rpm) is essential to avoid whipping air into the mixture, which causes bubbles and pinholes.
A gauge rake helps spread the compound to a uniform depth, while a spiked roller is crucial for popping air bubbles and helping the material settle smoothly. Attempting the job without these tools is a gamble you’ll likely lose.
Mistake #4: Environmental Sabotage – Temperature and Drafts
Self-leveling compound is a diva; it demands a controlled environment. The ideal temperature is typically between 15-25°C. If it’s too hot, it will cure too fast, not allowing enough time for it to flow and level.
Drafts from open doors or windows are also your enemy. Airflow across the surface causes rapid drying, which can lead to waves, cracks, and an uneven finish. You must seal the room during and after the pour.
The Damage Report: Assessing Your Uneven Floor
Before you can formulate a rescue plan, you need to diagnose the problem accurately. Get a long, straight edge or a level and lay it across the floor. Identify the high spots, the low spots, the ridges, and the waves. Understanding the specific nature of the unevenness will dictate the best method for repair.
Some problems, like minor bumps, are an easy fix. Others, like widespread low spots, require a more involved solution. Take the time to map out your floor’s topography before proceeding.
| Problem | Common Cause | Primary Solution |
|---|---|---|
| Bumps and Ridges | Pouring too slowly; not maintaining a wet edge. | Grinding or sanding down high spots. |
| Waves or Ripples | Drafts or improper spreading with a trowel. | Grinding and/or applying a thin skim coat. |
| Low Spots / Dips | Insufficient material; compound set too quickly. | Applying a second, properly primed coat. |
| Pinholes / Bubbles | Mixing too fast; unprimed subfloor (outgassing). | Skim coating with a feather-finish compound. |
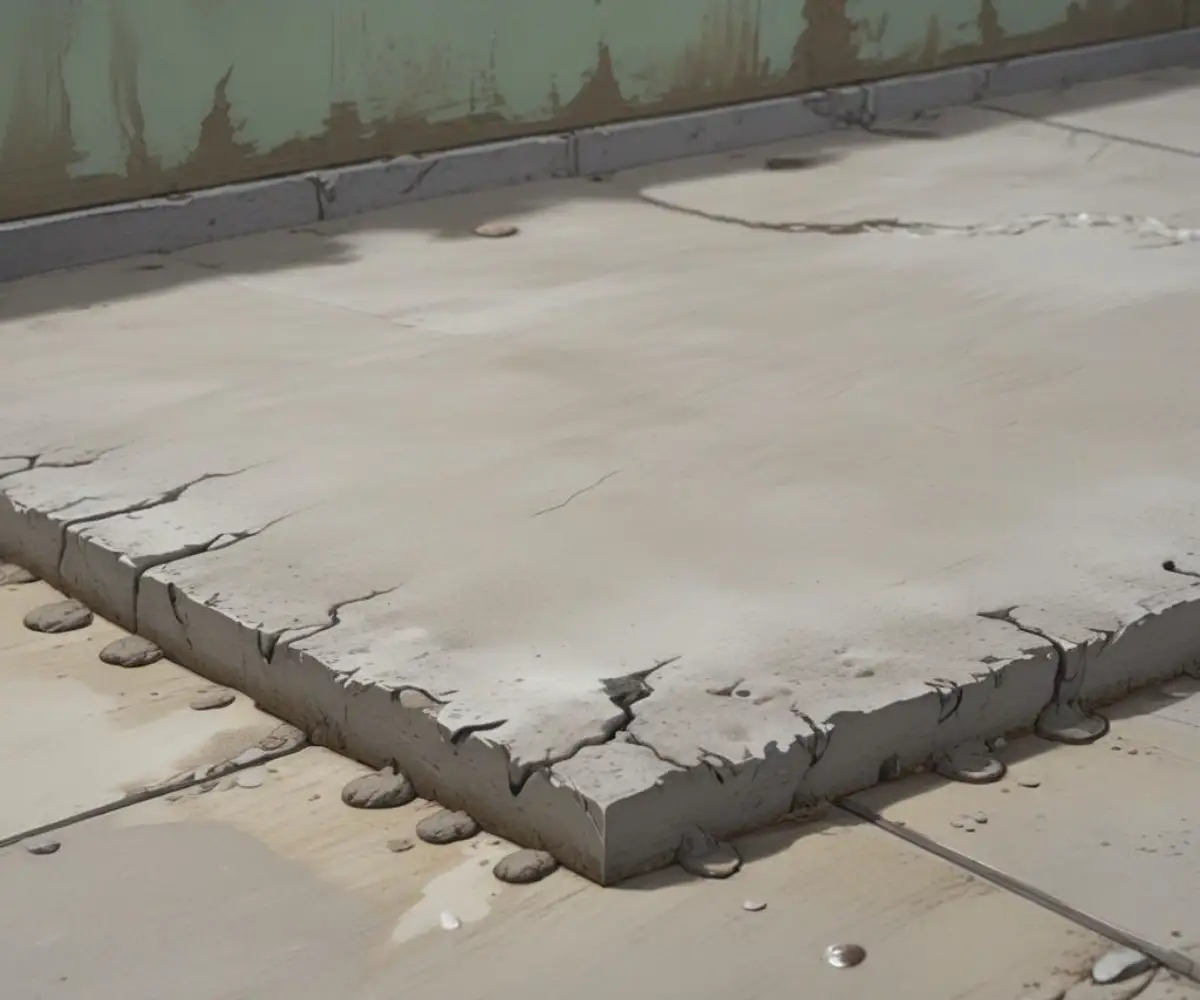
| Cracking / Peeling | Poor surface prep; too much water in mix. | Removal and starting over. |
Rescue Mission: How to Fix Self-Leveling Compound That Isn’t Flat
Seeing an uneven result is frustrating, but it’s often salvageable. Depending on the severity of the imperfections, you have several options to get the flat surface you need for your final flooring.
From simple sanding to pouring a second coat, here’s how to tackle the most common issues. Remember, a poorly leveled floor can cause major headaches down the line, especially with floating floors. For more complex leveling challenges, you may need to explore broader strategies like those used to fix an uneven second floor.
For Minor Imperfections: Scraping and Sanding
If you have small bumps or ridges, you might get lucky with a simple fix. Within the first few hours of pouring, some high spots can be scraped down with a flat trowel or scraper. Be careful not to gouge the surface.
Once the compound has fully cured (usually after 24 hours), you can address high spots with mechanical abrasion. A power sander with coarse-grit sandpaper can make quick work of small bumps. For larger areas or harder compounds, you may need to rent a concrete grinder.
For High Spots and Ridges: The Power of Grinding
When you have significant high spots or ridges, grinding is the most effective solution. You can rent a walk-behind concrete grinder for large areas or use a handheld angle grinder with a diamond cup wheel for smaller spaces and edges.
Always wear proper personal protective equipment (PPE), including a high-quality dust mask, safety glasses, and hearing protection. Grinding creates a massive amount of fine dust that is hazardous to inhale. Connect the grinder to a dust extractor for the best results.
For Low Spots and Dips: The Second Pour
Can you pour a second coat of self-leveling compound? Yes, you absolutely can, but the preparation is critical. You cannot simply pour a new layer over the old one and hope for the best.
First, you must wait for the initial layer to fully cure. Then, you must prime the existing, uneven layer. The primer acts as a bonding agent, ensuring the new coat adheres properly to the first. Without primer, the second layer is likely to delaminate and fail.
When to Call It Quits and Start Over
Sometimes, the pour is a total failure. If the compound is soft, crumbly, or has widespread cracking and peeling, the mix was likely too wet or the subfloor was contaminated. In these severe cases, the only real solution is to remove the failed compound and start from scratch.
This is a labor-intensive job that involves chipping and scraping the material off the subfloor. It’s a tough pill to swallow, but installing flooring over a failed underlayment will only lead to bigger problems later on. This is especially true when dealing with old adhesives, as outlined in our guide on installing vinyl plank over old glue.
Prevention is the Best Cure: Pro Tips for a Perfect Pour Every Time
The best way to fix a bad pour is to avoid it in the first place. By following a strict process and using the right techniques, you can achieve a perfectly flat floor on your first try.
This isn’t just about saving yourself the headache of repairs. A perfectly prepped subfloor is the foundation for a professional-looking and long-lasting flooring installation.
Master the Mix
Read and follow the manufacturer’s instructions to the letter. Use a measuring bucket to get the water-to-powder ratio exactly right. Mix for the specified time with a proper low-speed mixer until the consistency is smooth and lump-free. For larger areas, have a second person mixing while the first person is pouring to ensure you can maintain a wet edge.
The principles of good prep and application are universal, whether you’re working on concrete or considering applying leveling compound over tile. The goal is always a strong, well-bonded, and flat surface.
Prime Like a Pro
Do not skip the primer. Clean the subfloor meticulously by vacuuming all dust and debris. Apply the primer recommended by the compound manufacturer using a roller or brush, ensuring even coverage. Porous substrates like concrete may require two coats.
Allow the primer to dry to the correct tackiness as specified in its instructions. This step is arguably just as important as the mix itself for achieving a strong bond and a smooth finish.
Control Your Environment
Take control of the job site. Close all windows and doors to prevent drafts. Turn off any HVAC systems or fans that could blow air across the surface. Ensure the room temperature is stable and within the recommended range for the product you are using.
By eliminating environmental variables, you give the self-leveling compound the stable conditions it needs to flow, settle, and cure correctly. This control is the final piece of the puzzle for a successful pour.
From Bumpy Mess to Flawless Foundation
A self-leveling compound that doesn’t turn out flat is a major setback, but it’s not the end of the world. By understanding the common causes of failure—from bad mixing to poor preparation—you can diagnose your specific problem and implement the right fix.
Whether it’s grinding down high spots or applying a second, carefully primed coat, you can rescue your project and create the flawless foundation your new flooring deserves. More importantly, by adopting a professional process for your next pour, you can ensure a perfect result every single time.