Mysterious Sand in Your House? It’s Not What You Think (and It’s a Big Warning Sign)
You sweep it up, and a few days later, it’s back. Small, mysterious piles of what looks like sand appear along your baseboards, on windowsills, or in the corners of your basement. It’s easy to dismiss it as simple dust or dirt tracked in from outside, but ignoring these little mounds could be a costly mistake.
That “sand” is often not sand at all. It is frequently the first—and sometimes only—warning sign of a serious problem brewing within your walls, from destructive pests to a crumbling foundation. Understanding the true source of these particles is the critical first step in protecting your home from significant damage.
You'll Learn About
Is It Really Sand? How to Identify the Source
Before you can solve the problem, you must become a detective. The appearance, texture, and location of these sand-like piles provide crucial clues to their origin. What you initially think is sand could actually be pest droppings (frass), deteriorating building materials, or even granules from an aging roof.
Your first step is to collect a sample. Use a clear bag or container and take a close-up photo. Examine the particles with a magnifying glass. Are they uniform in shape and size? Do you see any insect parts? Is the material gritty like sand or fibrous like sawdust?
The #1 Culprit: Wood-Destroying Insects
In many cases, the most alarming cause of sand-like debris is wood-destroying insects. These pests silently chew through the structural components of your home, leaving behind tell-tale waste that looks deceptively like sawdust or sand.
Carpenter Ants: The Tidy Destroyers
A common misconception is that carpenter ants eat wood. In reality, they excavate it, tunneling through wooden structures to create smooth, clean galleries for their nests. To keep their nests tidy, they push the wood shavings, which is called “frass,” out of small openings known as “kick-out” holes.
This frass looks like fine, fibrous sawdust and often contains parts of dead ants or other insects. You’ll typically find these piles on the floor directly below an infested area, such as under a window frame, along a baseboard, or beneath exposed ceiling beams. If you are seeing random ants in house, no trail, it could be a sign these pests are already established within your walls.
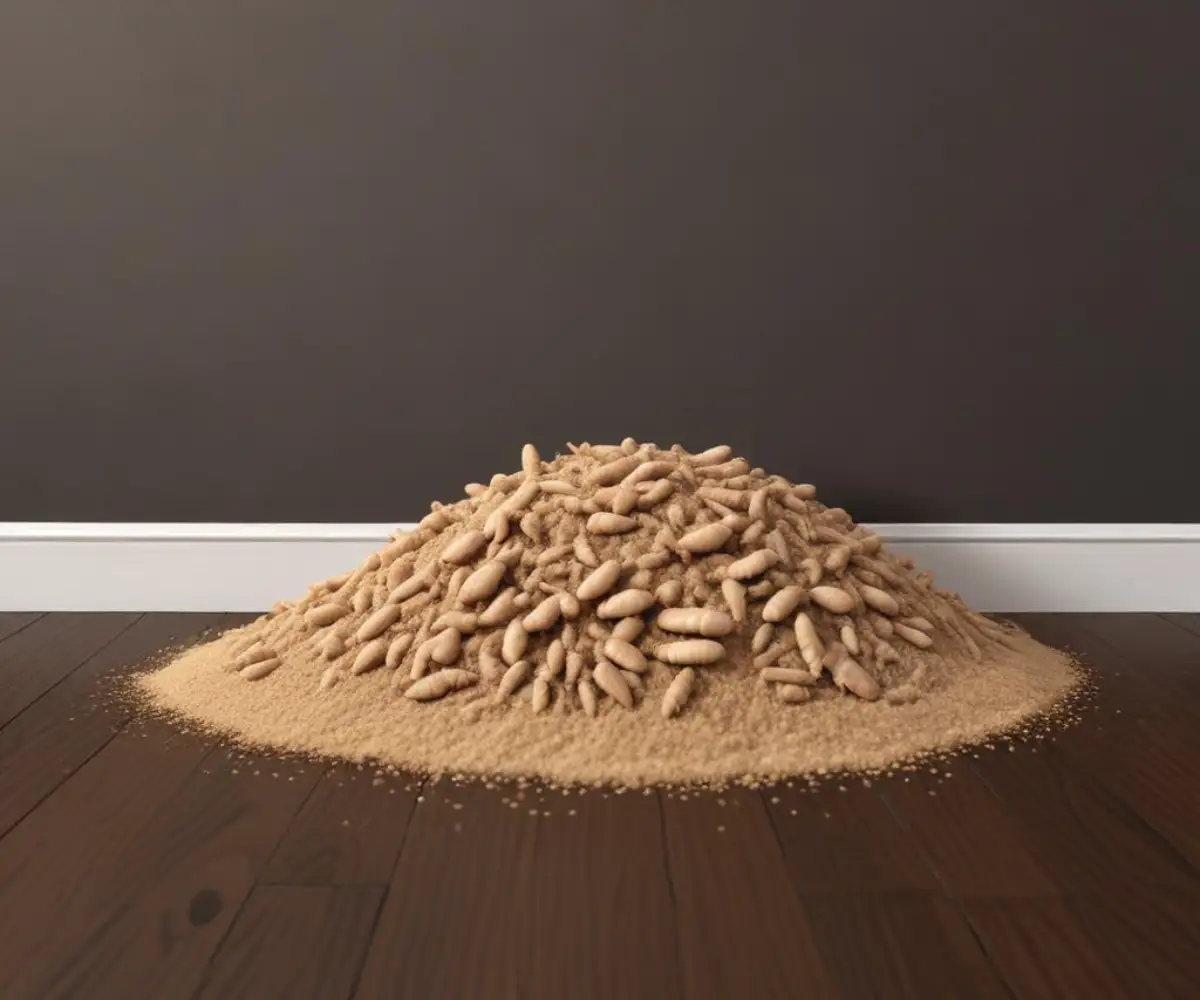
Termites: The Silent Home-Eaters
Termites are a homeowner’s worst nightmare, and their frass is a definitive sign of an active infestation. Drywood termites, in particular, live entirely within the wood they consume. Like carpenter ants, they create kick-out holes to push their waste out of their galleries, keeping their living space clean.
However, termite frass looks distinctly different from that of carpenter ants. It consists of very small, hard, six-sided pellets. The color can range from light tan to dark brown, depending on the wood being eaten, and the piles often resemble coffee grounds or sand. Finding these tiny, uniform pellets is a red flag that demands immediate action.
When Your House Itself is the Source of the Sand
If you’ve ruled out pests, the sand may be coming from the very materials your house is built with. Over time, moisture and age can cause concrete, plaster, and mortar to break down, shedding sand-like particles.
Crumbling Concrete or Mortar
This is especially common in basements and crawl spaces with older foundations. Moisture penetrating through foundation walls can cause the concrete or the mortar between stones to degrade and crumble. The result is a gritty, sandy powder accumulating on the floor near the base of the walls.
You might also see a white, chalky substance called efflorescence, which is caused by salts leaching out of the concrete with the moisture. Preventing water intrusion is key, which is why a proper sealant between driveway and house is a small fix that can prevent the kind of moisture damage that leads to crumbling foundations.
Decomposing Plaster Walls
Homes built before the 1950s often have lath and plaster walls. While durable, this plaster can become brittle with age and break down, especially if exposed to moisture or vibrations. When this happens, fine grains of the plaster and sand aggregate can fall from behind the baseboards or out of small cracks in the walls.
Deteriorating Grout or Adhesives
In bathrooms, kitchens, or any tiled area, the sand-like material could be from old, deteriorating grout. Over years of use and cleaning, grout can break down and crumble, leaving sandy particles on the floor near the tile lines.
Less Common (But Still Possible) Causes
Sometimes, the source of the sand is less obvious and originates from unexpected places. These culprits are often overlooked but can be the source of the persistent, mysterious debris appearing in your home.
One such source is a deteriorating chimney flue liner. Older clay tile liners can break down over time, shedding sandy or gritty material that falls down the chimney and appears in the fireplace or even leaks out from behind the wall. Another surprising source is asphalt shingle granules. As a roof ages, the gritty granules on the shingles come loose. They can get into the attic and eventually filter down into living spaces through gaps around ceiling fans or recessed lighting.
Your Step-by-Step Action Plan
Discovering sand-like particles is unsettling, but a methodical approach can help you identify the source and take the correct action. Don’t just clean it up and forget about it; follow these steps to get to the root of the problem.
Step 1: Collect a Sample. Carefully gather some of the material in a sealed plastic bag. Note the exact location and date you found it. This sample will be invaluable for comparison and for showing to a professional if needed.
Step 2: Investigate the Area. Look directly above where you found the pile. Check walls, ceilings, and window frames for tiny, pin-sized holes, cracks, water stains, or damaged wood. Tap the surrounding surfaces gently and listen for a hollow sound, which could indicate galleries within the wood.
Step 3: Compare Your Findings. Use the table below to help diagnose the issue. Match the appearance and location of your sample to the likely culprits.
| Symptom | Appearance (Color/Texture) | Common Locations | Likely Culprit |
|---|---|---|---|
| Tiny, uniform pellets | Light tan to dark brown; hard, six-sided pellets. Resembles coffee grounds. | Piles under wooden furniture, windowsills, baseboards, or in attics. | Drywood Termites |
| Fibrous shavings | Light wood color; looks like fine sawdust mixed with insect parts. | Piles under kick-out holes in walls, ceilings, or near wooden beams. | Carpenter Ants |
| Gritty, dusty powder | Gray or whitish; feels like sand mixed with fine cement dust. May accompany a white, chalky residue. | Along the base of foundation walls in basements or crawl spaces. | Deteriorating Concrete/Mortar |
| Fine, sandy grit | White, tan, or gray; fine grains mixed with chalky dust. | Along baseboards of older interior walls. | Crumbling Plaster |
Step 4: Determine the Solution. If you suspect termites or carpenter ants, do not wait. Contact a licensed pest control professional immediately for an inspection. For issues like crumbling concrete or plaster, the solution depends on the severity. Minor grout repair can be a DIY project, but a deteriorating foundation requires a structural expert.
Remember that some home repairs require professional expertise for safety and compliance. Just as you’d need to ask, “Do I need a permit to rewire my house?” for electrical work, significant structural repairs often require permits and professional oversight to ensure they are done correctly and safely.
Preventing Future “Sand” Scares
Once you’ve addressed the immediate problem, the best strategy is proactive prevention. Regular maintenance can help you avoid future issues with both pests and structural materials.
Start by controlling moisture, as it is the root cause of many of these problems. Ensure your gutters are clean and that water drains away from your foundation. Inside, fix any plumbing leaks promptly and use exhaust fans in bathrooms and kitchens to reduce humidity.
Finally, conduct regular inspections of your home’s trouble spots. At least twice a year, check your basement, attic, and crawl space for any unusual signs like sand-like piles, water stains, or damaged wood. Catching these signs early is the key to preventing a small issue from turning into a major, expensive repair.
![Chipmunk Behind Siding [What to Do?]](https://fixitinthehome.com/wp-content/uploads/2023/02/Chipmunk-Behind-Siding-768x432.webp)