Wiring a Ceiling Without Attic Access? Here’s the No-Sweat Guide
You’ve found the perfect spot for a new ceiling fan or a stunning pendant light, but there’s a major roadblock: no attic access. For many homeowners, this is where the project stalls. The thought of cutting massive holes in the ceiling is daunting, but running wires through that inaccessible space doesn’t have to be a project-ending nightmare.
The challenge lies in the unseen structure above your head. Between your ceiling and the floor above, there’s a network of joists, potential plumbing, and other obstacles. Without a clear path from above, navigating this maze requires the right strategy and tools.
Fortunately, with careful planning and a bit of patience, fishing wires through a finished ceiling is an achievable DIY task. This guide breaks down the professional methods for conquering this common home improvement hurdle with minimal mess and maximum success.
You'll Learn About
First, Plan Your Attack: Mapping the Unseen
Before you make a single cut, you need a clear plan. Careful preparation is the most critical step to avoid unnecessary drywall repair and potential hazards. Your goal is to find the most direct and obstacle-free path from your power source to the new fixture location.
Understanding Your Ceiling’s Structure
The first piece of the puzzle is determining which direction your ceiling joists run. Joists are the parallel beams that support the floor above and provide the framework for your ceiling. Running your wire parallel to the joists is always the easiest route, as it allows you to stay within a single joist bay.
Use a high-quality stud finder to locate the joists. Mark their positions lightly on the ceiling with a pencil. This simple map will be your guide and prevent you from planning a path that requires drilling through multiple joists—a much more complex task.
Power Source and Path
Next, identify your power source. This is typically an existing wall switch or outlet. Once located, map the most logical path to the desired ceiling location. Consider the joist direction. If the joists run perpendicular to your desired wire path, the job becomes more invasive, but not impossible.
Essential Tools for a Clean Installation
Having the right tools is non-negotiable for this job. Attempting it with the wrong equipment will lead to frustration and a messy outcome. These are the key items that will make the process smoother and more professional.
| Tool | Primary Use | Why It’s Essential |
|---|---|---|
| Stud Finder | Locating ceiling joists | Prevents drilling into structural supports and helps map the easiest wire path. |
| Fish Tape or Fiberglass Rods | Pulling wire through cavities | This is the star of the show, allowing you to guide wires through the ceiling. |
| Drywall Saw | Cutting clean holes | Provides precise control for cutting openings for boxes and access points. |
| Flexible Drill Bit | Drilling through fire blocks/joists | A long, flexible bit allows you to drill angled holes in tight spaces. |
| Voltage Tester | Confirming power is off | Safety is paramount. Never work on wiring without verifying the circuit is dead. |
The Step-by-Step Process to Run Wire Through a Ceiling
With your plan and tools ready, it’s time to begin. Remember to always turn off the power at the circuit breaker and verify with a voltage tester before touching any wires.
Step 1: Cut Your Openings
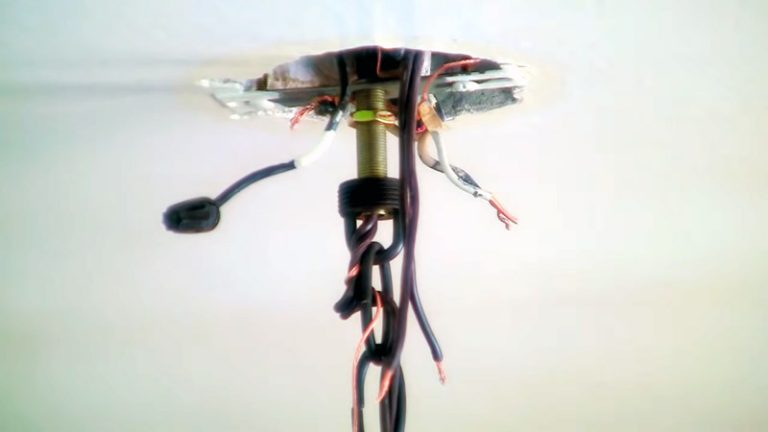
You will need to cut at least two holes: one at the fixture location and one near the wall where the wire will run down to the switch. At the new fixture location, trace the outline of your new electrical box onto the ceiling. Use a drywall saw to carefully cut out this opening.
Next, at the top of the wall, directly above your power source switch, cut a small access hole in the ceiling. This hole, about 4×4 inches, only needs to be large enough to drill through the top plate of the wall—the horizontal beam that forms the top of the wall’s frame.
Step 2: Drill the Path
From the access hole in the ceiling, you need to drill through the wall’s top plate to create a path for the wire to run down to the switch box. An angle drill or a flexible drill bit can make this easier. The goal is a clean hole that enters the wall cavity where the switch is located.
If you must cross joists, this is where the process requires more work. You’ll need to cut small, rectangular access holes alongside each joist you need to cross. These holes allow you to drill through the joist and feed the wire through to the next bay.
Step 3: Fishing the Wire
This is where your fish tape or fiberglass rods come into play. Start at the fixture opening and feed the fish tape toward the access hole at the wall. This may take some maneuvering to get past insulation or other minor obstructions.

Once the end of the fish tape is visible at the access hole, securely attach your electrical cable to it with electrical tape. Make sure the connection is smooth and tapered to prevent snagging. Go back to the fixture opening and carefully pull the fish tape, drawing the electrical cable along with it.
Step 4: Running Wire Down the Wall
Now, feed the fish tape from the access hole down through the hole in the top plate until it reaches the switch box opening in the wall. You may need to remove the existing switch to grab the tape. Attach the other end of your cable and pull it down through the wall.
Leave about 12-18 inches of excess wire at both the fixture location and the switch box to make connections. It’s much easier to trim a little extra than to come up short. Before making your final connections, it is wise to address any cosmetic issues, such as a light fixture not flush with ceiling, which can be fixed during this phase.
Dealing with Obstacles: Fire Blocks and Insulation
In many homes, walls contain horizontal fire blocks between the studs. A flexible, long drill bit is invaluable for drilling through these without cutting additional holes in the wall. You can often locate fire blocks by using a stud finder horizontally across the wall.
Insulation can also make fishing wires tricky. Fiberglass rods are often more effective than steel fish tape in insulated cavities, as they are stiffer and less likely to get tangled. Patience is key when navigating through dense insulation.
Alternative Methods and When to Use Them
Sometimes, fishing wire through the ceiling isn’t the best option. Crown molding or surface-mounted wire channels (raceways) can be practical alternatives. Wire molding can be painted to match the wall and ceiling, offering a less invasive way to conceal wires, especially in rooms where cutting drywall is not desirable.
These alternatives are particularly useful for low-voltage wiring, such as for speakers or data cables. For some installations, you might consider forgoing wires entirely. For instance, exploring how to replace a wired smoke detector with a wireless model could be a simpler solution than running new power lines.
Frequently Asked Questions
Do I have to cut holes in my ceiling to run wires without attic access?
Yes, in most cases, you will need to cut access holes in your ceiling and possibly walls. This allows you to drill through joists and navigate the wire to its destination. The size and number of holes will depend on the path of the wire and the direction of your ceiling joists.
What tools are needed to run a wire through a finished ceiling?
You will typically need tools for cutting drywall, a drill with flexible long bits, and fish tape or glowing fiberglass rods to guide the wire. A stud finder is also essential to locate the ceiling joists before you begin cutting.
Is it possible to run a wire across ceiling joists without attic access?
Running wires perpendicular to joists is more challenging as it requires drilling a hole through each joist. This often necessitates cutting a series of holes along the path of the wire to access and drill through each joist. Running wires parallel to the joists is generally easier as you can often fish the wire through the cavity between two joists.
Will I need to repair my drywall after running the wires?
Yes, you will need to patch and repaint the holes made in the drywall to access the ceiling space. Carefully cutting the drywall can make patching easier. Some people opt to cover the access channel with decorative molding as an alternative to drywall repair.
Final Connections and Patching
Once the wire is in place, you can install your new electrical boxes and make the final wiring connections. If you’re installing a heavy fixture like a chandelier, ensure you’re using a fan-rated box that is properly secured. The process is similar to what’s involved when learning how to change a high ceiling chandelier, where secure mounting is critical.
With the wiring complete, you can patch the access holes. Carefully replace the pieces of drywall you cut out, secure them with screws, and use joint compound and drywall tape to seamlessly blend the patch with the rest of the ceiling. After sanding and painting, the repair will be virtually invisible.
Safety Is Not a Shortcut
Working with electricity requires diligence. Always double-check that the power is off, and if you feel uncertain at any point, do not hesitate to contact a licensed electrician. Faulty wiring is a serious fire hazard, and professional guidance is worth the investment for peace of mind.
![Splice 10/3 Wire [is Easy to Do]](https://fixitinthehome.com/wp-content/uploads/2023/02/Splice-10_3-Wire-768x432.webp)