Run Cable Under Siding: The Pro Secret to a Flawless Finish
You have the perfect spot for that new security camera, outdoor speaker, or landscape lighting. The only problem? A tangle of ugly, exposed wires will ruin your home’s curb appeal and create a potential hazard. This is a common frustration for homeowners looking to upgrade their outdoor living spaces or security systems.
Exposed cables are not just an eyesore; they are vulnerable to weather damage, UV degradation, and accidental cuts from landscaping tools. While some might resort to unsightly clips or surface-mounted conduit, there is a far superior method. Learning to properly run cable under siding provides a clean, professional, and protected installation that preserves the beauty and integrity of your home.
You'll Learn About
Why Hiding Cables Under Siding is the Superior Choice
Tucking cables away behind your home’s siding isn’t just about aesthetics; it’s a strategic move for longevity and safety. This method offers unparalleled protection from the elements, shielding sensitive wiring from rain, snow, and harsh sunlight that can cause insulation to become brittle and crack over time. A hidden cable is a safe cable.
Furthermore, it completely eliminates the risk of someone tripping over a loose wire or a landscaper accidentally severing a crucial connection. Compared to other methods, running cables under the siding provides a truly integrated solution that adds functionality without subtracting from your home’s visual appeal, making it the gold standard for any exterior wiring project.
The Downside of Exposed Wiring
Leaving wires exposed or using surface clips might seem like an easy fix, but it’s a short-term solution with long-term consequences. These methods leave cables susceptible to physical damage and significantly shorten their lifespan due to environmental exposure. They also clutter the exterior of your home, potentially lowering its curb appeal.
In contrast, a concealed installation maintains a clean and intentional look. It shows a level of care and attention to detail that speaks to the overall maintenance of your property. For a truly professional result, taking the extra step to hide the wiring is always the best course of action.
Before You Begin: Planning for Success
Proper preparation is the key to a smooth and successful project. Before you touch a single tool, it’s essential to plan your cable route, gather the necessary materials, and understand the safety precautions involved. A few minutes of planning can save you hours of frustration and potential rework.
This initial phase ensures you have the right type of cable for outdoor use, the correct tools to work with your siding, and a clear path that avoids obstacles. Rushing this step is one of the most common mistakes, leading to improper installations that can damage your home or the cable itself.
Choosing the Right Cable for the Job
Not all cables are created equal, and using an indoor-rated cable for an outdoor application is a recipe for disaster. Outdoor environments demand cables with robust, weather-resistant jacketing designed to withstand moisture, temperature fluctuations, and UV radiation. Always look for cables specifically labeled for “outdoor” or “direct burial” use.
For networking, a CMX-rated Cat6 cable is ideal for PoE cameras. For video, an outdoor-rated RG6 coaxial cable is the standard. For low-voltage projects like landscape lighting, use appropriately gauged landscape wire. Choosing the correct cable is the first and most critical step in ensuring a reliable, long-lasting installation.
Essential Tools and Materials
Having the right tools on hand will make the job significantly easier and safer. The most important specialty tool is a siding zip tool, which is designed to unlock and lock panels of vinyl siding without causing damage. Attempting this with a screwdriver or pry bar can easily crack or break the siding.
Beyond that, you’ll need standard DIY tools like a power drill, fish tape for guiding the wire, and high-quality outdoor silicone sealant. This is where a comprehensive checklist becomes invaluable, preventing last-minute trips to the hardware store.

| Tool/Material | Purpose | Pro Tip |
|---|---|---|
| Siding Zip Tool | Safely unlocks and fastens vinyl siding panels. | Keep the tool parallel to the siding and use a gentle “unzipping” motion. |
| Fish Tape or Fiberglass Rods | Guides the cable through the space behind the siding. | Tape the cable securely to the fish tape to prevent it from detaching midway. |
| Power Drill & Bits | Creates entry and exit holes through the wall. | Use a bit size just large enough for the cable to pass through to ensure a tight seal. |
| Outdoor-Rated Silicone Sealant | Weatherproofs the drilled holes to prevent moisture and pest entry. | Choose a paintable sealant to match your home’s exterior color for a cleaner finish. |
| Outdoor-Rated Cable | Ensures durability against weather, UV rays, and moisture. | Always purchase a slightly longer cable than you think you’ll need to allow for slack. |
The Step-by-Step Guide to Running Cable Under Siding
With your route planned and tools gathered, it’s time to begin the installation. This process can be broken down into a few manageable steps. Working methodically and carefully will ensure you don’t damage your siding or the cable, resulting in a clean and durable setup.
Remember that patience is key, especially when working with older, more brittle siding. Take your time, and if you encounter resistance, stop and reassess rather than forcing a tool or cable into place. This careful approach is the difference between a DIY success and a costly repair.
Step 1: Create Your Entry and Exit Points
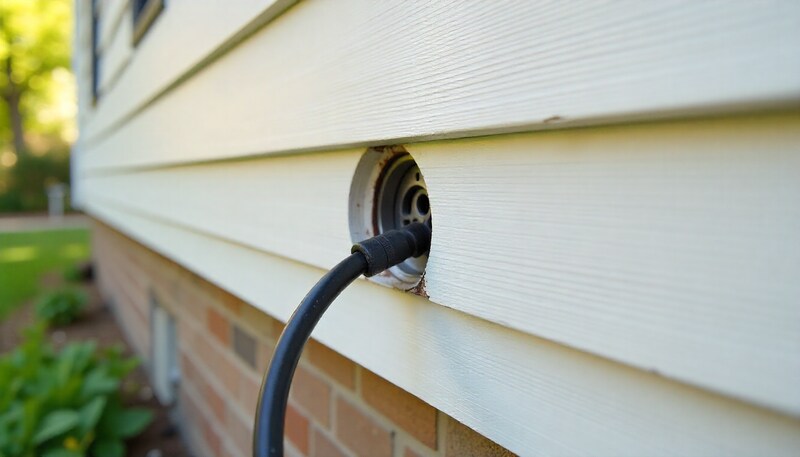
The first physical step is creating a pathway for your cable from the inside of your home to the outside. This requires careful measurement to ensure the hole emerges exactly where you need it behind the siding. Understanding how to drill a hole from inside to outside correctly is paramount to avoiding costly mistakes and ensuring a weatherproof seal.
Always drill from the inside out, and angle the hole slightly downwards toward the exterior. This simple trick uses gravity to help prevent water from ever wicking its way into the wall cavity. After drilling, insert a plastic or rubber bushing to protect the cable’s jacket from being chafed by the rough edge of the hole.
Step 2: Unlock the Siding with a Zip Tool
This is where the magic happens. A siding zip tool allows you to gently separate the interlocking seam of a vinyl siding panel. Hook the tool under the bottom lip of the panel you want to run the cable behind and pull downward and outward to release the lock.
You don’t need to remove the entire panel. Simply unlocking a section long enough to work with is sufficient. This provides access to the channel between the siding and the wall sheathing, which is the perfect protected raceway for your cable.
Step 3: Fish the Cable Along Your Path
With the siding unlocked, you can now use your fish tape or fiberglass rods to guide the cable. Start at your entry hole and push the fish tape along the channel behind the siding toward your destination point—the location of your camera, speaker, or light fixture.
Once the fish tape reaches the endpoint, securely attach the cable to its hook using electrical tape. Go back to the starting point and gently pull the fish tape, drawing the cable along with it. Having a helper feed the cable can prevent snags and kinks during this process.
Step 4: Secure the Siding Panel
After the cable is in position, it’s time to lock the siding panel back into place. Ensure the cable is lying flat and not pinched in the interlocking seam, which could damage the wire over time. Hook the bottom lip of the panel back onto the panel below it.
Using your siding zip tool, push the locking edge back into place, moving along the panel until you hear a satisfying “click,” indicating it is secure. Run your hand along the seam to confirm it is fully engaged and flat against the house.
Step 5: Seal for Ultimate Protection
The final and most critical step for weatherproofing is to seal the hole where the cable enters the house. Apply a generous bead of high-quality, 100% silicone sealant around the cable where it passes through the wall. This creates a permanent, flexible, and waterproof barrier.
This seal prevents moisture, drafts, and insects from entering your home through the wall penetration. Do not skip this step; an unsealed hole is an open invitation for water damage and pest infestations down the road.
Advanced Techniques and Professional Considerations
While the basic method works for most straight runs, you may encounter obstacles like windows, exterior outlets, or corners. Navigating these requires a bit more finesse. For instance, when approaching a window, you may need to utilize the J-channel—the trim piece around the window—as a conduit to guide the wire discreetly.
Thinking ahead is also the mark of a pro. If there’s any chance you’ll need to run another cable in the future, consider running a flexible conduit or leaving a pull string in place. This “future-proofing” makes adding a second camera or device later incredibly simple without having to repeat the entire process.
Working with Different Siding Materials
While this guide focuses on vinyl siding, the principles can be adapted for other materials like wood or fiber cement. These materials are more rigid and less forgiving than vinyl. You may need to carefully pry a board loose or, in some cases, remove a section entirely to gain access.
With wood or fiber cement, it’s even more critical to pre-drill holes for any mounting hardware and to seal all penetrations meticulously to prevent moisture from getting trapped and causing rot or deterioration.
Common Mistakes to Avoid at All Costs
Even with a solid plan, pitfalls exist. The most dangerous mistake is using indoor-rated wiring for an outdoor project. It will fail, often within a single season, leading to system malfunctions and the need to do the job all over again.
Another frequent error is pinching the cable in the siding seam when locking it back in place. This can sever the connection immediately or cause an intermittent fault that is difficult to troubleshoot. Always double-check that the cable has free space before sealing the panel.
Finally, improper sealing of the entry hole can lead to significant water damage inside your walls. Take the extra minute to apply sealant thoroughly. This simple action protects the much larger investment you have in your home.
A Clean Installation for a Polished Home
Running a cable under your siding is more than just a technical task; it’s about maintaining the aesthetic integrity and value of your home. By taking a thoughtful, careful approach, you can install outdoor electronics like security cameras or beautiful gable peak lighting without a single distracting wire in sight.
The skills used in a project like this build confidence for other DIY tasks, from simple interior jobs like learning how to install floating shelves without studs to more complex undertakings. With the right tools and knowledge, you can achieve a professional-grade result that is clean, protected, and built to last.


