Rotten Subfloor Under Bathtub? Replace It Without Removing the Tub
That soft, spongy feeling under your feet near the bathtub is a homeowner’s nightmare. It’s a classic sign that water has invaded the unseen layers of your floor, causing the subfloor to rot. Immediately, you envision a massive, costly, and messy bathroom demolition.
Conventional wisdom often dictates that fixing a rotten subfloor means everything on top of it must come out, including the bathtub. This can turn a targeted repair into a full-blown remodel. But there is a better, more efficient way to tackle this critical repair.
It is entirely possible to replace a rotten subfloor without removing the bathtub. With the right tools, techniques, and a methodical approach, you can restore the structural integrity of your bathroom floor, saving significant time, money, and stress.
You'll Learn About
Why You Can’t Ignore a Damaged Subfloor
A compromised subfloor is far more than a cosmetic issue; it is a serious structural problem. The subfloor is the foundation that supports the immense weight of your bathtub, the surrounding walls, and anyone using the room. Ignoring the initial signs of damage can lead to catastrophic failure.
When a subfloor begins to rot, it loses its strength and stiffness. This can cause the bathtub to shift, leading to cracked tiles and broken plumbing seals, which in turn allows more water to leak, accelerating the decay. In severe cases, the deterioration can compromise the floor joists themselves, putting the entire structure at risk. You can learn more about how a tub’s weight impacts your structure, especially on an upper level, in our guide to second-floor bathtub weight considerations.
Furthermore, the persistent moisture that causes subfloor rot is the perfect breeding ground for mold and mildew. These fungi can release spores into the air, creating unhealthy indoor air quality and posing health risks to your family. A musty odor in the bathroom is a frequent indicator of hidden mold growth beneath the flooring.
Tools and Materials: Your Arsenal for a Solid Repair
Gathering the correct tools and materials before you begin is crucial for a smooth and successful project. Having everything on hand prevents delays and ensures you can complete each step safely and effectively. This table outlines everything you’ll need to get the job done right.
| Category | Item | Purpose |
|---|---|---|
| Tools | Oscillating Multi-Tool | Making precise, flush cuts against the bathtub and wall studs. |
| Circular Saw | Cutting straight lines in the main area of the subfloor. | |
| Pry Bar & Hammer | Removing the old, rotten subfloor sections. | |
| Drill/Impact Driver | Securing the new subfloor and support blocking. | |
| Shop Vacuum | Cleaning debris from the work area and joists. | |
| Tape Measure & Square | Ensuring accurate measurements and cuts for a perfect fit. | |
| Materials | Plywood/OSB | Marine-grade or pressure-treated plywood is highly recommended for moisture resistance. Match the thickness to your existing subfloor (typically 3/4 inch). |
| 2×4 or 2×6 Lumber | Creating support blocking between the floor joists. | |
| Construction Adhesive | Bonding the new subfloor to the joists and blocking to prevent squeaks. | |
| Wood Screws | Fastening the new subfloor and blocking securely. | |
| Waterproof Caulk/Sealant | Sealing the seams of the new patch to prevent future water intrusion. | |
| Safety Gear | Safety glasses, dust mask, and gloves are non-negotiable. |
The Step-by-Step Guide to Replacing Your Subfloor
With your tools and materials ready, it’s time to tackle the repair. This process is methodical and requires patience. Working carefully will ensure a professional-quality result that lasts for years to come.
Step 1: Preparation and Damage Assessment
First, ensure a safe work environment. Turn off the water supply to the bathroom fixtures. Protect any remaining fixtures and surfaces from dust and debris with plastic sheeting.
Carefully remove the finished flooring (vinyl, tile, etc.) to fully expose the subfloor around the damaged area. Use a utility knife and pry bar as needed. You need a clear view of the extent of the rot to plan your cuts.
Use a screwdriver or an awl to probe the wood. Soft, crumbling wood indicates rot. Mark the perimeter of the area you need to remove with a pencil, extending your lines at least 4-6 inches into solid, healthy wood on all sides. This ensures you remove all compromised material.
Step 2: Cutting and Removing the Old Subfloor
This is the most critical phase of the project. The goal is to remove the damaged section without disturbing the bathtub. An oscillating multi-tool is the star of this step.
Use the multi-tool with a wood-cutting blade to make precise cuts flush against the base of the bathtub and along the wall plates. For the open areas away from the tub, set the blade depth on your circular saw to match the thickness of your subfloor. This prevents you from accidentally cutting into the floor joists below.
Once the perimeter is cut, make additional cuts across the rotten section to break it into smaller, more manageable pieces. Use a pry bar and hammer to carefully lift and remove the damaged wood. Vacuum the entire area thoroughly to remove all debris.
Step 3: Preparing Joists and Installing Support Blocking
With the rotten subfloor gone, inspect the exposed floor joists for any signs of water damage or rot. If a joist is soft or discolored, it must be reinforced. This is typically done by “sistering”—attaching a new joist of the same dimensions alongside the damaged one with structural screws or bolts.
Next, you must install support blocking around the entire perimeter of the hole you created. Cut 2×4 or 2×6 lumber to fit snugly between the joists. Screw these blocks flat against the joists, positioning them so their top edge sits flush with the top of the joists. This blocking creates a solid ledge to support the edges of your new subfloor patch, which is essential for a strong, squeak-free repair.
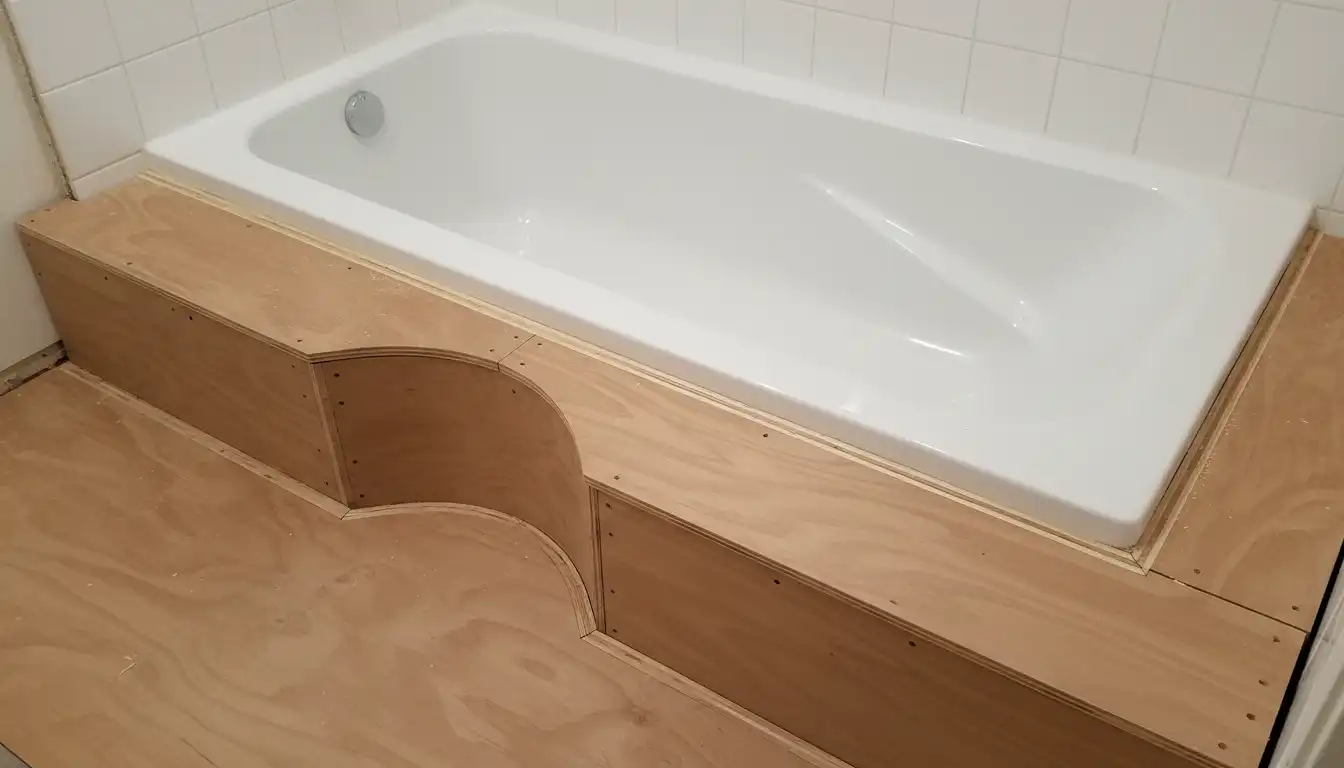
Step 4: Cutting and Fitting the New Subfloor Patch
To ensure a perfect fit, create a template of the opening using cardboard. This is much easier than trying to measure complex angles directly. Trace the shape of the cutout onto your new sheet of plywood.
Cut the new subfloor piece using a circular saw or jigsaw. For bathroom applications, it is highly recommended to use marine-grade plywood or a pressure-treated option for its superior resistance to moisture. Test-fit the patch in the opening. It should be snug but not so tight that you have to force it into place; leave a 1/8-inch expansion gap around the edges.
Step 5: Securing the New Subfloor
A solid installation prevents future movement and noise. Apply a generous bead of high-quality construction adhesive along the top of the floor joists and all the support blocking you installed.
Carefully set the new subfloor patch into place. Secure it immediately with wood screws, driving them every 6 inches along the perimeter into the blocking and every 8-10 inches into the floor joists in the middle of the patch. The screw heads should be driven slightly below the plywood surface.
Step 6: Finishing the Job for a Lasting Repair
The final touches are about creating a seamless, waterproof transition. Fill the 1/8-inch expansion gap around your patch with a high-quality waterproof caulk or sealant. This prevents any water from getting under the patch in the future.
Once the sealant is cured, your new subfloor is ready. You can now install your underlayment and new finished flooring, confident that the foundation beneath it is solid, stable, and secure. This repair not only fixes the immediate problem but also fortifies your bathroom against future issues.
When Should You Call a Professional?
While this method is a fantastic solution for localized rot, some situations are best left to professionals. If your assessment reveals extensive rot that has significantly damaged multiple floor joists, it’s time to call a structural contractor. A professional is also recommended if you discover widespread mold that extends beyond the immediate subfloor area.
Additionally, if you lack the specific tools, like an oscillating multi-tool, or don’t feel confident making precise cuts next to plumbing and fixtures, hiring a professional can save you from costly mistakes. A pro can assess the full extent of the damage and ensure the repair meets all structural and building code requirements.
Pro Tips for Preventing Future Subfloor Damage
Once your floor is repaired, prevention is key. The number one cause of a rotten subfloor is water, so controlling moisture is your top priority. Regularly inspect the caulking around the base of your bathtub and where the tub meets the wall surround. If it’s cracked or peeling, remove the old caulk and apply a fresh, high-quality silicone sealant.
Immediately address any plumbing leaks, no matter how small. A slow drip from a drain or supply line can saturate the subfloor over time. Ensure your bathroom has proper ventilation, such as an exhaust fan, to control humidity levels during and after showers.
Pay attention to early warning signs. Sometimes, a problem with the tub itself, like a dip in the bathtub floor, can indicate flexing that stresses plumbing connections. By being proactive, you can prevent a small issue from becoming a major repair project down the road.
Final Word
Conquering a soft floor doesn’t have to trigger a total bathroom demolition. By focusing your repairs on the specific area of decay and utilizing strategic reinforcement techniques, you can bypass the grueling process of disconnecting and hauling out a heavy bathtub. This targeted approach preserves your existing fixtures and plumbing while ensuring the structural foundation of your home is once again solid and safe. Success depends on meticulous cutting, proper joist support, and choosing moisture-resistant materials to prevent a repeat performance of rot. Ultimately, mastering this surgical repair saves you thousands in labor and material costs. You transition from a state of homeownership anxiety to the peace of mind that comes with a stable, dry floor—all while keeping your bathroom functional and your budget intact.