Sill Plate Replacement Without Jacking: The Ultimate Guide
Discovering a rotted sill plate in your home can feel like a punch to the gut. This critical structural component, the wooden base that connects your home’s frame to its foundation, is fundamental to its stability. The conventional wisdom has always been that replacing it requires the monumental task of jacking up the entire house, a prospect that brings to mind immense cost, complexity, and potential for disaster. But what if there was another way? Is it truly possible to replace a sill plate without resorting to lifting your home? The answer, surprisingly, is often yes.
Many homeowners face the daunting issue of sill plate decay due to moisture, pests, or simple old age. The thought of displacing your family and spending a fortune on hydraulic jacks and structural engineers can be paralyzing. This guide is here to cut through the noise and provide a clear, actionable path for addressing this serious problem without the drama and expense of jacking, focusing on sectional replacement for manageable, safe, and effective repairs.
You'll Learn About
Understanding the Enemy: What Is a Sill Plate and Why Does It Rot?
Before diving into the solution, it’s crucial to understand the problem. The sill plate, or mudsill, is typically a pressure-treated piece of lumber that is bolted directly onto the concrete or masonry foundation of your home. It serves as the foundational anchor for the entire wall framing system. The vertical studs of your walls rest directly on this plate, transferring the entire weight of the house down to the foundation.
Unfortunately, its position makes it uniquely vulnerable. Moisture is the primary culprit behind sill plate rot. Water can wick up from a porous foundation, splash back from the ground due to poor grading, or result from leaks and condensation. This constant dampness creates the perfect environment for fungal growth, leading to wood decay that compromises the structural integrity of your home. Termites and other wood-boring insects are also drawn to this moist wood, compounding the damage.
Signs Your Sill Plate Is in Trouble
Identifying a failing sill plate early is key to preventing more extensive and costly damage. Be on the lookout for these tell-tale signs, especially in your basement or crawlspace:
- Spongy or Crumbly Wood: Use a screwdriver or awl to poke the sill plate. If the wood feels soft, spongy, or flakes away easily, you have a rot problem.
- Visible Mold or Mildew: Dark stains, fuzzy growth, or a persistent musty odor are clear indicators of a moisture issue that is likely affecting the sill.
- Warped or Sagging Floors: As the sill plate compresses under the weight of the house, you may notice floors beginning to slope or sag near the exterior walls.
- Cracks in Drywall: Stress from a failing foundation support can manifest as new or expanding cracks in your interior walls, particularly around door and window frames.
- Insect Damage: Look for small holes, tunnels, or the presence of insect wings or droppings (frass) on or around the sill plate.
The “No-Jack” Philosophy: Replacing a Sill Plate in Sections
The core principle behind replacing a sill plate without jacking is to work in small, manageable sections. The wall framing above can temporarily support the load over a short span while you remove and replace a damaged piece of the sill below. This method avoids the risks and costs associated with lifting the entire structure, making it a more approachable DIY project for a skilled homeowner or a less invasive job for a professional.
This is not a task for the faint of heart or the inexperienced. It requires a solid understanding of structural principles, the right tools, and a meticulous, safety-first approach. If you have any doubts, consulting a structural engineer or hiring a qualified contractor is always the wisest course of action.
Is This Method Right for Your Situation?
Sectional replacement is ideal for localized rot, typically spanning a few feet. If the entire perimeter of your home has extensive decay, a full-scale jacking operation may be unavoidable. A thorough inspection is the first step to determining the scope of the damage and the feasibility of this “no-jack” approach. If you notice widespread issues, such as those caused by neglecting to disconnect a garden hose in winter which can lead to foundation leaks, it’s critical to assess the full extent of the problem. You can find more information on preventing such issues here: Forgot to Disconnect My Garden Hose in Winter.
Step-by-Step Guide to Sectional Sill Plate Replacement
Once you’ve confirmed the damage is localized and you’re prepared to tackle the job, follow these detailed steps. Safety is paramount; always wear safety glasses, gloves, and a dust mask.
Step 1: Preparation and Exposure
First, you need clear access to the damaged sill plate. This may involve removing drywall from the interior, siding from the exterior, or both. You’ll need to expose the sill plate, the bottom of the wall studs, and the foundation it rests upon. Carefully remove any insulation, plumbing, or electrical wiring that may be in the way.
Step 2: Temporary Support (The Key to No-Jacking)
Even though you aren’t jacking the house, you must provide temporary support for the wall studs while you work. Cut a length of 4×4 lumber to span across the studs in the section you’ll be replacing. Use a bottle jack to gently apply upward pressure to the 4×4, just enough to take the weight off the sill plate. Do not lift the wall; you only want to support it. An alternative is to tap temporary vertical supports snugly into place between the floor and the horizontal 4×4.
Step 3: Removing the Rotted Sill Section
With the wall supported, you can now remove the damaged sill plate. This is often the most labor-intensive part of the job.
- Cut the Stud Nails: Use a reciprocating saw with a long metal-cutting blade to slide between the bottom of the wall studs and the top of the sill plate, cutting through the nails that connect them.
- Deal with Anchor Bolts: The sill plate is secured to the foundation with anchor bolts. If the nuts are accessible and not rusted solid, you may be able to unscrew them. More likely, you’ll need to cut the bolts flush with the foundation using the reciprocating saw or an angle grinder.
- Cut and Pry: Cut the rotted sill plate into smaller, more manageable chunks using your reciprocating saw or a circular saw. Use a pry bar and hammer to carefully pry the old wood out from under the studs.
Step 4: Clean and Prepare the Foundation
Once the old sill is removed, thoroughly clean the top of the foundation. Scrape away any remaining wood fragments, old sealant, or debris. Use a wire brush and a shop vacuum to create a clean, level surface for the new sill plate. This is also the time to inspect the foundation for any cracks or damage that need to be addressed.
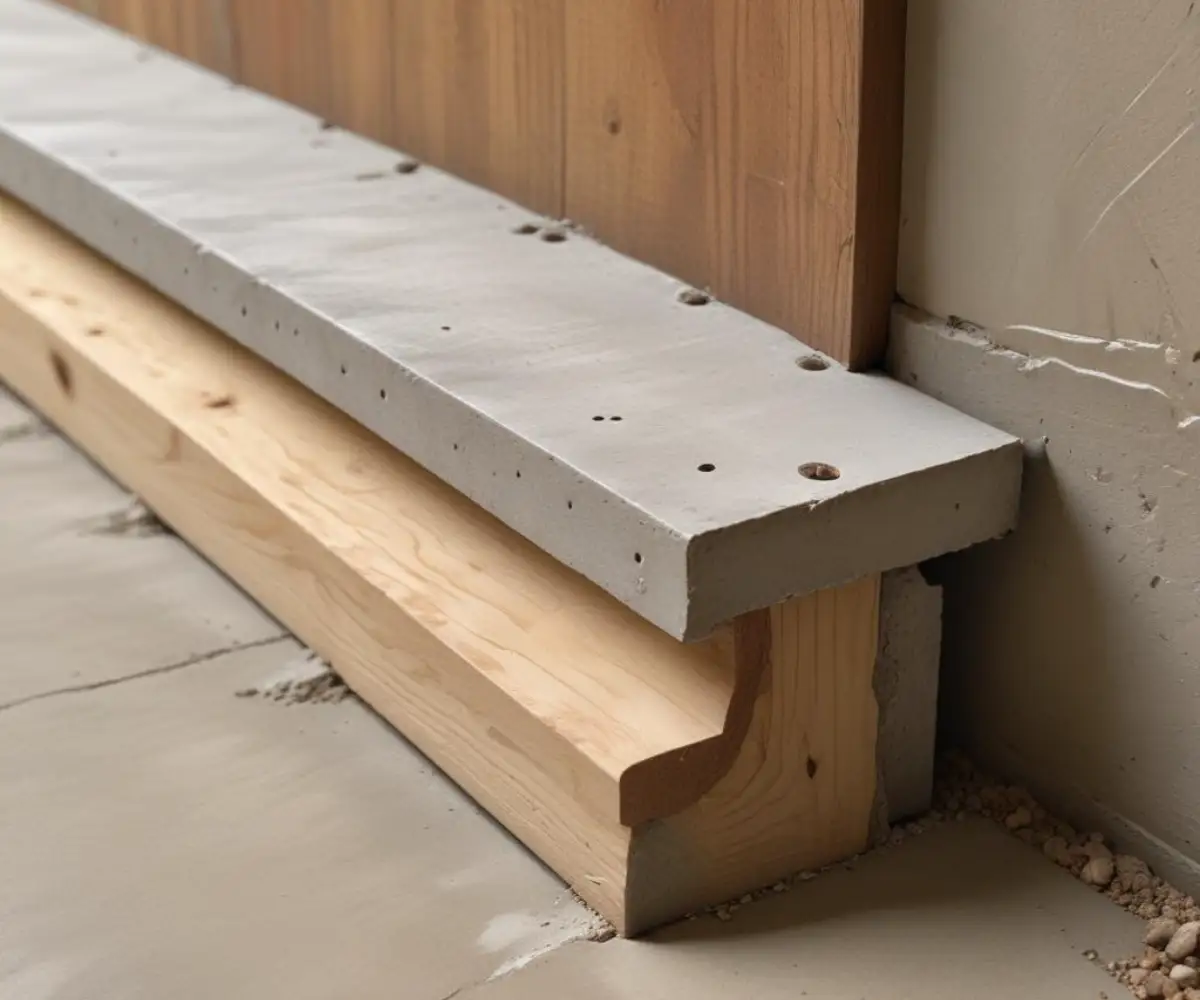
Step 5: Installing the New Sill Plate
Now, you’re ready to install the new piece of sill plate. Always use pressure-treated lumber rated for ground contact for this application.
- Install a Sill Sealer: Before placing the new wood, roll out a layer of foam sill sealer on top of the foundation. This creates a crucial barrier against moisture wicking up from the concrete and provides an air seal.
- Cut and Position the New Sill: Measure the opening carefully and cut the new pressure-treated lumber to fit snugly. You may need to use a hammer and a block of wood to gently tap it into position under the supported wall studs.
- Secure the New Sill: The new sill plate must be firmly anchored to the foundation. Since the old anchor bolts were likely cut, you will need to install new ones. The most common method is to use expansion anchors or concrete anchor bolts. Drill holes through the new sill plate and into the concrete foundation, then install the new anchors according to the manufacturer’s instructions.
Tools and Materials Overview
Having the right tools is non-negotiable for this project. Below is a table outlining the essential items you will need to complete a sectional sill plate replacement successfully.
| Category | Item | Purpose |
|---|---|---|
| Power Tools | Reciprocating Saw | Cutting nails between studs and sill; cutting out the old sill plate. |
| Circular Saw | Making precise cuts in the old and new sill plate sections. | |
| Hammer Drill | Drilling into the concrete foundation for new anchor bolts. | |
| Angle Grinder | (Optional) Cutting off old anchor bolts. | |
| Shop Vacuum | Cleaning debris from the foundation surface. | |
| Hand Tools | Pry Bar & Crowbar | Removing the old, rotted wood sections. |
| Hammer / Sledgehammer | Tapping new sill into place; general demolition. | |
| Tape Measure & Speed Square | Ensuring accurate cuts and placement. | |
| Caulking Gun | Applying construction adhesive and sealant. | |
| Wire Brush | Cleaning the concrete foundation. | |
| Materials | Pressure-Treated Lumber | The new sill plate material (ground-contact rated). |
| Foam Sill Sealer | Moisture and air barrier between foundation and wood. | |
| Concrete Anchor Bolts | Securing the new sill plate to the foundation. | |
| Construction Adhesive | To create a stronger bond and seal gaps. | |
| Safety Gear | Safety Glasses | Protecting eyes from dust, debris, and wood chips. |
| Work Gloves | Protecting hands during demolition and construction. | |
| Dust Mask / Respirator | Preventing inhalation of dust, mold spores, and chemicals. |
Step 6: Finishing the Job
With the new sill section securely in place, you can carefully remove your temporary supports. The wall studs should now be resting firmly on the new plate. To complete the connection, “toe-nail” or “toe-screw” the bottom of each stud to the new sill plate by driving fasteners in at an angle. Finally, replace any insulation, sheathing, and drywall you removed, and finish the surfaces to match the surrounding area.
Addressing the Root Cause
Simply replacing the rotted wood is not enough. You must address the source of the moisture that caused the rot in the first place. Failure to do so means you’ll be repeating this repair in a few years. Common preventative measures include:
- Improving Grading: Ensure the ground around your foundation slopes away from the house, so water doesn’t pool against it.
- Gutter Maintenance: Clean your gutters regularly and ensure downspouts direct water several feet away from the foundation.
- Waterproofing: Consider applying a waterproof sealant to the exterior of your foundation walls.
- Crawlspace/Basement Ventilation: Improve air circulation in damp areas with vents or a dehumidifier to keep things dry.
These preventative steps are just as critical as the repair itself. Much like performing routine maintenance tasks like an oil furnace removal to upgrade your system, proactive moisture management is essential for the long-term health of your home’s foundation. Even simple things, like learning how to revive a DeWalt 20v battery to ensure your tools are ready, can make these preventative tasks easier to tackle.
Final Thoughts: A Manageable Solution to a Major Problem
Replacing a rotted sill plate is a serious structural repair, but it doesn’t always have to be a catastrophic, house-lifting event. By working methodically in small sections, you can replace damaged portions of this critical component safely and effectively without the need for expensive and complex jacking procedures. It is a demanding project that requires skill, patience, and a strong focus on safety.
By understanding the cause of the rot, carefully executing the sectional replacement, and—most importantly—addressing the underlying moisture issues, you can restore the structural integrity of your home and protect it for years to come. While the “no-jack” method provides a viable path forward for many homeowners, never hesitate to call in professionals when the scope of the damage exceeds your comfort level or expertise. Your home’s foundation is its most important asset; treat it with the care and respect it deserves.