Replace Overmount Sink with Undermount: The Ultimate Guide
That raised lip on your overmount sink does more than just define its edge; it’s a magnet for crumbs, grime, and gunk. This dated design not only makes cleaning a chore but can make an entire kitchen feel stuck in the past. The solution is a seamless, modern upgrade that elevates both form and function.
Switching to an undermount sink is one of the most impactful changes you can make to your kitchen or bathroom. This guide provides a comprehensive walkthrough, transforming that clunky drop-in fixture into a sleek, integrated basin. Prepare to wipe away messes with ease and enjoy a cleaner, more contemporary space.
You'll Learn About
Why Make the Switch? The Undeniable Benefits of an Undermount Sink
Before diving into the “how,” it’s important to understand the “why.” An undermount sink isn’t just about aesthetics; it’s a practical upgrade that enhances daily usability and adds tangible value to your home. The benefits make this project a worthwhile investment in your space.
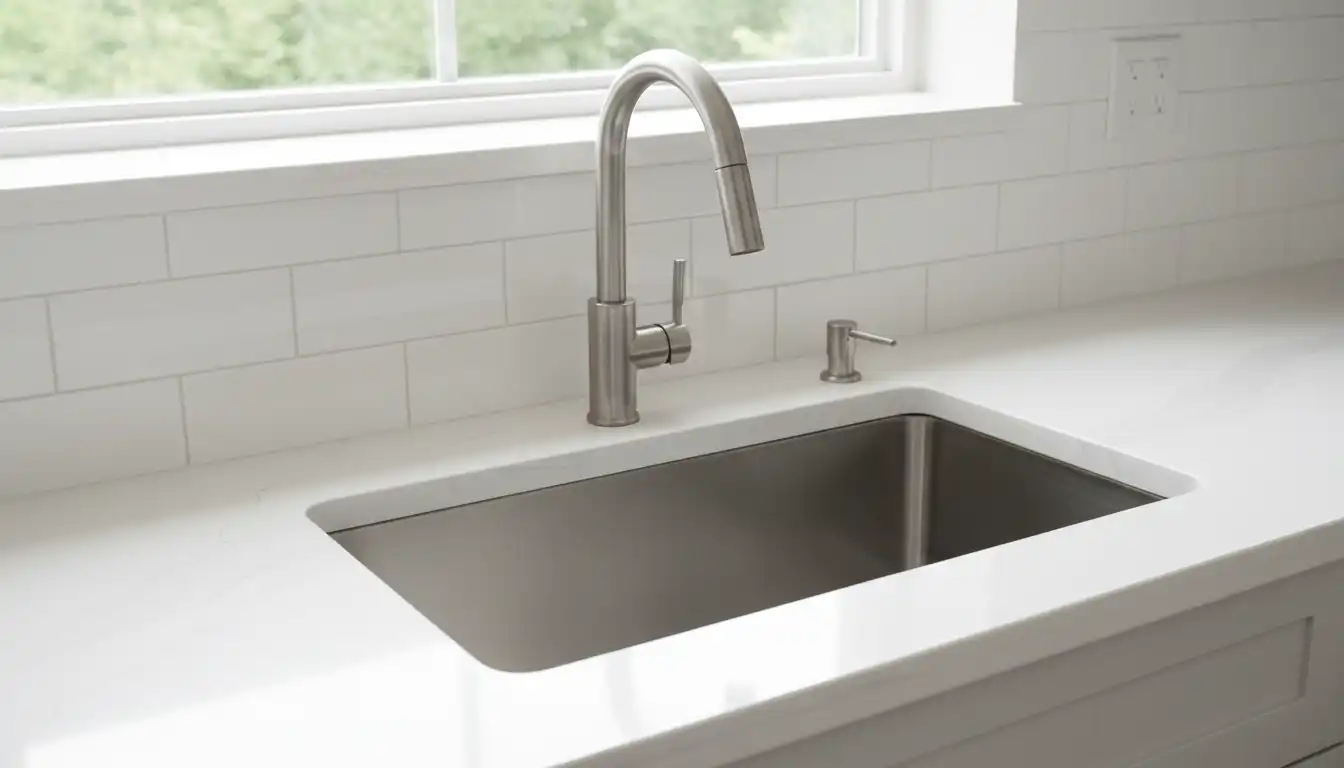
The most celebrated advantage is the seamless transition from countertop to sink. With no raised rim to block the way, you can wipe spills and crumbs directly into the basin. This eliminates the buildup of grime that inevitably collects around the edge of an overmount sink, making your cleaning routine faster and more hygienic.
Enhanced Aesthetics and Increased Space
Undermount sinks create a clean, uninterrupted line across your countertop, contributing to a modern, high-end look. This minimalist appeal can make a kitchen feel more spacious and luxurious. By eliminating the sink’s lip, you also gain a few extra inches of usable counter space, which is invaluable in smaller kitchens.
This upgrade is more than just a visual improvement; it’s a feature that prospective homebuyers notice. A well-installed undermount sink is a hallmark of a modern kitchen and can contribute to a higher property value. It signals a well-maintained and updated home.
Before You Begin: Critical Compatibility Checks
Not every countertop is a candidate for an undermount sink. This is the most critical factor to verify before you purchase any materials or begin disassembly. The success and longevity of your new sink depend entirely on having the right foundation to support it.
The countertop material is everything. Undermount sinks hang from the underside of the counter, meaning the material must be strong, solid, and water-resistant. Solid surface materials like granite, quartz, marble, and concrete are ideal candidates because they can support the weight and their exposed edges can be polished to a smooth, waterproof finish.
Understanding Countertop Limitations
Laminate and most tile-over-particleboard countertops are generally incompatible with undermount sinks. The core of these materials is susceptible to water damage, and the exposed edge created by the sink cutout cannot be effectively sealed. Water will inevitably seep in, causing the particleboard to swell, warp, and fail over time.
Accurate measurements are non-negotiable. Measure the interior dimensions of your sink cabinet to ensure it can accommodate the new sink’s basin. You must also measure the existing countertop cutout; if the new undermount sink requires a larger hole, the countertop will need to be professionally cut, which is a task best left to stone fabricators.
DIY vs. Hiring a Pro: An Honest Cost and Effort Breakdown
Deciding whether to tackle this project yourself or call a professional involves weighing cost, time, and risk. While a DIY approach can be rewarding and save money, it requires a certain level of skill and the right tools. An honest assessment of your abilities is crucial for a successful outcome.
Hiring a professional plumber or countertop installer typically ensures a fast, correct, and leak-free installation. They have the experience to handle unforeseen issues and the specialized tools to get the job done right. However, this expertise comes at a price, with labor costs often matching or exceeding the cost of the sink itself.
| Aspect | DIY Approach | Professional Hire |
|---|---|---|
| Average Cost | $150 – $400 (Sink & Materials) | $400 – $1,200+ (Includes Labor) |
| Time Commitment | 4-8 hours (plus curing time) | 2-4 hours |
| Required Tools | Wrenches, sealant gun, utility knife, clamps, drill | Full professional toolkit, specialized stone tools if needed |
| Risk Level | Moderate to High (leaks, countertop damage) | Low (insured and guaranteed work) |
| Skill Level | Intermediate to Advanced plumbing/DIY skills | Licensed and Experienced Professional |
The Ultimate 10-Step Guide to Replacing Your Sink
With the preparatory checks complete, it’s time to begin the transformation. This step-by-step guide breaks down the process into manageable tasks. Work methodically, double-check your work, and never rush a step involving plumbing or adhesives.
Safety should always be your first priority. Before you disconnect any pipes, be sure to turn off the water supply and have a bucket ready to catch residual water. Protective eyewear is also recommended, especially when working underneath the counter.
Step 1: Gather Your Tools and Materials
Having everything you need on hand before you start will prevent frustrating interruptions. Your list should include the new undermount sink, a high-quality 100% silicone sealant, sink mounting clips (often included with the sink), an adjustable wrench, a utility knife, a caulk gun, denatured alcohol, rags, and a bucket. You may also need temporary supports like 2×4 lumber and clamps.
Step 2: Shut Off Water and Disconnect Plumbing
Locate the hot and cold water shut-off valves under the sink and turn them clockwise until they are fully closed. Turn on the faucet to release any remaining pressure. Place a bucket under the P-trap and use an adjustable wrench to disconnect the drain lines and water supply lines from the faucet and drain.
Step 3: Removing the Old Overmount Sink
With the plumbing disconnected, use a utility knife to carefully cut the silicone seal around the perimeter of the overmount sink. From underneath, locate the clips holding the sink to the countertop and loosen them with a screwdriver or wrench. Once all clips are released, gently push up on the sink from below to lift it out of the countertop.
Step 4: Prepare the Countertop Cutout
This is a critical step for ensuring a perfect seal. Use a scraper or razor blade to carefully remove all old sealant and residue from the top and underside of the countertop around the cutout. Once the residue is gone, clean the area thoroughly with denatured alcohol to ensure the surface is perfectly clean and ready for the new adhesive.
Step 5: Test Fit and Mark the New Sink
Before applying any sealant, perform a “dry fit.” Lift the new undermount sink into position against the underside of the countertop. Center it perfectly within the cutout and use a pencil to mark the positions for the mounting clip anchors on the underside of the counter. This ensures perfect alignment before the permanent installation begins.
Step 6: Installing the Mounting Hardware
Follow the manufacturer’s instructions for the sink clips. This typically involves drilling shallow holes into the underside of the countertop at the marks you just made. Be extremely careful not to drill all the way through. Insert the anchors and attach the mounting clip studs.
Step 7: Applying Sealant and Setting the Sink
Apply a continuous, generous bead of 100% silicone sealant around the top flange of the sink—the part that will contact the countertop. Don’t be shy with the sealant, as this is what creates the waterproof barrier. With the help of a second person, carefully lift the sink into position against the underside of the counter.
Step 8: Securing the Undermount Sink
While holding the sink firmly in place, attach the mounting clips to the studs and hand-tighten the wingnuts. A great way to keep the sink pressed tightly against the counter while you work is to use a bar clamp through the drain hole, braced with a 2×4 across the top of the counter. Tighten the clips evenly in an alternating pattern, like tightening lug nuts on a wheel, until the sink is snug.
Step 9: Reconnecting the Plumbing and Faucet
If you haven’t already, now is the easiest time to install the faucet and drain assembly onto the new sink. Reconnect the P-trap and the hot and cold water supply lines. Hand-tighten all connections first, then give them a final quarter-turn with a wrench to ensure they are secure but not overtightened.
Step 10: The Final Seal and Cleanup
Wipe away any excess silicone sealant that may have squeezed out from between the sink and the countertop. Turn the water supply back on slowly and check thoroughly for any leaks at all connection points. Let the sealant cure for at least 24 hours before filling the sink with water or putting any weight in it.
Common Mistakes to Avoid for a Flawless Installation
Even with a detailed guide, there are common pitfalls that can compromise the installation. Being aware of these potential errors can save you from leaks, damage, or an unprofessional finish. The most frequent issues stem from inadequate preparation and rushing the process.
One of the biggest errors is using the wrong sealant. Latex caulk or other non-silicone adhesives will not provide a durable, waterproof bond. Always use 100% silicone designed for kitchens and baths to prevent leaks and mold growth.
Insufficient Support and Poor Preparation
Relying solely on silicone to hold the weight of the sink is a recipe for failure. Always use the mechanical mounting clips provided with the sink. For very heavy sinks like cast iron or fireclay, consider building an additional wood support frame inside the cabinet for extra peace of mind.
Failing to properly clean the old adhesive off the countertop will prevent the new sealant from forming a strong bond. The surface must be completely free of dust, grease, and old caulk. Take the time to prepare the surface correctly for a bond that will last for years.
Beyond the Basics: Advanced Tips for a Professional Finish
A successful installation is great, but a professional-looking one is even better. A few extra details can elevate your project from simply functional to truly high-end. One such detail is the “reveal,” which refers to how the countertop edge relates to the sink basin.
There are three types of reveals: a positive reveal (where a small lip of the sink rim is exposed), a zero reveal (where the counter and sink edge are perfectly flush), and a negative reveal (where the countertop overhangs the sink edge slightly). A zero or negative reveal is often preferred for its clean look and ease of wiping debris directly into the sink.
The Importance of Quality Materials
Pay attention to the features of the sink itself. High-quality stainless steel sinks often include sound-dampening pads on the underside. These pads significantly reduce the noise from running water and clanging dishes, creating a much quieter kitchen environment.
Thinking about support in a modern way can also improve your home’s overall design integrity. Just as you might consider a roof overhang without posts to achieve a clean, contemporary exterior line, ensuring your sink has robust, hidden support contributes to a streamlined kitchen aesthetic. It’s about achieving a high-end look through smart, structural solutions.
Frequently Asked Questions (FAQ)
Even a detailed guide can leave some questions unanswered. Here are some of the most common queries that arise during this project. Having these answers handy can help you troubleshoot and proceed with confidence.
Can I replace an overmount sink with an undermount without replacing the countertop?
Yes, it is often possible, provided your existing countertop is made of a compatible solid material like granite, quartz, or marble. The key challenge is ensuring the existing cutout is the correct size and shape for the new undermount sink. Minor adjustments are difficult, and significant resizing requires a professional stone fabricator.
How long does it take for the silicone to cure?
While the silicone may be water-ready in as little as 30 minutes, it needs to fully cure to achieve maximum strength and adhesion. You should wait at least 24 hours before removing any temporary supports, filling the sink with water, or using the garbage disposal. Always check the specific curing time on the sealant product you use.
What is the best sealant for an undermount sink?
The consensus among professionals is to use 100% silicone sealant. It offers excellent adhesion, permanent flexibility, and is completely waterproof. Look for a product specifically formulated for kitchens and baths, as these often contain mildewcide to prevent mold growth.
Do I need a special faucet for an undermount sink?
No, a special faucet is not required. The faucet mounts directly to the countertop behind the sink, not to the sink itself. Therefore, any standard deck-mounted kitchen faucet will work, giving you a wide range of styles to choose from.
A Modern Upgrade Within Reach
Replacing an overmount sink with an undermount model is a transformative project that boosts both the style and functionality of your kitchen. The result is a clean, seamless look that makes daily cleanup easier and adds lasting value to your home.
While it requires careful planning and attention to detail, this is an achievable goal for a confident DIYer. By following these steps, avoiding common mistakes, and using the right materials, you can successfully complete this upgrade and enjoy the benefits for years to come.