Refrigerator Glass Shelf Shattered? Here’s the Shocking Reason Why & How to Fix It Fast
It’s a startling and surprisingly common kitchen nightmare. You open your refrigerator door, perhaps looking for a midnight snack, only to be greeted by a chaotic scene of shattered glass and scattered food. A refrigerator glass shelf has spontaneously exploded, turning a simple appliance into a hazardous cleanup zone. This sudden event can be baffling and frustrating, leaving you to wonder what could have possibly caused such a durable-looking shelf to fail so dramatically.
The reality is, these shelves don’t just break without reason. A combination of physics, hidden damage, and everyday use can culminate in this exact scenario. Understanding the root causes is the first step in not only dealing with the immediate mess but also preventing it from ever happening again. This comprehensive guide will walk you through why your refrigerator shelf shattered, how to clean it up with meticulous care, and what your best options are for a lasting replacement.
You'll Learn About
Why Did My Refrigerator Glass Shelf Spontaneously Shatter?
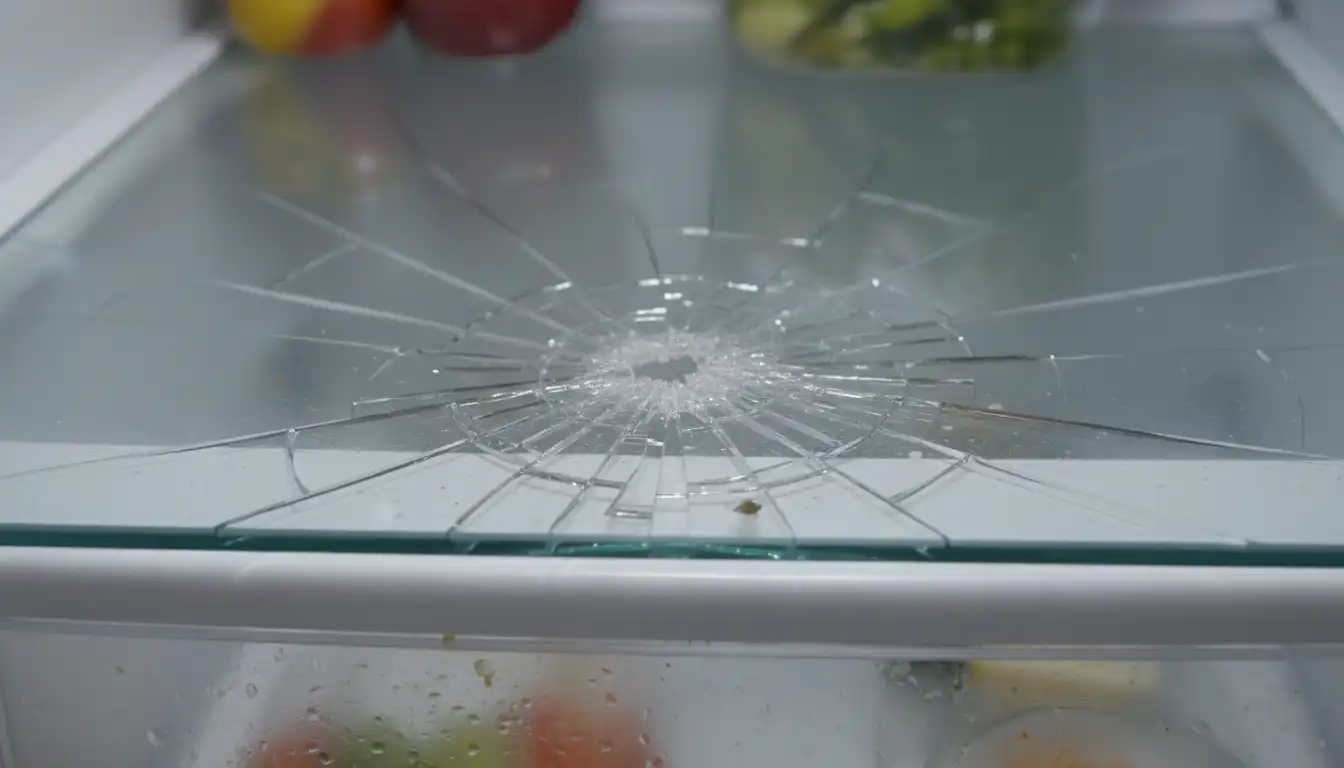
The glass used for refrigerator shelves is not ordinary glass; it’s tempered glass. This type of safety glass is created through a process of extreme heating followed by rapid cooling. This process creates a state of constant tension, with the outer surfaces in high compression and the inner core in high tension, making it about four to five times stronger than standard glass. However, this internal stress is also what causes it to shatter into thousands of small, granular pieces when it does break, rather than sharp, jagged shards.
Several factors can trigger this dramatic failure, and it’s often a combination of them. Understanding these culprits is crucial for preventing future incidents and ensuring the longevity of your appliance’s interior components.
Thermal Shock: The Primary Culprit
The most frequent cause behind a shattered refrigerator shelf is thermal shock. This occurs when the glass experiences a rapid and drastic change in temperature, causing different parts of it to expand or contract at different rates. This differential movement creates immense internal stress that the tempered glass simply cannot withstand, leading to a catastrophic failure.
A classic example is placing a hot pot or a warm dish straight from the stovetop or microwave onto a cold glass shelf. The area directly under the hot item expands quickly, while the rest of the shelf remains cold and contracted. This conflict of forces is often enough to trigger the shattering effect. The same can happen in reverse, such as taking a shelf out for cleaning with warm water and immediately placing it back into the cold environment of the fridge.
Hidden Damage: Scratches, Chips, and Nicks
Tempered glass is incredibly strong on its surface, but its edges are its Achilles’ heel. A tiny, almost invisible chip or scratch, especially along the edge, can compromise the entire structural integrity of the shelf. This initial point of damage creates a significant stress concentration point.
Over time, the normal vibrations from the refrigerator’s compressor, the opening and closing of the door, and the slight expansion and contraction from temperature cycles can cause this tiny flaw to propagate. Eventually, the internal tension is released from this weak point, resulting in the “spontaneous” explosion. This is why it’s so important to handle glass shelves carefully and inspect them periodically for any signs of damage, no matter how minor they may seem.
Manufacturing Flaws and Inherent Stress
While rare, imperfections can occur during the manufacturing process of tempered glass. Microscopic inclusions, such as nickel sulfide crystals, can sometimes be trapped within the glass. These inclusions can expand and change their structure over time, creating a powerful point of internal stress.
This expansion is often unpredictable and can happen months or even years after the shelf has been in use, leading to a truly spontaneous shattering event with no apparent external cause. Though manufacturers have processes to minimize these risks, no manufacturing process is entirely perfect, making this a small but real possibility.
Overloading and Uneven Weight Distribution
Every refrigerator shelf has a weight limit, even if it’s not explicitly stated. Consistently overloading a shelf, especially with heavy items like gallons of milk, large containers of juice, or heavy cookware, places it under constant strain. While tempered glass is strong, it is not flexible.
The problem is exacerbated by uneven weight distribution. Placing a very heavy item near one edge or corner can create a leverage effect, stressing one part of the glass more than others. This sustained, unbalanced pressure can eventually lead to failure, often starting from a minor imperfection or edge chip that might have otherwise remained harmless.
The Immediate Aftermath: A Step-by-Step Safe Cleanup Guide
Discovering a shattered shelf is alarming, but your immediate priority must be safety. The small, cube-like pieces of tempered glass can be deceptively sharp and can scatter much farther than you’d expect. Follow these steps methodically to ensure a safe and thorough cleanup.
Safety First: Protect Yourself
Before you even begin to touch the mess, you must gear up. Always wear thick, puncture-resistant gloves—not thin latex gloves—to protect your hands from sharp edges. It’s also wise to wear closed-toe shoes to protect your feet from any glass that may have fallen onto the floor. If the shattering was particularly explosive, consider wearing safety glasses to protect your eyes from any lingering dust or small particles.
Remove Food and Unbroken Shelves
Carefully inspect all the food that was on or below the shattered shelf. You must be ruthless in this step: any unwrapped food or food in soft packaging must be discarded. Microscopic glass shards can easily contaminate items like blocks of cheese, vegetables, or anything in a plastic bag or cardboard box. Only items in sealed glass jars or sturdy cans are likely safe after a thorough rinsing of the container’s exterior.
Once the food is dealt with, carefully remove any other shelves and drawers from the refrigerator. This will give you unobstructed access for cleaning and prevent cross-contamination of glass fragments onto these other components. Take them to a separate area to be cleaned and inspected later.
Handling the Large Glass Pieces
With your protective gloves on, begin by carefully picking up the largest pieces of glass from inside the refrigerator and on the floor. Place them directly into a sturdy cardboard box or a bucket lined with a heavy-duty trash bag. Do not simply toss them into a regular kitchen trash bag, as the sharp edges can easily tear through it and create a hazard for you or sanitation workers.
Tackling the Tiny Glass Slivers
This is the most critical and tedious part of the cleanup. Sweeping and vacuuming are good first steps, but they rarely get all the tiny, almost invisible slivers. For a truly thorough cleanup, employ some unconventional but highly effective methods. Press a slice of soft bread or a halved potato onto the surfaces inside the fridge and on the floor; the soft, damp texture is excellent at picking up the tiniest glass fragments. Another great technique is to use a wide roll of heavy-duty packing tape or a lint roller, pressing it firmly onto all affected surfaces to lift away any remaining particles.
Thorough Cleaning and Disinfection
After you are confident that all glass fragments have been removed, it’s time for a deep clean. Use a vacuum with a hose attachment to go over every nook and cranny inside the empty refrigerator. Pay special attention to shelf supports, gaskets, and corners where glass dust can settle.
Finally, wipe down the entire interior of the refrigerator with a solution of warm water and a mild detergent or a food-safe disinfectant. Do the same for any shelves and drawers you removed earlier, after carefully inspecting them for any damage. This final wipe-down ensures any remaining glass dust is removed and your fridge is hygienic and ready for use once a replacement shelf is installed.
Finding the Right Replacement: Your Options Explored
Once the cleanup is complete, you’re faced with the task of replacing the shelf. You have several options, each with its own set of considerations regarding cost, convenience, and durability. Making an informed decision here is key to a long-term solution.
OEM vs. Aftermarket Shelves
Your first choice is between an Original Equipment Manufacturer (OEM) part and an aftermarket one. An OEM shelf is made by or for the original manufacturer of your refrigerator, guaranteeing a perfect fit and identical quality to the one that broke. This is often the safest but also the most expensive option.
Aftermarket shelves are made by third-party companies. They are designed to fit a range of models and are typically more affordable. However, the quality can vary, and you need to ensure you are buying from a reputable supplier to get a product that is both safe and durable. While a great way to save money, it requires a bit more research to ensure compatibility.
How to Find Your Refrigerator’s Model Number
Regardless of which type of shelf you choose, you will need your refrigerator’s exact model number. This is non-negotiable for finding a part that fits. The model number is typically located on a sticker or plate in one of several places: inside the refrigerator on an upper side wall, on the ceiling of the fridge compartment, or behind one of the crisper drawers. Once you have this number, you can easily search for the correct part online or provide it to an appliance parts dealer.
Table: Comparing Replacement Shelf Options
To help you decide, here is a breakdown of the most common replacement options. This table compares factors like cost, durability, and the ease of acquisition for each choice.
| Replacement Option | Estimated Cost | Guaranteed Fit | Durability | Availability |
|---|---|---|---|---|
| OEM Tempered Glass | High ($50 – $150+) | Yes | High (Same as original) | Direct from manufacturer or authorized dealers |
| Aftermarket Tempered Glass | Medium ($30 – $100) | Usually, check reviews | Varies by brand | Wide availability online |
| Custom-Cut Acrylic/Plexiglass | Medium ($40 – $80) | No, requires precise measurements | Good (less prone to shattering, but can scratch) | Local plastics fabricators or online suppliers |
| Custom-Cut Plate Glass | Low ($20 – $50) | No, requires precise measurements | Low (Not recommended, unsafe) | Local glass shops |
A DIY Alternative: Is a Custom Shelf a Good Idea?
For those with a DIY spirit, ordering a custom-cut piece of acrylic or plexiglass can be an excellent alternative. These materials are strong, shatter-resistant, and can be cut to your exact specifications by most local plastic suppliers. The versatility of plexiglass is well-known, making it a reliable material for all sorts of custom home projects, whether you’re undertaking something complex like a diy-plexiglass-dog-pen_gem1 or a simple shelf replacement.
If you choose this route, be sure to measure the dimensions precisely and opt for a thickness that is comparable to the original glass shelf to ensure it can bear the necessary weight. One important note: avoid using standard plate glass from a local hardware store. It lacks the strength and safety features of tempered glass and will break into dangerous, sharp shards if it fails.
Preventing Future Disasters: Proactive Shelf Care
Preventing another shattered shelf is far easier than cleaning one up. By adopting a few simple habits and being mindful of how you use your refrigerator, you can significantly reduce the risk of this happening again. A little proactive care goes a long way in overall kitchen maintenance, from your appliances to your fixtures. In fact, many people consult guides like milzen-cabinets-reviews_gem1 to ensure they are using the right products to care for all their kitchen surfaces.
Mind the Temperature Gaps
This is the most important preventative measure. Never place hot items directly on a cold glass shelf. Allow leftovers and warm dishes to cool down to at least room temperature before placing them in the refrigerator. Similarly, when you remove a shelf for cleaning, allow it to warm to room temperature before washing it with warm water, and let it cool down again before putting it back in the cold fridge.
Regular Inspection is Key
Make it a habit to quickly inspect your glass shelves every time you do a major grocery shop or clean out the fridge. Run your fingers gently along the edges to feel for any nicks, chips, or rough spots. If you discover any damage, it is far safer and more cost-effective to order a replacement shelf proactively than to wait for it to fail and potentially ruin your food and create a safety hazard.
Proper Loading Techniques
Be mindful of how you load your shelves. Distribute weight as evenly as possible, avoiding concentrating all the heavy items in one spot. Place heavier items like beverage gallons closer to the sides or back of the shelf where it is supported by the refrigerator’s frame. Avoid dropping items onto the glass or sliding heavy, rough-bottomed containers across the surface, which can cause scratches.
Gentle Cleaning Habits
When cleaning your shelves, use a soft cloth or sponge and a non-abrasive cleaner. Harsh, gritty cleansers or scouring pads can create micro-scratches on the surface of the glass. Over time, these tiny scratches can weaken the glass and become nucleation points for a future fracture. A simple solution of vinegar and water or a mild dish soap is all that’s needed to keep them clean and clear.
Advanced Considerations and Unique Scenarios
While the primary causes cover most incidents, there are other, less common factors that can contribute to a shelf shattering. Considering these scenarios demonstrates a deeper understanding of appliance care and the physics at play in your home. This attention to detail is similar to the careful planning needed for tricky home improvement tasks, such as figuring out how-to-mount-a-light-on-uneven-stone_gem1, where stability and proper support are paramount.
Dealing with Spills Underneath the Glass
Many refrigerator shelves are set into a plastic or rubber trim frame. Spills can sometimes seep between the glass and this trim, creating a sticky, hard-to-clean mess. If not cleaned, this residue can harden and create pressure points on the glass edge. When you need to clean this area, be extremely gentle when attempting to remove the glass from the frame, as this is a moment where the edges are particularly vulnerable to being chipped.
When It’s Not Just the Shelf: Frame and Support Issues
In some cases, the problem may not be with the glass itself, but with its supports. The plastic or metal nubs and rails that hold the shelf in place can become warped, cracked, or bent over time. If a shelf is not sitting perfectly level and securely on its supports, it will be under constant, uneven stress.
Before installing a new shelf, take a moment to inspect these support points. Ensure they are clean, intact, and level. If you notice any damage to the refrigerator’s interior liner or the shelf supports themselves, this may need to be addressed to prevent the new shelf from suffering the same fate.
The Role of Proper Installation
When you receive your new replacement shelf, take a moment to ensure it is installed correctly. It should slide into place smoothly and rest securely on all its designated support points without rocking or wobbling. Forcing a shelf into a tight spot or leaving it improperly seated can create the very stress points you want to avoid, leading to a frustrating repeat of the entire shattering, cleanup, and replacement cycle.
Conclusion
A shattered refrigerator shelf is a jarring and inconvenient event, but it is a solvable problem. By understanding that the primary culprits are thermal shock, hidden physical damage, and improper loading, you are empowered to prevent it from happening in the future. The key lies in mindful handling: allowing dishes and shelves to acclimate to room temperature, inspecting for damage, and cleaning with care.
When faced with the immediate aftermath, a methodical and safety-first approach to cleanup is essential to protect yourself and ensure your appliance is free of hazardous debris. From there, finding the right replacement—whether it’s an OEM part for a perfect fit or a custom-cut piece of acrylic for a durable DIY solution—will get your kitchen back to normal. A little knowledge and proactive care can turn this shocking kitchen mishap into a one-time event.