Rain on Your Unfinished Roof? Don’t Panic! Here’s Your Guide
The sight of dark clouds rolling in during a roof replacement is a homeowner’s nightmare. The thought of rain pouring onto your exposed roof structure can cause instant panic. You’re left wondering if your home is about to suffer catastrophic damage.
This is a stressful and unfortunately common situation. However, a little rain doesn’t automatically mean disaster. The key is to take swift, informed action to protect your property and ensure the long-term integrity of your new roof.
You'll Learn About
Understanding the Immediate Risks of Rain on an Exposed Roof
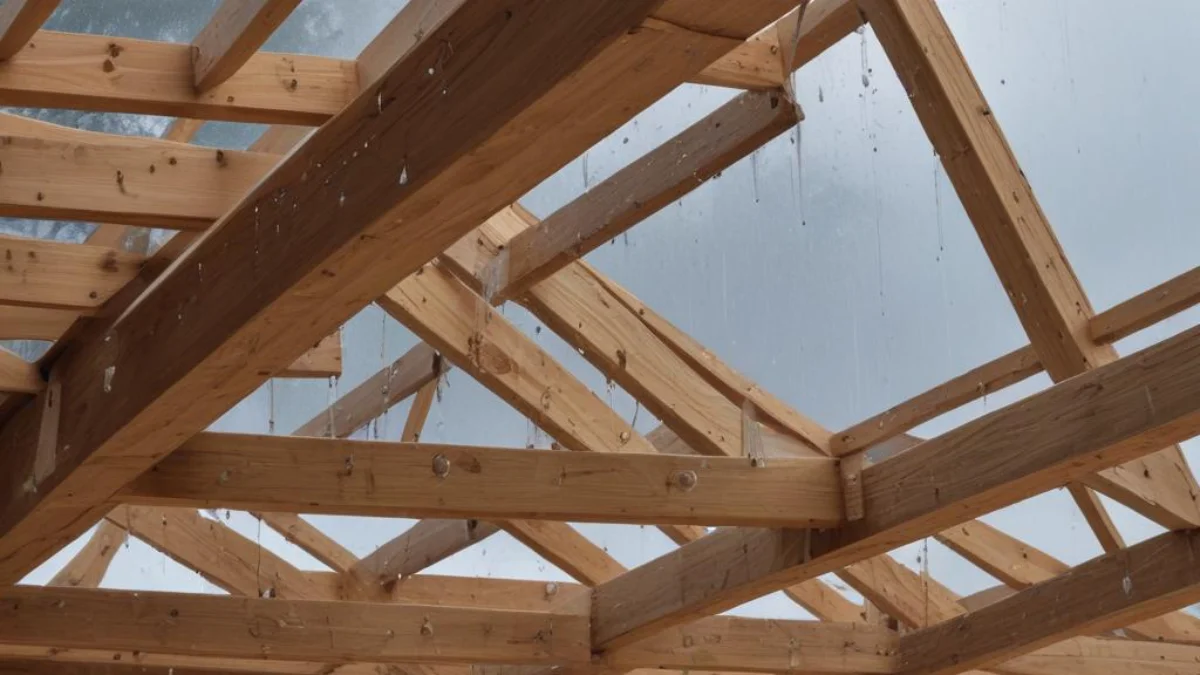
When your roof’s protective layers are gone, the underlying structure is vulnerable. The primary materials at risk are the wooden components, specifically the roof sheathing (or decking) and the structural trusses or rafters. How they react to water is crucial.
How Water Affects Different Roofing Materials
Not all wood sheathing is created equal when it comes to water exposure. Plywood is generally more water-resistant than Oriented Strand Board (OSB) due to its layered construction and the types of adhesives used. It can handle a few cycles of rain and drying without significant damage.
OSB, however, is like a sponge. It is made of compressed wood flakes, and its edges are particularly vulnerable to absorbing water. This can cause it to swell, flake, and lose its structural integrity, a process that can compromise the gripping power of roofing nails later on.
The structural beams, like rafters and trusses, are typically solid wood and can withstand some moisture. The main concern with these elements is prolonged saturation, which can lead to warping or create the perfect conditions for rot and mold.
The Hidden Threat of Mold and Mildew
The most insidious threat from water exposure is mold. When rainwater soaks into wood and gets trapped within your attic or wall cavities, it creates a dark, damp environment where mold can thrive. This isn’t just a cosmetic issue.
Mold can degrade building materials and, more importantly, can have serious health implications for your family. Once your new roof is installed, trapping that moisture inside, mold remediation can become a costly and invasive process.
Emergency Action Plan: What to Do the Moment It Starts Raining
If rain catches you and your contractor off-guard, your immediate actions can significantly reduce the potential for damage. Speed is your greatest ally. Here is what you need to do right away.
Step 1: Cover the Roof Immediately
The absolute first step is to get the exposed area covered. Large, heavy-duty tarps are essential. Your roofing contractor should have these on hand and should be working quickly to deploy them. A 10-mil or thicker tarp is ideal for resisting wind and rain.
The tarps must be properly secured with sandbags, weights, or boards. Simply laying a tarp down is not enough; wind can easily get underneath and turn it into a kite, leaving your roof exposed once again. Ensure it is pulled taut to prevent water from pooling.
Step 2: Manage Water Inside the Home
While the exterior is being secured, you need to check for water intrusion inside. Head to your attic or the top floor of your home and look for any signs of dripping or water stains on the ceiling. Place buckets or plastic sheeting under any active leaks.
This proactive step can prevent ceiling damage, protect your insulation, and stop water from reaching your living spaces. Efficient water management inside is just as critical as covering the roof outside.
Step 3: Document Everything
In the midst of the chaos, grab your smartphone and start documenting. Take photos and videos of the exposed roof, the rain, any active leaks inside your home, and the measures being taken to cover the structure. This evidence is invaluable.
Clear documentation will be crucial if you need to file an insurance claim or if a dispute arises with your contractor about responsibility for any resulting damages. Note the date and time the rain started and when the roof was finally covered.
After the Storm: Assessing the Damage
Once the rain has stopped and the tarps are removed, a thorough assessment is critical before any further roofing work continues. You and your contractor must inspect every inch of the exposed area to determine if the wood is sound or needs replacement.
Inspecting Your Roof Sheathing
Carefully examine the surface of the plywood or OSB. Look for visible signs of swelling, particularly along the seams where two boards meet. Run your hand over the surface to feel for delamination, which is when the layers of wood begin to separate and peel.
Press firmly on the sheathing in various spots, especially areas that appear discolored. If it feels soft, spongy, or bouncy, it’s a strong indicator that the wood has absorbed too much water and has lost its structural integrity. This is not a surface you can safely build a roof on.
When to Replace vs. When to Dry
The decision to dry out the existing sheathing or replace it entirely depends on the material and the severity of the water exposure. Minor surface dampness on plywood can often be dried, but significant swelling in OSB almost always warrants replacement. Refer to this table for guidance.
| Damage Indicator | Description | Recommended Action |
|---|---|---|
| Minor Surface Dampness | The wood feels damp to the touch but is not visibly swollen or soft. | Allow to dry completely. Use fans and dehumidifiers to speed up the process. |
| Noticeable Swelling | The edges of the sheathing panels are raised and feel thicker than the center. | Replacement is strongly recommended, especially for OSB. Swollen wood is permanently weakened. |
| Delamination or Flaking | The layers of plywood are separating, or the surface of the OSB is flaking off. | Must be replaced. The material has lost its structural integrity and cannot hold nails. |
| Soft or Spongy Spots | The wood flexes or feels soft under pressure when carefully walked on. | Must be replaced immediately. This is a major structural and safety hazard. |
The Professional Assessment
While your own inspection is important, always rely on the final judgment of your professional roofing contractor. They have the experience to distinguish between superficial moisture and genuine structural damage. Do not allow work to resume until you are both confident that the substrate is completely dry and structurally sound.
The Drying Process: Ensuring a Solid Foundation
If the sheathing is deemed salvageable, a thorough drying process is non-negotiable. Roofing over damp wood is a recipe for disaster, as it traps moisture and leads to rot, mold, and premature roof failure. Patience is key.
Promoting Air Circulation
The best way to encourage drying is with aggressive air circulation. Place large industrial fans in your attic space, pointing them directly at the underside of the damp roof deck. Open any attic vents or windows to create cross-flow ventilation.
Proper air movement is fundamental to a healthy home environment. Inefficient circulation can lead to other issues, sometimes leaving you to wonder why is a cold spot on floor appearing in another part of the house due to complex airflow patterns.
Using Dehumidifiers
In conjunction with fans, use a commercial-grade dehumidifier in the attic or the room directly below the dampest areas. Dehumidifiers work by pulling moisture directly out of the air and the surrounding materials, significantly accelerating the drying time.
Be sure to empty the dehumidifier’s collection tank regularly, or run a drain hose to a suitable location. This proves just how much water is being removed from the wood.
How Long Does It Take to Dry?
The time it takes for wood to dry completely can range from a few days to over a week. This depends on the level of saturation, the ambient humidity, and the temperature. Do not rush this process.
The most accurate way to know if the wood is ready is by using a moisture meter. Your contractor should have one of these tools. Most roofing material manufacturers specify that the wood substrate should have a moisture content of 15% or less before installation begins.
Preventing Future Water Issues During Construction
While you can’t control the weather, you and your contractor can take steps to minimize the risk of rain damage during a roofing project. Good planning and clear communication are paramount.
Working With Your Contractor
Before the project even starts, discuss a weather contingency plan. A professional contractor will only tear off a section of the roof that they can reasonably expect to “dry in” (i.e., install underlayment on) in the same day. They should also watch the weather forecast closely.
Your contract should specify who is responsible for providing and installing tarps in an emergency. Being aligned on this plan from the start prevents confusion and ensures a rapid response when needed. Throughout a major project, clear communication on all fronts is key; even seemingly small details like asking can shark bites be used for baseboard heat contribute to a well-executed, secure, and leak-free home renovation.
Long-Term Moisture Management
A roofing project is a core part of protecting your home’s entire envelope from moisture. Once the roof is securely in place, your focus can shift to other areas. Proper moisture control is a whole-house system.
Thinking about the complete barrier is vital for longevity. For instance, understanding how to correctly install insulation between brick and drywall is another crucial element in preventing moisture and thermal issues down the road.
Conclusion: A Dry Roof is a Secure Roof
Experiencing rain on your unfinished roof is undeniably stressful, but it is a manageable problem. The keys to a successful outcome are to act fast to cover the area, perform a meticulous damage assessment, and be patient and thorough during the drying process.
Never allow new roofing materials to be installed over damp, swollen, or compromised wood sheathing. By following these steps and maintaining open communication with your contractor, you can ensure your home remains protected and your new roof is built on a solid, dry, and secure foundation.