Pull Out Trash Can Without Drilling: A Damage-Free Guide
There’s a universal desire for a clean, streamlined kitchen. A visible, freestanding trash can often disrupts that aesthetic, collecting dust and becoming an obstacle. The elegant solution is a pull-out trash can, neatly tucked away inside a cabinet, but this upgrade comes with a significant fear: drilling into expensive cabinetry.
For homeowners who’ve just invested in a kitchen remodel, or for renters who are strictly forbidden from making permanent alterations, the thought of power tools and permanent holes is a non-starter. This common problem leaves many feeling stuck with a cluttered kitchen floor, believing a hidden trash system is out of reach. Fortunately, innovative solutions now exist that offer the convenience of a pull-out system without any of the damage, providing a clean, integrated look that is completely reversible.
You'll Learn About
Why Avoiding the Drill is a Smart Move
The hesitation to drill into kitchen cabinets is rooted in very real and valid concerns. Understanding these risks highlights why no-drill solutions have become so popular. It’s about more than just avoiding a bit of sawdust; it’s about protecting one of the most significant investments in your home.
First and foremost, drilling creates permanent, irreversible holes. If you make a mistake in measurement or alignment, that hole is there forever. This can be a heartbreaking realization on brand-new, custom cabinets. For renters, this is often a direct violation of their lease agreement, potentially leading to the loss of a security deposit and strained landlord relationships.
Beyond the cosmetic damage, there’s a structural risk. Kitchen cabinets, especially modern particleboard or MDF options, can be prone to splitting or cracking if drilled improperly. This can compromise the integrity of the cabinet box itself. Furthermore, any unauthorized modifications can void the manufacturer’s warranty on your cabinets, leaving you without recourse if other issues arise down the line.
The Core Technologies Behind No-Drill Systems
The genius of the “pull out trash can without drilling” concept lies in clever engineering that sidesteps the need for screws. These systems primarily rely on two main principles: freestanding stability and advanced adhesives. Each offers a unique approach to securing a sliding trash can system firmly within your cabinet.
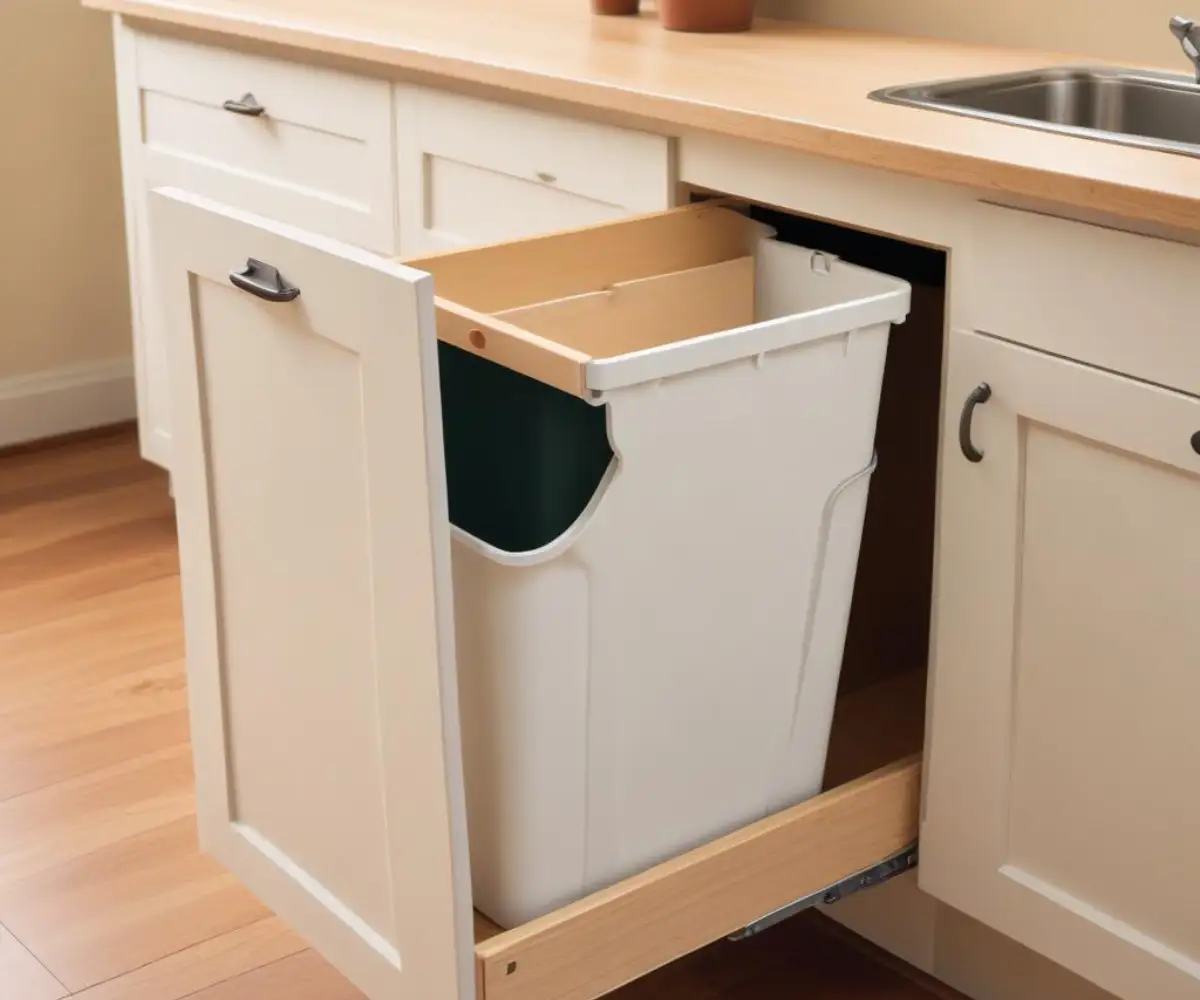
The most common and straightforward solution is the freestanding pull-out frame. This design is essentially a self-contained unit—a sturdy metal cage with integrated sliders that simply rests on the floor of your cabinet. Its stability comes from its own weight, the weight of the trash cans, and the precision of its construction. Because it doesn’t attach to the cabinet walls or door, it requires zero drilling and can be installed or removed in seconds.
A more recent innovation involves the use of high-strength industrial adhesives. This isn’t your everyday double-sided tape. These systems use specialized adhesive pads, often the same type used in construction or automotive applications, to bond the slider tracks to the base of the cabinet. When applied to a clean, non-porous surface, these adhesives create a remarkably strong and durable hold capable of supporting the weight and repeated motion of a fully loaded trash can.
Top No-Drill Solutions for a Clean Kitchen
Navigating the world of no-drill pull-out trash cans is simpler than you might think. The market has responded to the demand for damage-free solutions with several excellent options. Understanding the pros and cons of each type will help you select the perfect system for your kitchen and your peace of mind.
Solution 1: The Freestanding Pull-Out Organizer
This is the undisputed champion of easy, reversible installations. A freestanding unit is a pre-assembled metal frame, typically made of heavy-gauge steel, with ball-bearing sliders built right in. The entire assembly is designed to simply sit on the cabinet floor, with no mounting required.
Its effectiveness relies on physics. The weight of the steel frame, combined with one or two full trash bins, creates a low center of gravity and enough friction to keep it stable during normal use. Many high-quality models are engineered to feel just as smooth and robust as their screw-in counterparts. This solution is ideal for anyone—especially renters or the DIY-averse—who wants a functional pull-out system in under five minutes.
Solution 2: Advanced Adhesive Mounting Systems
For those who want the security of a mounted system without the permanence of screws, adhesive-based options are a fantastic alternative. These kits come with sliders that have pre-applied pads of industrial-strength adhesive or separate strips that you apply yourself. The key is meticulous surface preparation.
The cabinet base must be thoroughly cleaned with an alcohol-based cleaner to remove any grease or residue. Once the surface is dry, the sliders are pressed firmly into place and require a curing period—typically 24 to 72 hours—before the trash can and its weight can be added. While the installation is more involved than a freestanding unit, the result is a firmly fixed system that won’t budge. Removal is also possible, usually with the help of a heat source like a hairdryer to soften the adhesive, followed by a gentle prying motion.
Your Pre-Installation Checklist: Planning for Success
Before you purchase and install your no-drill pull-out trash can, a few minutes of planning can save you a world of hassle. Ensuring you have the right fit and the right product for your specific cabinets is the key to a successful, frustration-free installation. Don’t skip these crucial preparatory steps.
Step 1: Measure Everything, Then Measure Again
This is the most critical step. You need to measure the clear opening of your cabinet, not just the interior space. Measure the width from side to side, the depth from the front face frame to the back wall, and the height from the cabinet floor to the underside of the sink or countertop. Be sure to account for any obstructions like plumbing pipes, hinges, or the cabinet’s face frame lip, as these can interfere with the pull-out mechanism.
Step 2: Assess Your Cabinet’s Interior Surface
The type of surface on your cabinet floor can influence which no-drill solution is best. Freestanding units will work on any flat surface, but they are most stable on smooth, finished wood or laminate. If your cabinet base is unfinished, slightly warped, or has a textured liner, you may want to add a thin, rigid board or a non-slip mat underneath the unit for added stability.
For adhesive-mounted systems, the surface is even more critical. These adhesives work best on smooth, sealed, non-porous surfaces like finished wood, melamine, or laminate. They will not bond reliably to unfinished particleboard, rough-painted surfaces, or certain types of vinyl liners.
Step 3: Determine Your Capacity and Can Requirements
Consider your household’s needs. Do you need a single large bin for trash, or a dual-bin system for separating trash and recycling? Pull-out systems are commonly designed for specific trash can sizes, measured in quarts (e.g., 35-quart is a common size). Check the product specifications to see if the trash cans are included or if you need to purchase them separately, ensuring they match the required dimensions of the frame.
| Solution Type | Best For | Installation Difficulty | Reversibility | Key Consideration |
|---|---|---|---|---|
| Freestanding Frame | Renters, DIY beginners, and those wanting the fastest installation. | Extremely Easy | 100% Reversible | May shift slightly over time; placing a non-slip mat underneath is recommended. |
| Adhesive-Mounted System | Homeowners who want a fixed feel without permanent holes. | Easy to Moderate | Reversible with effort | Requires a clean, smooth, non-porous cabinet surface for a secure bond. |
| Tilt-Out Cabinet | Those needing a completely standalone unit that doesn’t use existing cabinets. | Moderate (Assembly Required) | N/A (It’s furniture) | Takes up floor space but adds countertop area and hides trash completely. |
Easy Installation: A Step-by-Step Guide for Freestanding Units
Installing a freestanding pull-out trash can is one of the most satisfyingly simple DIY projects you can undertake. It requires no special tools and can be completed in just a few minutes. Follow these steps for a perfect, damage-free setup.
Step 1: Unbox and Inspect. Carefully unbox your unit and check that all parts are present and undamaged. The main component should be a single, pre-assembled frame with sliders.
Step 2: Clean the Cabinet. Thoroughly wipe down the interior floor of your cabinet. Removing any dust or debris will ensure the unit sits flat and stable.
Step 3: Place a Non-Slip Mat (Recommended). For extra stability and to prevent any minor shifting, place a non-slip rubber or silicone shelf liner on the cabinet floor where the unit will sit.
Step 4: Position the Frame. Simply slide the freestanding frame into the cabinet. Push it back until it is flush with the back wall or as far back as you desire, ensuring it is centered.
Step 5: Add the Trash Cans. Place your trash can or cans into the designated holders within the frame. The added weight will immediately make the unit more secure.
Step 6: Test the Sliding Action. Gently pull the unit out and push it back in several times. It should glide smoothly. If it feels stiff, check for any obstructions and ensure the frame is sitting level.
Troubleshooting Common No-Drill Challenges
Even with a simple installation, you might encounter minor issues. Here’s how to address the most common challenges associated with no-drill pull-out trash cans to ensure your system works flawlessly.
Problem: The Freestanding Unit Slides Around Slightly
This is the most frequent issue with freestanding models, especially in cabinets with very slick surfaces. The easiest and most effective fix is to place a high-grip, non-slip shelf liner directly underneath the unit’s frame. This simple addition creates the friction needed to keep the entire assembly firmly in place, even when pulling it out with some force.
Problem: The Adhesive Mount Isn’t Holding Securely
If an adhesive-mounted system fails, it’s almost always due to improper surface preparation. First, ensure the surface is compatible (smooth and non-porous). Then, re-clean the area thoroughly with isopropyl alcohol, not just a household cleaner, to remove any trace of grease or oils. When reapplying, press down with firm, even pressure for at least 60 seconds and, most importantly, respect the full curing time recommended by the manufacturer before adding any weight.
Problem: The Sliding Mechanism Feels Stiff or Noisy
A stiff or noisy slider can usually be traced to one of two things: debris in the tracks or a need for lubrication. First, fully extend the unit and inspect the ball-bearing tracks for any dust or small debris and wipe them clean. If it’s still not smooth, a small application of a silicone-based lubricant can work wonders. Understanding product differences is useful here; just as you’d want to know the distinction between sealants when researching silicone 1 vs 2, choosing the right lubricant for metal ball bearings is key to long-term performance.
Pro Tips for a Perfect Pull-Out Experience
Beyond the basics, a few expert tips can elevate your no-drill trash can setup from good to great. These small adjustments and best practices will enhance stability, longevity, and overall user satisfaction.
Balance the Load. Especially in dual-can systems, try to distribute weight evenly. Avoid letting one can get excessively heavy while the other is empty, as this can put uneven stress on the sliding mechanism over time.
Level the Base. If your cabinet floor is slightly uneven, the pull-out unit may not slide smoothly. This is a situation where a tiny bit of DIY knowledge comes in handy. Learning how to cut toilet shims provides you with a skill that’s perfect for leveling not just toilets, but almost any freestanding unit, ensuring a stable, wobble-free operation.
Perform Regular Maintenance. Once every few months, take a moment to wipe down the sliding tracks. Kitchens can be dusty environments, and keeping the ball bearings free of grit and grime will ensure they continue to glide smoothly for years to come.
Frequently Asked Questions (FAQ)
Are no-drill pull-out trash cans as sturdy as drilled-in models?
High-quality freestanding or adhesive-mounted systems are designed to be exceptionally sturdy and can handle the demands of daily kitchen use. While a professionally drilled-in model might feel slightly more integrated, a well-chosen no-drill option offers comparable stability and smoothness for the vast majority of households, with the significant advantage of being damage-free.
Can I attach my cabinet door to a no-drill system?
Generally, no. The primary advantage of these systems is avoiding any modification to your cabinets, including the door. They are designed to be used within a cabinet that has a standard hinged door that you open first. Some specialized kits may exist, but the most common and effective no-drill solutions are independent of the cabinet door.
What is the typical weight capacity of a no-drill unit?
Weight capacity varies by model, but most are engineered to hold well over what a typical full kitchen trash can would weigh. Many freestanding steel frames can comfortably support 100 pounds or more. Always check the manufacturer’s specifications, but rest assured they are built to handle a full load of waste and recycling.
Conclusion: The Ultimate Damage-Free Kitchen Upgrade
The desire for a tidy, functional kitchen no longer needs to be at odds with the fear of damaging your cabinets. The evolution of pull out trash can without drilling solutions has provided a perfect middle ground for renters, new homeowners, and cautious DIYers alike. By opting for a freestanding or advanced adhesive system, you can achieve that coveted, clean aesthetic and superior functionality in minutes.
This simple project is a fantastic starting point for a broader kitchen refresh. Once you see how easy it is to improve your space without major renovations, you might be inspired to tackle other small but impactful updates. Projects like giving your baseboards a fresh coat of paint can completely revitalize the look of your room, and understanding the nuances of painting shoe molding can help you achieve that professional finish. Embrace the freedom of a damage-free upgrade and enjoy a more organized, spacious, and beautiful kitchen today.