Puck Lights vs Can Lights: The Ultimate Showdown for Home Lighting
Choosing the right lighting for your home can feel like a monumental task. The sheer number of options is enough to make anyone’s head spin, but the decision often boils down to two popular contenders: puck lights and can lights. Making the wrong choice can lead to poorly lit spaces, frustrating installation processes, and even wasted money.
The core of the problem lies in understanding the fundamental purpose of each light type. Homeowners often struggle to decide which is better for creating a warm, inviting atmosphere versus which provides the bright, focused light needed for daily tasks. This guide will illuminate the path, solving the common dilemma of puck lights versus can lights once and for all.
You'll Learn About
What Are Puck Lights? The Unsung Heroes of Accent and Task Lighting
Puck lights are small, low-profile, circular fixtures, aptly named for their resemblance to a hockey puck. These compact lights are masters of targeted illumination, designed to shine a focused beam of light on a specific area. They are incredibly versatile and can be found in various forms, from easy-to-install battery-powered models to more permanent hardwired and plug-in solutions.
The evolution of puck lights has heavily favored LED technology, making them an energy-efficient and long-lasting choice. Unlike their older halogen and xenon counterparts, LED puck lights generate very little heat, making them safe for installation in enclosed spaces like cabinets and closets. Many modern options also come with features like dimmers, remote controls, and even motion sensors for added convenience.
The Pros of Puck Lights: Why They Shine in Specific Spaces
The primary advantage of puck lights lies in their specialized nature. They excel in applications where broad, general lighting would be overwhelming or impractical.
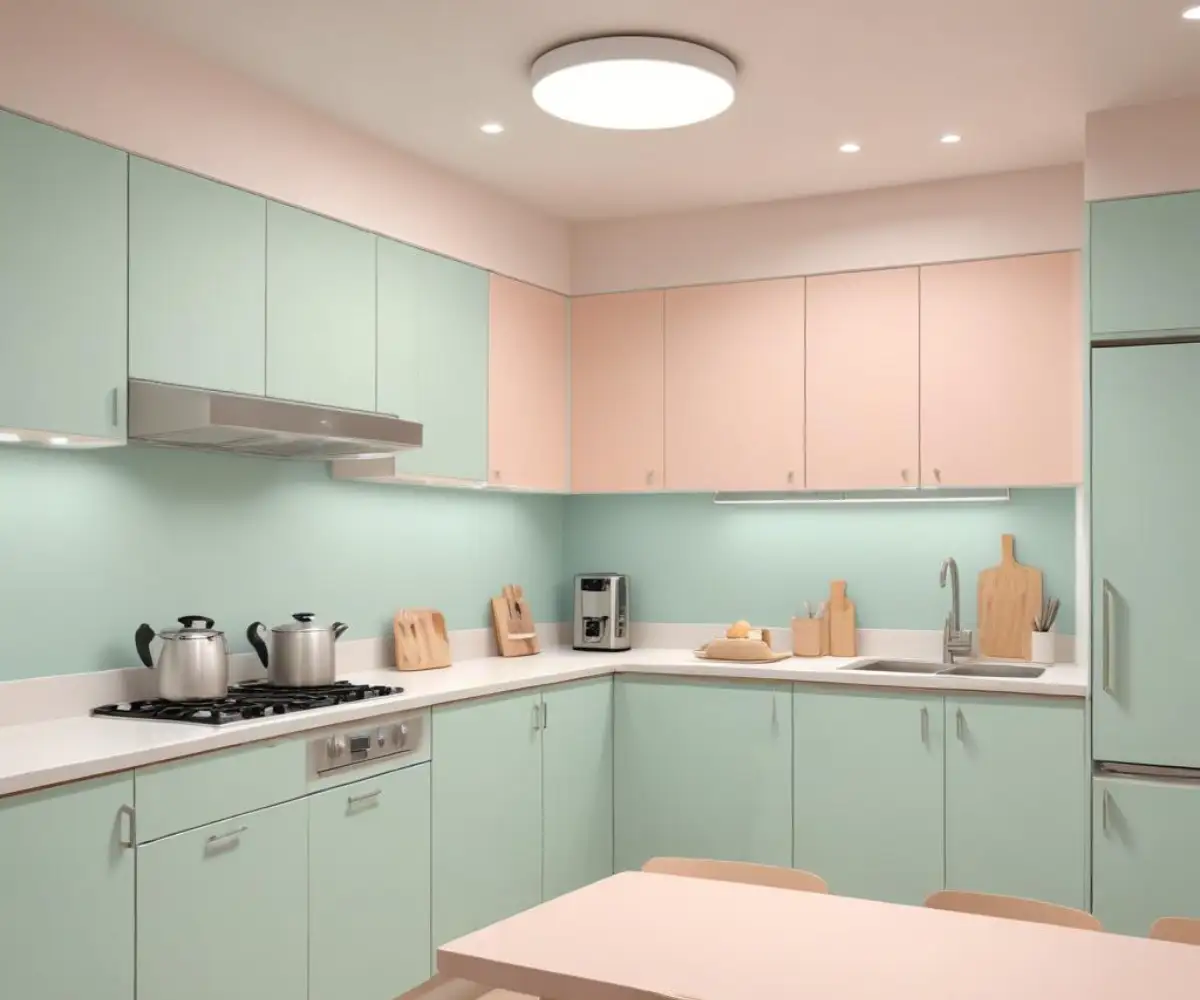
One of their most common and effective uses is for under-cabinet lighting in kitchens. Placed strategically, they eliminate shadows on countertops, providing brilliant task lighting for meal prep and cooking. Their focused beams can also be used to highlight decorative backsplashes or create a warm, ambient glow in the evening.
Their compact size makes them ideal for display cases, bookshelves, and closets, drawing attention to collectibles or making it easier to find what you need. For renters or those hesitant about complex electrical work, battery-operated and plug-in puck lights offer a fantastic, DIY-friendly solution that can be installed in minutes.
The Cons of Puck Lights: Where They Fall Short
Despite their versatility, puck lights are not a one-size-fits-all solution. Their biggest limitation is their focused light spread. They create distinct “pools” of light, which can lead to a spotty or uneven effect if not spaced correctly. This makes them unsuitable for providing general, ambient light for an entire room.
While some installations are simple, achieving a clean, professional look with hardwired puck lights can be challenging. Hiding wires and connecting multiple lights to a single switch often requires careful planning and may necessitate professional help. Undertaking this without proper knowledge can lead to safety hazards, underscoring the risks associated with unpermitted electrical work.
Finally, the convenience of battery-powered models comes with the recurring task of replacing batteries. For frequently used areas, this can become a persistent hassle, making a hardwired or plug-in option a more practical long-term choice.
What Are Can Lights? The Workhorses of General Illumination
Can lights, also known as recessed lights or downlights, are fixtures installed directly into the ceiling. The main components—the housing and the bulb—are hidden, with only the trim being visible. This creates a clean, seamless, and modern aesthetic that integrates perfectly into any room’s design.
They are the go-to choice for providing broad, ambient lighting across large areas such as living rooms, kitchens, hallways, and basements. By casting a wide cone of light downwards, a well-planned layout of can lights can illuminate an entire space evenly, eliminating dark corners and creating a bright, welcoming environment.
The Pros of Can Lights: The Power of Seamless Integration
The most significant advantage of can lights is their ability to provide powerful, uniform illumination while remaining visually unobtrusive. Because they are flush with the ceiling, they don’t take up any visual space, which can make rooms feel larger and more open. This minimalist appeal is a major draw for contemporary and modern home designs.
Can lights are also incredibly versatile. With a wide variety of trim styles (such as baffle, reflector, or gimbal) and bulb types, they can be adapted for general, task, or even accent lighting. For example, an adjustable “eyeball” trim can be directed to highlight a piece of art or an architectural feature. A well-executed recessed lighting plan can significantly increase a home’s perceived value.
The Cons of Can Lights: What to Watch Out For
The primary drawback of can lights is their installation complexity. Installing them in an existing ceiling is a significant undertaking that involves cutting large holes in the drywall, navigating around ceiling joists, and performing more intensive electrical wiring. This is almost always a job for a professional electrician, which adds to the overall cost.
The upfront cost for both the fixtures and professional installation is considerably higher than for most puck light solutions. Furthermore, if not installed correctly, traditional can lights can be a source of air leakage into the attic, leading to energy loss. It is crucial to use airtight, IC-rated (Insulation Contact) housings, especially in ceilings that border unconditioned spaces.
Finally, their permanence is a double-edged sword. Once can lights are installed, relocating them is a major renovation project. This makes meticulous planning before installation absolutely essential to avoid costly mistakes.
The Head-to-Head Comparison: Puck Lights vs. Can Lights
To simplify the decision, it helps to see a direct comparison of their key attributes. This table breaks down the essential differences between the two lighting types.
| Feature | Puck Lights | Can Lights |
|---|---|---|
| Primary Use | Task & Accent Lighting (Under-cabinet, display) | General & Ambient Lighting (Whole-room illumination) |
| Light Spread | Focused, narrow beam (creates pools of light) | Wide, broad cone of light for even coverage |
| Aesthetics | Low-profile but visible fixture on the surface | Seamless, minimalist look; flush with the ceiling |
| Installation | Easy to difficult (Battery/plug-in are simple; hardwired is complex) | Difficult; typically requires professional installation |
| Upfront Cost | Lower (especially for DIY-friendly models) | Higher (due to fixture cost and professional labor) |
| Energy Efficiency | Excellent (primarily use low-wattage LEDs) | Good (LED options are highly efficient, but older models vary) |
Beyond the Basics: Factors No One Tells You About
Choosing between puck lights and can lights involves more than just their primary function. Several nuanced factors can dramatically impact the final look and feel of your space, and getting these details right is what separates an amateur lighting job from a professional one.
The Critical Role of Beam Angle and Color Temperature
Not all light is created equal. The beam angle determines how wide or narrow the cone of light is. Puck lights inherently have a narrower beam angle, perfect for spotlighting. Can lights offer a wider range, but choosing the right one is key to achieving the desired effect. A common mistake is improper spacing, which creates a “scalloping” effect on walls—uneven arcs of light that look unprofessional. A well-designed plan ensures overlapping fields of light for a smooth, consistent wash.
Equally important is color temperature, measured in Kelvins (K). A lower Kelvin value (2700K-3000K) produces a warm, yellowish light, ideal for creating a cozy atmosphere in living rooms and bedrooms. A higher value (4000K-5000K) produces a cool, bluish-white light that mimics daylight, making it perfect for task-oriented spaces like kitchens and home offices.
Smart Home Integration and Dimmability
In today’s connected homes, lighting control is paramount. Both puck and can lights offer smart home integration, but the approach differs. Smart puck light kits are often plug-and-play, connecting via Wi-Fi and controlled through an app. Integrating can lights into a smart home system typically involves installing a smart dimmer switch or using smart bulbs, which provides more centralized control over an entire room’s lighting scheme.
Dimmability is non-negotiable for modern lighting design. It allows you to adjust the intensity from bright, functional light to a soft, ambient glow, making any space more versatile. Always ensure that your chosen fixtures and bulbs are compatible with the type of dimmer switch you plan to use.
Making the Right Choice: A Step-by-Step Guide
Feeling confident in your lighting decision comes down to a clear, methodical approach. Follow these steps to ensure you choose the perfect lighting for your needs.
Step 1: Define Your Lighting Goal
First, identify the primary function of the light in your specific space. Are you trying to illuminate an entire room (ambient lighting), light up a workspace for specific activities (task lighting), or draw attention to a unique feature (accent lighting)? Your answer will immediately point you in the right direction. For instance, renovating a basement with low ceilings might involve both types: can lights for general illumination and puck lights for a built-in bar area. When working on foundational projects, like preparing a floor with products designed for self-leveling concrete over tile, it’s the perfect time to plan your ceiling’s electrical layout from the ground up.
Step 2: Assess Your Space and Constraints
Consider the physical characteristics of the room. High ceilings can easily accommodate can lights, while low ceilings might feel crowded by them. The space above the ceiling is another critical factor; can lights require several inches of clearance, making them difficult to install if ductwork or plumbing is in the way. For projects where the structure is a key feature, such as those using specialty materials discussed in weathershield-lumber-reviews, integrating lighting that respects the material and space is crucial.
Step 3: Evaluate Your Budget and DIY Skills
Be realistic about what you can spend and what you can do yourself. Puck lights offer a range of options for every budget and skill level. If you’re comfortable with basic tools, a plug-in or battery-operated kit is an easy weekend project. Can lights, on the other hand, represent a larger investment in both materials and professional labor. Factoring in the cost of an electrician is essential for a safe and code-compliant installation.
Step 4: Create a Simple Lighting Plan
You don’t need to be a professional designer to create a basic lighting plan. Sketch your room on a piece of paper and mark where you need light the most. For can lights, a general rule of thumb is to space them apart by half the ceiling height. For under-cabinet puck lights, centering one under each cabinet is a good starting point. This simple exercise will help you visualize the final result and avoid common mistakes like creating unintentional shadows or glare.
Ultimately, the “puck lights vs can lights” debate isn’t about which is superior overall, but which is the right tool for the job. Puck lights are the specialists, perfect for targeted tasks and accentuating details. Can lights are the generalists, providing broad, foundational light for entire rooms. By understanding their distinct strengths and planning thoughtfully, you can layer these lighting types to create a home that is not only functional but also beautiful and inviting.