PTO Switch Bypass Gone Wrong? Your Ultimate Diagnostic Guide
You’re ready to tackle the lawn, but your riding mower has other plans. You pull the PTO switch to engage the blades, and… nothing happens. It’s a frustrating moment that can bring your entire yard work routine to a halt. When this happens, the Power Take-Off (PTO) switch is often the prime suspect.
Many people immediately consider a PTO switch bypass to solve the problem. While this can be a useful diagnostic step, it’s a dangerous permanent solution. This guide will walk you through understanding your PTO switch, the severe risks of a permanent bypass, and how to safely diagnose the real issue with your mower.
You'll Learn About
What is a PTO Switch and Why Does It Fail?
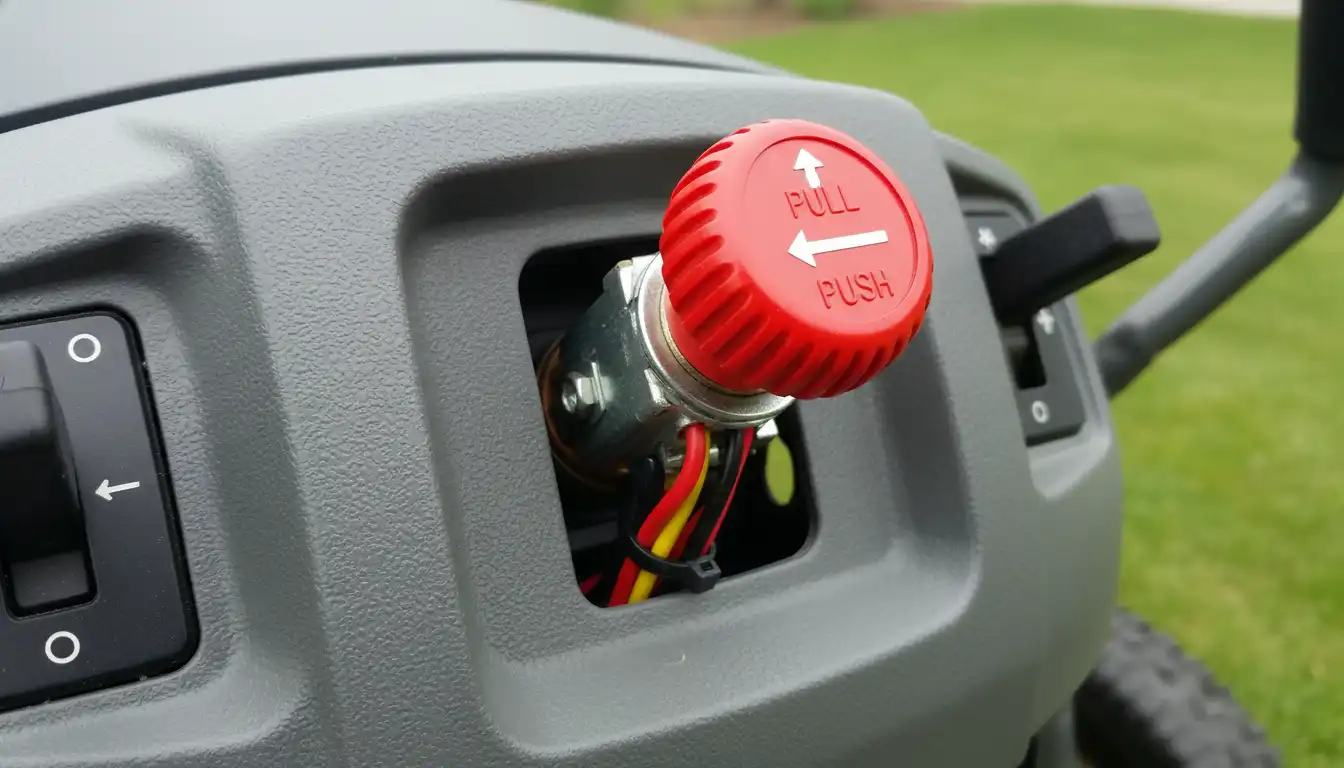
A PTO switch is a critical safety and operational component on your riding mower or lawn tractor. Its main job is to engage and disengage the mower’s cutting blades by controlling power to the electric PTO clutch. When you pull the switch, it sends an electrical current that creates a magnetic field, forcing clutch plates together to spin the blades. Pushing the switch cuts the power, stopping the blades safely.
Like any component, these switches can fail. Common culprits include internal wear from repeated use, corrosion on the electrical terminals from moisture, frayed or broken wires, or a simple short circuit. Understanding these failure points is the first step toward a correct and safe repair.
The Shocking Dangers of a Permanent Bypass
Before attempting any bypass, it is crucial to understand this is not a permanent fix. A permanent PTO switch bypass is incredibly dangerous and should never be done. The switch is part of an integrated safety system designed to protect you and those around you.
Bypassing it can lead to accidental blade engagement, posing a severe risk of injury. It also eliminates the kill-circuit function tied to other safety features, like the seat switch, which is designed to stop the blades if the operator falls off. Furthermore, a permanent bypass can cause significant damage to your mower’s electrical system, leading to more expensive repairs down the road.
Beyond Safety: The Hidden Electrical Risks
What many guides fail to mention is the strain a bypass puts on the PTO clutch and the mower’s charging system. A bypassed switch can cause the PTO clutch to be constantly energized, leading it to overheat and fail prematurely—a costly component to replace. It also creates a continuous draw on the electrical system, which can strain the alternator and battery, causing them to fail over time.
How to Safely Test Your PTO Switch Before a Bypass
Jumping straight to a bypass is a common mistake. The first step should always be to test the switch itself. A faulty switch is a common reason for blades not engaging, and it’s a simple, inexpensive part to replace. You can easily test your PTO switch with a multimeter.
First, disconnect the battery’s negative terminal for safety. Then, access the back of the PTO switch and unplug its wiring harness. Set your multimeter to the continuity setting (it often has a sound symbol). Test the terminals on the switch according to your mower’s wiring diagram or the table below for a common configuration.
| Switch Position | Terminals to Test | Expected Multimeter Reading |
|---|---|---|
| OFF (Pushed In) | Terminal A to Terminal B | Continuity (Beep or ~0 Ω) |
| OFF (Pushed In) | Terminal C to Terminal D | No Continuity (OL) |
| ON (Pulled Out) | Terminal A to Terminal B | No Continuity (OL) |
| ON (Pulled Out) | Terminal C to Terminal D | Continuity (Beep or ~0 Ω) |
If the readings don’t match this pattern, the switch is faulty and needs to be replaced. This simple test can save you from the risks and complexities of an unnecessary bypass.
The Temporary Bypass: A Step-by-Step Diagnostic Tool
If your switch tests fine, a temporary bypass can help determine if the problem lies elsewhere in the circuit, such as the PTO clutch itself. This should only be performed for a few seconds for testing purposes.
WARNING: This procedure is for diagnostic purposes ONLY. Never operate the mower with a bypassed switch. Always ensure the mower is off, the key is removed, and the negative battery terminal is disconnected before working on wiring.
- Access the Wiring: Unplug the wiring harness from the back of the PTO switch.
- Identify the Correct Wires: You need to identify the wires that send power to the PTO clutch. Consult your mower’s service manual or wiring diagram. Typically, you are looking for the main power-in wire and the power-out wire that leads to the clutch.
- Create a Jumper Wire: Use a short piece of 12-gauge wire with alligator clips on both ends.
- Perform the Jump: Briefly connect the jumper wire between the power-in and power-out terminals on the wiring harness (NOT the switch itself). If the PTO clutch makes a distinct “click” sound, it is engaging. This indicates the clutch is likely functional and the problem may lie in the wiring between the switch and the clutch.
Remove the jumper wire immediately after the test. If the clutch engages during this test, your problem is likely not the clutch but could still be a safety interlock elsewhere.
What if the Bypass Fails to Engage the Clutch?
If you perform the temporary bypass and the PTO clutch still doesn’t engage, the problem is not your switch. This points to other potential failures in the system. The next components to investigate are the PTO clutch solenoid, the wiring harness leading to the clutch, or the safety interlock system.
Sometimes, the issue isn’t even electrical. It could be a mechanical failure, like a seized bearing in a spindle or a broken deck belt. If your riding mower starter is not engaging, you might be looking at a different set of electrical issues that need to be addressed first. A systematic approach to troubleshooting is key.
Investigating the Safety Interlock System
Modern riding mowers have a network of safety switches that must all be in the correct state for the blades to engage. This typically includes a seat switch, a brake switch, and sometimes a reverse-mow (RIO) switch. A failure in any of these can prevent power from reaching the PTO clutch.
You can test these switches for continuity with a multimeter in the same way you tested the PTO switch. A faulty safety switch is a far more common issue than a complete PTO clutch failure and is much easier and cheaper to fix.
The Right Fix: Proper Component Replacement
Once you have diagnosed the faulty component—whether it’s the PTO switch, a safety switch, or the clutch itself—the only correct and safe solution is replacement. Bypassing a safety feature is never the answer. Using OEM or high-quality replacement parts will ensure your mower operates safely and reliably.
Replacing a PTO switch is typically straightforward. It often involves disconnecting the battery, carefully prying the switch out of the dashboard, unplugging it, and connecting the new one. This ensures all safety systems remain intact.
Maintaining Your Mower’s Electrical Health
Preventative maintenance can help you avoid these issues in the future. Regularly clean your mower deck and engine area to prevent debris buildup. Inspect visible wiring for any signs of wear, fraying, or corrosion.
Apply dielectric grease to electrical connectors, especially the PTO switch and clutch plugs, to keep moisture out and prevent corrosion. A well-maintained electrical system is less likely to fail. Even seemingly unrelated issues, like an always on light switch in your home, often boil down to basic electrical principles of switches and connections failing over time.
Conclusion: Diagnose, Don’t Bypass
While a PTO switch bypass can seem like a quick fix, it introduces serious safety risks and can cause further damage to your lawn tractor. By taking a methodical approach—testing the switch, using a bypass only as a brief diagnostic tool, and checking the entire safety circuit—you can accurately identify the root cause of the problem.
The correct solution is always to replace the faulty component. This not only gets your mower back to cutting grass but also ensures it does so safely, protecting you, your family, and your investment for years to come.