Prism Grout Problems? The #1 Guide to a Perfect Finish
You envisioned a flawless tile installation, with crisp, uniform grout lines elevating the entire space. You chose Custom Building Products’ Prism Grout, known for its promises of color consistency and high performance. Yet, here you are, staring at a finished project that looks anything but perfect, wondering where it all went wrong. This frustration is a common story for many DIYers and even some professionals who find themselves facing unexpected Prism grout problems.
From bewildering color splotches to cracks and powdery finishes, the dream of a perfect grout job can quickly turn into a nightmare. The good news is that these issues are almost always preventable and fixable. This guide will dive deep into the most common Prism grout failures, uncover the precise reasons they happen, and provide you with expert, actionable solutions to either prevent them from the start or repair them effectively, ensuring your tile work looks as stunning as you imagined.
You'll Learn About
Decoding the 5 Most Common Prism Grout Problems
Prism is a high-performance, calcium aluminate cement-based grout, which means it behaves differently than traditional Portland cement grouts. Its rapid-setting nature and specific chemical composition are designed for strength and color consistency, but they also create a smaller margin for error during installation. Understanding these unique properties is the first step to avoiding and solving problems.
Let’s break down the five most frequent complaints and transform them from frustrating issues into manageable tasks. We’ll explore why each problem occurs and, most importantly, how to achieve that professional-grade finish you’re after.
1. The Nightmare of Blotchy, Inconsistent, and Faded Color
This is arguably the most maddening of all Prism grout problems. You selected a specific shade, perhaps a bold charcoal or a subtle gray, only for it to dry in an unpredictable patchwork of light and dark spots. Some areas may look washed out, while others appear much darker, creating a messy, unprofessional look that ruins the entire tile job.
The Root Causes: Color inconsistency in a cementitious grout like Prism is almost always related to one critical element: water. An improper water-to-grout ratio is the primary culprit. Too much water in the initial mix can dilute the pigments, causing them to dry lighter. Conversely, cleaning the grout off the tile too soon or with an overly saturated sponge can pull pigment out of the joints, leading to fading and splotches. The rapid-setting nature of Prism means timing is everything; washing it down before it has had a chance to firm up is a recipe for color disaster.
The Pro-Level Solution: Precision is your best defense.
- Measure Religiously: Use a measuring cup for both the water and the grout powder. Do not estimate. Follow the manufacturer’s instructions on the packaging to the letter. It’s better for the mix to be slightly too dry initially and then add water sparingly than to start with too much.
- Mix Methodically: Mix with a low-speed drill or by hand until the powder is fully integrated. Then, let the grout “slake” or rest for 5-10 minutes. This allows the chemicals to fully activate. After slaking, give it a final remix without adding more water.
- The “Finger Test”: Before you even think about cleaning, wait for the grout to firm up in the joints. The official guidance is to wait until you can press your finger on a grout line and it doesn’t transfer to your finger. This indicates it’s hard enough to withstand a gentle wash without losing its pigment.
- Damp, Not Soaking: When cleaning, use a barely damp sponge. Wring it out until it’s almost dry to the touch. This prevents excess water from washing out the color from the still-curing grout lines.
2. Pesky Pinholes and Pitting on the Surface
You’ve finished grouting and step back to admire your work, only to notice tiny but numerous pinholes dotting the surface of your grout lines. These small pits and voids not only trap dirt and grime, making cleaning difficult, but they also compromise the structural integrity and water resistance of the grout joint over time.
The Root Causes: Pinholes are essentially trapped air bubbles. This can happen if the grout is over-mixed, especially at a high speed, which whips air into the mixture. The other major cause is not packing the grout joints firmly enough during application. If the grout isn’t pressed deep into the joint with adequate pressure, small air pockets can remain, which reveal themselves as the grout cures.
The Pro-Level Solution: A methodical application technique is key.
- Mix Low and Slow: If using a drill mixer, keep it at a low RPM (under 300). This folds the ingredients together rather than whipping them, preventing excess air from being incorporated.
- Pack it In: When applying the grout with your float, use firm pressure. Hold the float at a 45-degree angle to the tile and press the grout diagonally across the joints. This ensures the grout is forced all the way to the bottom of the joint, eliminating air voids.
- Small Fixes: If you only have a few pinholes after the grout has cured, you can perform a spot treatment. Mix a very small amount of Prism grout to a thick, putty-like consistency. Press a tiny amount directly into the pinhole with your finger, wipe away the excess with a barely damp cloth, and let it cure.
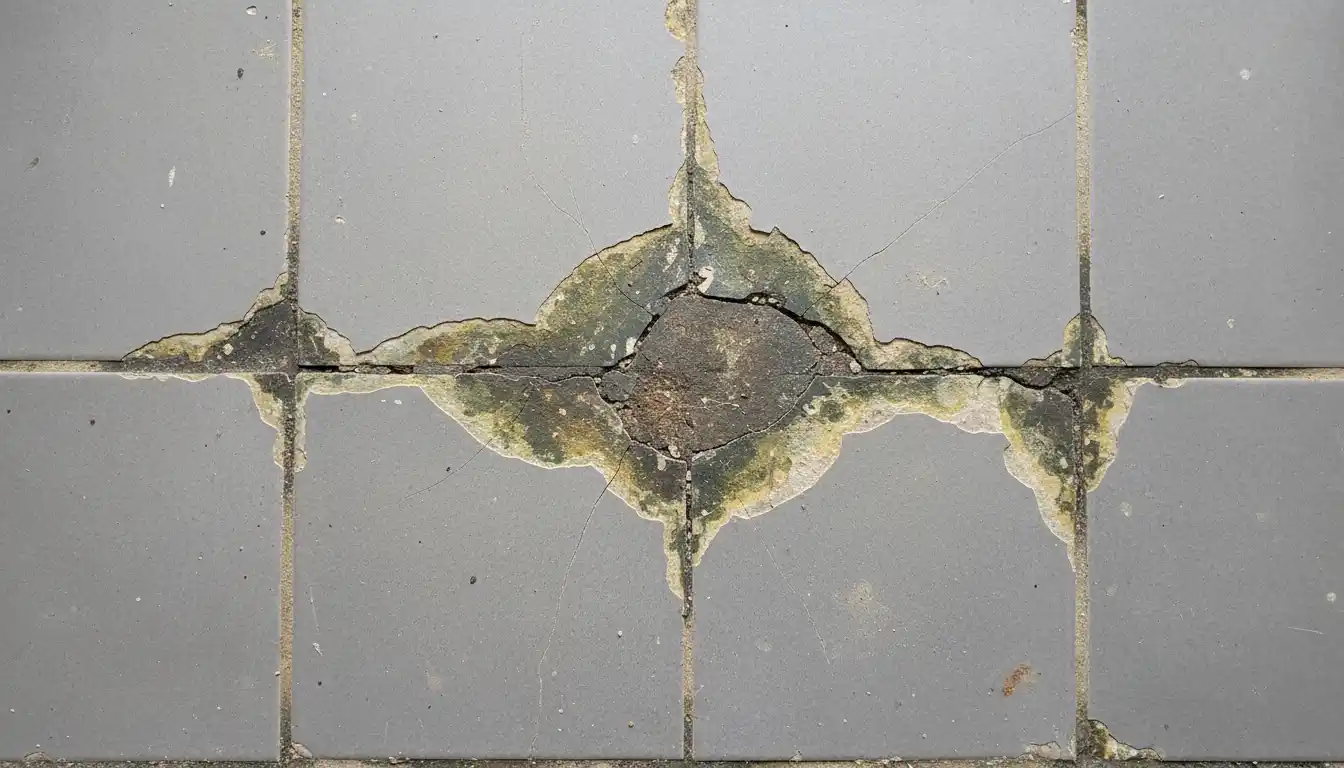
3. Cracking and Shrinking Grout Lines
Cracks in your grout are more than just a cosmetic issue; they are a breach in the defensive line of your tile installation. Water can penetrate these cracks, potentially leading to loose tiles and damage to the substrate underneath. The cracks might appear as fine hairline fractures or larger, more noticeable separations from the tile edge.
The Root Causes: Much like color issues, cracking often traces back to too much water in the mix. Excess water evaporates as the grout cures, causing the grout to shrink more than it should, which leads to cracks. Another cause is filling movement joints—like the corner where a floor meets a wall—with grout instead of a flexible caulk. Buildings naturally shift and move, and rigid grout will crack under this stress. Finally, cleaning too early can wash out grout material, leaving joints only partially filled and weak.
The Pro-Level Solution: Combine a proper mix with proper joint filling.
- Thick is Better: Your final grout mix should have a creamy, peanut-butter-like consistency. It should not be runny or soupy. A thicker mix has less water to evaporate, leading to minimal shrinkage.
- Caulk the Corners: Never grout inside corners or changes of plane. These areas are called movement joints for a reason. Use a color-matched 100% silicone or urethanized caulk designed for this purpose. This provides the flexibility needed to absorb structural movement without failing.
- Don’t Rush the Cure: Allow the grout to cure fully according to the manufacturer’s directions before subjecting it to heavy use or moisture. This allows it to reach its maximum compressive strength.
4. Efflorescence: That Stubborn White Haze
Sometimes, days or even weeks after your grout has cured, a chalky white film appears on the surface, particularly with darker grout colors. This is efflorescence, a deposit of mineral salts left behind as moisture evaporates from the grout. While not structurally damaging, it can be a persistent and unsightly problem.
The Root Causes: Efflorescence is caused by soluble salts within the cement being carried to the surface by moisture. Using too much water in the mix or during cleanup is a primary trigger. If the substrate (the surface beneath the tile) is damp, that moisture can also travel up through the grout, bringing salts with it. Prism grout is specifically formulated with calcium aluminate cement to resist efflorescence, but severe installation errors can still cause it to appear.
The Pro-Level Solution: Control the moisture from start to finish.
- Dry Substrate: Ensure the thin-set mortar is fully cured and the substrate is dry before you begin grouting. Grouting over a still-damp mortar bed is a common cause of efflorescence.
- Minimal Water Cleanup: This cannot be overstated. A nearly dry sponge during cleanup is one of the best ways to prevent efflorescence.
- Removal: If efflorescence does occur, it can often be removed. Start by trying to buff it off with a dry microfiber towel. If that doesn’t work, use a specialized efflorescence remover or a solution of 1 part white vinegar to 5 parts water. Always test in an inconspicuous area first and rinse thoroughly with clean water afterward.
5. Soft, Powdery, and Weak Grout
If your cured grout can be easily scratched with a fingernail or seems to rub away in a powdery residue, you have a serious problem. Soft grout will not stand up to cleaning or foot traffic and indicates a fundamental failure in the curing process. It will quickly deteriorate, leaving your tile vulnerable.
The Root Causes: An improper mix is almost always the issue. Either too much water was added, creating a weak, porous structure, or the grout was not mixed thoroughly enough, leaving unhydrated pockets of cement powder. Another less common cause is expired grout; always check the date on the bag before using it.
The Pro-Level Solution: Unfortunately, this is the hardest problem to fix after the fact.
- Prevention is Everything: The only real solution is to get the mix right from the start. Follow the mixing and slaking instructions perfectly. A proper mix is the foundation of strong, durable grout.
- Removal and Replacement: If the grout is truly soft and powdery throughout, there is no topical fix. It must be completely removed and replaced. Use a grout removal tool to carefully grind or scrape out the old, failed grout. Vacuum the joints thoroughly, and then re-grout, this time following all procedures with meticulous care. This is a labor-intensive process, but it’s the only way to ensure a lasting result. For challenging projects, exploring different types of grout may be beneficial, as detailed in some grout with sealer built-in reviews which discuss alternatives that can simplify the process.
Beyond the Basics: Hidden Factors That Can Ruin Your Grout
Even when you follow the main rules, subtle environmental factors can sabotage your results. Ambient temperature and humidity play a significant role in how grout cures. Grouting on a very hot, dry day can cause the grout to lose moisture too quickly, leading to a weak cure and potential cracking. Conversely, cold, damp conditions can dramatically slow the curing process, making the grout susceptible to damage for a longer period.
The water quality itself can also have an impact. Water with a high mineral content (hard water) can sometimes affect the final color and contribute to efflorescence. For critical projects, especially with very dark or vibrant grout colors, using distilled water for mixing is an expert-level trick to eliminate any variables from your tap water.
Quick Reference Troubleshooting Table
For a fast overview, here is a breakdown of the most common Prism grout problems and their solutions.
| Problem | Primary Cause(s) | The Solution |
|---|---|---|
| Blotchy or Faded Color | Too much water in mix; cleaning too soon or with too much water. | Measure water precisely, wait for grout to firm up before cleaning (finger test), use a barely damp sponge. |
| Pinholes and Pitting | Over-mixing (whipping in air); not packing joints fully. | Mix at a low speed, use firm pressure with a float to pack joints, spot-fix individual holes with a thick paste. |
| Cracking and Shrinking | Too much water in mix; grouting movement joints. | Use a thicker, peanut-butter consistency mix; use 100% silicone caulk in all corners and changes of plane. |
| Efflorescence (White Haze) | Excess moisture carrying mineral salts to the surface. | Use minimal water for cleanup, ensure substrate is dry before grouting, clean with a dry cloth or specialized remover. |
| Soft and Powdery Grout | Incorrect water-to-grout ratio; improper mixing; expired product. | Prevention is key. If cured soft, the only solution is complete removal and replacement. |
Achieving Grout Perfection
While Prism grout problems can be incredibly disheartening, they are rarely the fault of the product itself. They are almost always a result of the installation process. By understanding the critical role of water ratio, mixing technique, and curing time, you can avoid these common pitfalls and achieve the beautiful, durable, and color-consistent finish that Prism is designed to deliver.
Tackling a tile project is a significant undertaking, and getting the final details right is what separates an amateur job from a professional one. With these insights, you are now equipped to handle the unique challenges of a high-performance grout. Success with home improvement often builds confidence for other projects, whether it involves simple seasonal upkeep or more complex system upgrades, like considering whether to replace central ac with mini split systems for better efficiency. Mastering each task, big or small, contributes to a well-maintained and comfortable home. For those who enjoy enhancing their tools, there are even communities focused on things like snowblower mods to improve performance. The key is careful research and precise execution, which applies as much to grouting as it does to any other home project.