Pressure Washing Paint Off Stucco? Avoid Disaster With This Guide
That peeling, cracked paint on your stucco exterior is an eyesore. Your home’s curb appeal is suffering, and you know a fresh coat of paint is long overdue. The thought of scraping it all by hand is daunting, which is why the powerful allure of a pressure washer seems like the perfect, time-saving solution. But this is the exact moment where a simple home improvement project can turn into a costly, irreversible disaster.
Using a pressure washer to remove paint from stucco isn’t like cleaning a concrete driveway. It’s a high-stakes operation that demands precision, the right tools, and a deep understanding of what you’re working with. One wrong move can blast away more than just paint, leaving you with etched, cracked, and water-damaged stucco that requires professional repair.
You'll Learn About
Why Removing Paint from Stucco is So Tricky
Stucco is not a simple, solid surface. It’s a porous, cement-based material with a textured finish that is surprisingly delicate. This texture, which gives stucco its character, also creates countless tiny crevices where paint can form a deep, mechanical bond that is incredibly difficult to break.
When you apply extreme force with a pressure washer, you risk gouging the stucco, creating “wand marks,” or blowing out entire chunks of the material. Furthermore, the intense pressure can force water deep into the stucco and behind it, leading to trapped moisture, mold growth, and potential damage to your home’s underlying structure. The goal is to remove the paint, not compromise the integrity of your exterior.
Before You Start: The Essential Preparation Checklist
Proper preparation is non-negotiable; it’s the barrier between a successful project and a significant repair bill. Rushing this stage is the single biggest mistake you can make. Take the time to prepare the area thoroughly to protect your home and yourself.
Your first priority must always be safety. Equip yourself with safety goggles, gloves, and durable, closed-toe footwear. A high-pressure stream of water can easily send paint chips and debris flying at dangerous speeds. Protect your eyes and skin from both the impact and any cleaning solutions you might use.
Next, conduct a detailed inspection of your stucco walls. Look for any pre-existing hairline cracks, chips, or damaged areas. Applying high-pressure water to these weak points will only make them worse. It is crucial to repair these imperfections first, much like you would take the time to cover old smoke detector holes for a flawless ceiling finish. Use an appropriate exterior-grade, paintable caulk or a stucco patch compound for repairs and allow it to cure completely.
Finally, protect the surrounding environment. Use painter’s tape and plastic sheeting to cover all windows, doors, light fixtures, and electrical outlets. Lay tarps over delicate plants, flowerbeds, and any nearby landscaping to shield them from flying paint chips and chemical runoff.
Can You Actually Pressure Wash Paint Off Stucco? The Honest Answer
The direct answer is yes, but this comes with significant caveats. You are not merely cleaning the stucco; you are attempting to strip a bonded layer from its surface. Success depends entirely on using the correct equipment and technique. It’s a task that requires finesse, not just brute force.
The effectiveness of pressure washing for paint removal hinges on several factors: the type and condition of the paint, the integrity of the stucco itself, and—most importantly—the pressure (PSI), nozzle type, and your distance from the wall. For old, heavily peeling, or flaking paint, a pressure washer can be highly effective at removing the loose material. However, for well-adhered paint, water pressure alone may not be enough and could cause damage before the paint gives way.
The Right Tools for the Job: More Than Just a Pressure Washer
Simply renting the most powerful pressure washer available is a recipe for disaster. The key is control. You need a pressure washer that allows for adjustable pressure, giving you the ability to fine-tune the force to match the task. For stucco, lower pressure is almost always better.
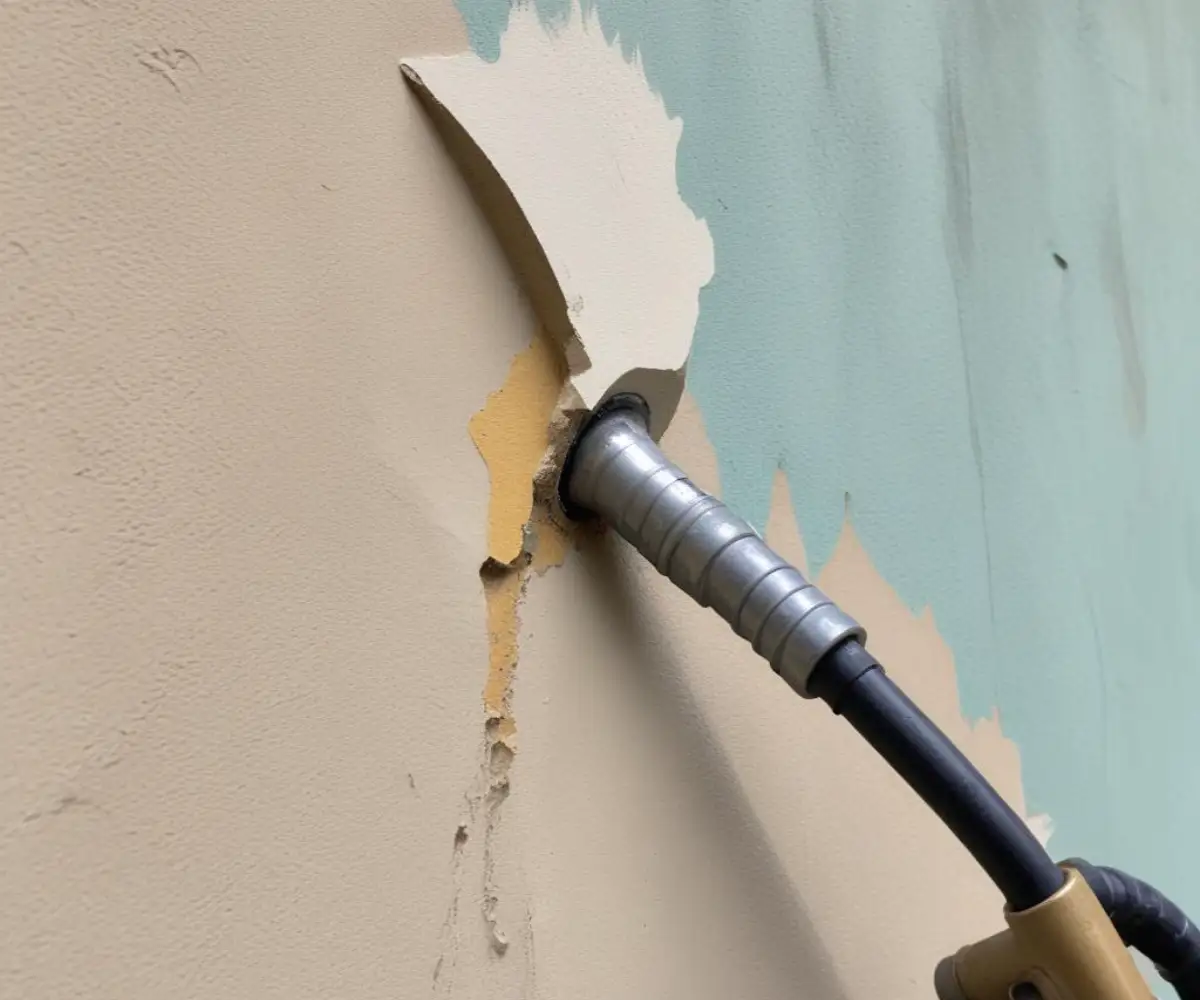
The single most critical component is the nozzle. Pressure washer nozzles are color-coded to indicate the angle of the water spray, which directly controls the intensity of the stream. Never, under any circumstances, use a red 0-degree nozzle on stucco; it will concentrate the pressure into a tiny point capable of drilling a hole straight through the material.
Start with the widest angle nozzle, typically the white 40-degree or green 25-degree tip. These spread the water pressure over a larger area, making them far safer for delicate surfaces. You may also consider using a chemical paint stripper designed for masonry surfaces as a pre-treatment to soften the paint, reducing the amount of pressure needed for removal.
Step-by-Step Guide: How to Safely Remove Paint from Stucco
With your preparations complete and the right equipment in hand, you can begin the process. Work methodically and patiently, letting the tools do the work without forcing them. Rushing will lead to mistakes and damage.
Step 1: Apply a Chemical Stripper (If Necessary). If the paint is well-adhered, start with a chemical stripper. Apply it to a section of the wall according to the manufacturer’s instructions, and let it sit for the recommended dwell time to soften the paint.
Step 2: Set Up and Test. Begin with the widest nozzle (40-degree) and set your pressure washer to its lowest effective pressure setting. Always test your setup on an inconspicuous area first, like a section of wall hidden behind a bush. This allows you to see how the stucco reacts before moving to a visible area.
Step 3: Master the Correct Technique. Maintain a consistent distance of at least 18 to 24 inches from the stucco surface. Hold the wand at a 45-degree angle to the wall. This angle helps the water get underneath the paint to lift it off, rather than blasting directly at the surface. Use smooth, overlapping, sweeping motions, working from the top of the wall downwards.
Step 4: Adjust as Needed. If the paint isn’t coming off, you can try moving slightly closer or switching to a 25-degree nozzle, but do so with extreme caution and re-test on your hidden spot. Let the water and the angle do the work. If a section of paint refuses to budge, it is safer to remove it manually with a scraper later than to risk blasting it with excessive pressure.
Step 5: Rinse Thoroughly. After stripping the paint from a section, switch to a low-pressure rinse to wash away all the paint chips and any remaining chemical stripper. A clean surface is essential for the next steps.
| PSI Range | Nozzle Type | Suitable For | Risk Level for Stucco |
|---|---|---|---|
| 1200 – 1500 PSI | White (40°) or Green (25°) | Safely cleaning or stripping loose paint from stucco. | Low (with proper technique) |
| 1500 – 2000 PSI | Green (25°) or Yellow (15°) | Stripping tougher paint, cleaning brick or harder surfaces. | Medium to High (Use with extreme caution) |
| 2000 – 3000 PSI | Yellow (15°) or Red (0°) | Cleaning concrete, stripping heavy rust. | Very High (Do NOT use on stucco) |
| 3000+ PSI | Red (0°) / Turbo Nozzle | Industrial cleaning, heavy equipment. | Extreme (Guaranteed to cause severe damage) |
What If Pressure Washing Isn’t Enough? Alternative Methods
Sometimes, pressure washing is not the right solution. If the paint is extremely stubborn or the stucco is old and fragile, you must consider safer, albeit more labor-intensive, alternatives. Pushing the limits with a pressure washer is never worth the risk.
For smaller areas or particularly tough spots, a combination of a quality paint stripper, a heat gun, and manual scraping can be very effective. This method gives you maximum control and significantly reduces the risk of damaging the stucco. Another option for large-scale projects is professional media blasting (like soda blasting), which uses fine particles to strip the paint without the destructive force of high-pressure water. However, this is strictly a job for experienced professionals.
Knowing when to call for help is key. Sometimes the investment is worth the peace of mind. The process can be similar to deciding on other home repairs; for instance, the cost to remove dog door in wall might seem high, but it’s often necessary to ensure a professional, weatherproof finish.
Common Mistakes to Avoid (And How to Fix Them)
Even with careful planning, mistakes can happen. Recognizing them early is crucial to minimizing damage. The most common error is impatience, which leads to using too much pressure or getting too close to the wall.
Using Too Much Pressure: If you see the surface of the stucco starting to look etched or “fuzzy,” or if small pieces of aggregate are being washed away, stop immediately. You are using too much pressure. Switch to a wider nozzle or increase your distance from the wall.
Using the Wrong Nozzle: As stated before, the red 0-degree nozzle is your enemy. If you’ve accidentally used it and created wand marks or gouges, the only fix is to repair the area with a stucco patching compound after the wall is fully dry.
Not Rinsing Properly: Leaving chemical stripper residue on the wall can interfere with the adhesion of new primer and paint. Always rinse thoroughly from the top down, ensuring all cleaning agents and debris are washed completely away.
After the Paint is Gone: Prepping Stucco for a New Finish
Successfully removing the old paint is only half the battle. Proper preparation of the newly stripped surface is essential for a long-lasting, beautiful paint job. Don’t cut corners on this final, critical phase.
First, you must allow the stucco to dry completely. Stucco is porous and will absorb a significant amount of water during washing. Painting over damp stucco will trap moisture, leading to blistering and peeling paint down the road. Depending on the climate and humidity, this could take several days.
Once dry, inspect the entire surface one last time for any minor damage you may have missed or caused during the washing process. Small imperfections can become glaringly obvious after a fresh coat of paint. This final check is as important as looking for floor damage after you remove carpet staples from stairs. After making any necessary repairs, apply a high-quality masonry or stucco primer. This will seal the porous surface, ensure even paint absorption, and provide a strong foundation for your topcoat.
Ultimately, pressure washing paint from stucco is a task that can be accomplished by a diligent DIYer, but it walks a fine line between success and failure. It requires patience, the right equipment, and a healthy respect for the material you are working with. By starting with the lowest pressure, using the widest angle nozzle, and testing every step of the way, you can refresh your home’s exterior without inflicting costly damage. When in doubt, always err on the side of caution or call a professional.