Pop Up Sump Pump Discharge: Your #1 Defense Against Flooding
You have a sump pump to protect your basement from turning into an indoor swimming pool. But where does all that water go? If your system uses a pop-up discharge, you might have a hidden vulnerability that could lead to catastrophic failure, especially when you least expect it.
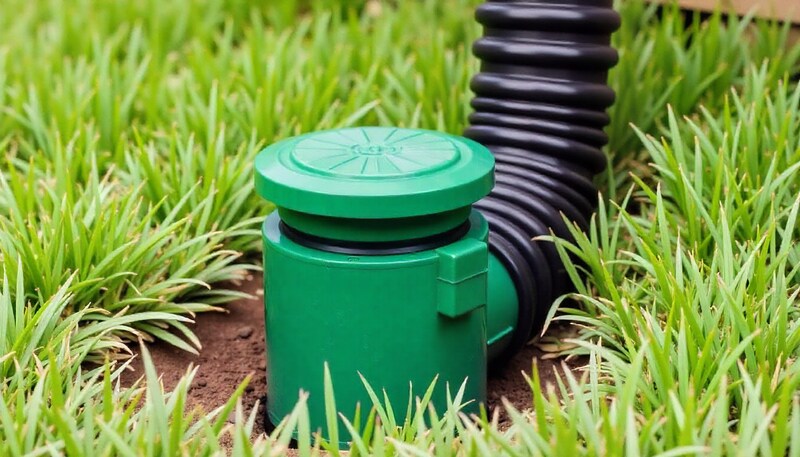
Many homeowners overlook the final exit point of their sump pump system, assuming it will always work flawlessly. This small, often green, cap flush with your lawn is the last gatekeeper. If it fails, your entire system backs up, potentially leaving you with thousands of dollars in water damage.
You'll Learn About
What is a Pop-Up Sump Pump Discharge and Why Should You Care?
A pop-up sump pump discharge, also known as a pop-up drainage emitter, is a fitting connected to the end of your underground sump pump discharge pipe. When your sump pump activates and pushes water through the pipe, the pressure causes the emitter’s lid to “pop up,” releasing the water onto your lawn at a safe distance from your foundation. Once the pump cycle ends and the pressure subsides, the lid closes to sit flush with the ground.
This design is popular for its discreet, mow-over convenience and for keeping debris and pests out of the discharge line. However, this seemingly simple mechanism is a critical chokepoint. If the pop-up emitter cannot open, your sump pump cannot discharge water, leading to a flooded basement as the sump pit overflows.
The Hidden Dangers Lurking in Your Lawn
The primary problem with pop-up emitters is their susceptibility to blockages. From debris and aggressive grass growth to the serious threat of freezing, several factors can prevent your discharge system from functioning correctly. Ignoring these risks is a gamble with your home’s safety.
One of the most common issues occurs when you hear the pump running but see no water coming out. This could mean the line is clogged or frozen solid. You might also notice pooling water around the emitter or even signs of soil erosion, indicating a leak or a blockage in the pipe just before the pop-up device.
The Freezing Menace: Winter’s Greatest Threat to Your Sump Pump
For homeowners in colder climates, the biggest enemy of a pop-up discharge system is ice. When temperatures drop, any water remaining in the discharge line can freeze, creating an impenetrable blockage. This is a significant risk because even a small amount of trapped water can expand and seal the pipe or the emitter itself shut.
When a thaw occurs or rain falls on frozen ground, your sump pump will work overtime. But if the discharge line is frozen, the pump will run continuously against a blockage, which can burn out the motor. If your pump is running more frequently than usual, like cycling every 10 seconds, a blockage could be the culprit.
How to Prevent a Frozen Pop-Up Discharge
Prevention is key to avoiding a winter disaster. Proper installation with a sufficient downward slope is the most critical factor. The discharge pipe must be buried with a constant slope away from your house, ensuring gravity drains as much water as possible after each pump cycle. A dip or low spot in the pipe will trap water, guaranteeing a future ice block.
Many high-quality pop-up emitter elbows come with a small “weephole” at the bottom. This allows the small amount of water left in the elbow to slowly drain into the surrounding soil. Placing a few inches of gravel beneath the emitter when installing it can greatly improve this drainage and prevent freezing.
Clogs and Critters: Year-Round Sabotage of Your System
Freezing isn’t the only threat. Throughout the year, your pop-up emitter faces a constant battle against debris and nature. Understanding these common culprits is the first step toward effective maintenance.
Common Causes of Pop-Up Emitter Clogs:
- Grass and Overgrowth: Aggressive turf can quickly grow over the emitter’s lid, preventing it from opening. It’s the number one reason for pop-up failure.
- Leaves and Debris: During autumn, leaves and small twigs can get washed into the discharge line and accumulate at the elbow of the pop-up, creating a stubborn clog.
- Dirt and Sediment: Fine particles of dirt and sediment pumped from your sump pit can settle in the discharge line and compact over time, restricting flow.
- Lawn Mower Damage: While designed to be mow-over safe, a direct hit from a lawn mower blade can crack or break the emitter’s lid, causing it to fail.
- Pest Infestations: A closed emitter should keep pests out, but if it becomes damaged or clogged, it can become an inviting home for insects and rodents. Figuring out how to keep bugs out of the sump pump system starts at the discharge point.
A clogged line can also cause strange sounds in your system. If you’re wondering why you hear water running in your sump pump long after it should have stopped, it could be water struggling to get past a partial blockage.
Your Step-by-Step Guide to Installing and Maintaining a Pop-Up Discharge
Proper installation and regular maintenance are non-negotiable for a reliable pop-up discharge system. Follow these steps to ensure your setup is effective and durable.
Installation Best Practices
- Choose the Right Location: The emitter should be located at least 10 feet away from your foundation in a spot where the ground slopes away from your house. This ensures discharged water doesn’t flow back toward your home.
- Dig the Trench: The trench for your discharge pipe must have a consistent downward slope of at least 1/8 inch per foot (or 1 inch for every 8 feet). Use a level to ensure there are no low spots where water can pool.
- Lay the Pipe: Use a smooth-walled PVC pipe rather than corrugated pipe if possible, as it is less likely to trap debris. Ensure all connections are secure.
- Prepare the Emitter Base: At the end of the trench, dig a slightly larger and deeper hole for the emitter. Fill the bottom with 4-6 inches of coarse gravel or drainage stone. This creates a small dry well for the weephole to drain into.
- Connect and Position: Attach the pop-up emitter elbow to the end of the discharge pipe. Place it on top of the gravel bed, ensuring the top of the emitter will be flush with the soil level, not the top of the grass. This helps prevent lawn mower damage.
- Backfill and Test: Carefully backfill the trench, compacting the soil as you go. Once finished, test the system by pouring water into your sump pit to activate the pump and confirm the emitter pops up and discharges water freely.
Essential Maintenance Checklist
Perform these checks at least twice a year, typically in the spring and fall, to keep your system in top working order.
- Clear the Area: Trim any grass or weeds growing around and over the emitter’s lid. Make sure the lid can move freely.
- Inspect the Lid: Pull up the emitter lid and check for any cracks or damage. Ensure it sits properly in the closed position.
- Clean Out Debris: Reach into the elbow and clear out any accumulated leaves, sticks, or sediment. This is often the primary point of clogging.
- Flush the Line: After cleaning, use a garden hose to flush water through the line from the sump pump end to push out any remaining debris.
Comparing Discharge Options: Is a Pop-Up Emitter Right for You?
While pop-up emitters are a popular choice, they aren’t the only option. Understanding the alternatives can help you decide if a pop-up is the best solution for your property’s specific needs.
Each discharge method has its own set of advantages and disadvantages, particularly concerning maintenance, aesthetics, and performance in different climates.
| Discharge Type | Pros | Cons | Best For |
|---|---|---|---|
| Pop-Up Emitter | – Discreet, flush with lawn – Keeps debris and pests out – Spreads water flow |
– Prone to freezing – Can be blocked by grass/debris – Requires regular maintenance |
Properties where aesthetics are a priority and regular maintenance is feasible. |
| Daylighted End Pipe | – Simple, reliable design – Less prone to freezing/clogging – Easy to inspect |
– Can be a tripping hazard – Vulnerable to pests/debris – Can be unsightly |
Sloped yards where the pipe can terminate at the bottom of a hill or into a drainage ditch. |
| Connection to Storm Sewer | – Most reliable, clog-free option – Moves water completely off-property – No freezing concerns |
– May be prohibited by local code – More complex and expensive installation – Can contribute to municipal water overload |
Urban or suburban areas where permitted and where other options are not viable. |
| Dry Well / Percolation Pit | – Hides discharge completely – Recharges groundwater – Excellent for flat properties |
– Most expensive to install – Requires specific soil conditions – Can be overwhelmed in heavy rain |
Properties with well-draining soil and no other suitable discharge location. |
When to Call a Professional
While installing and maintaining a pop-up emitter is a manageable DIY project for many, there are situations where professional help is the smarter choice. If you are dealing with persistent freezing, recurring clogs, or a complex yard grading situation, a drainage expert or plumber can offer a more permanent solution.
Don’t wait for a flood to find out your discharge system has failed. The health of your sump pump system is only as strong as its weakest link, and that link is often the small, green cap hiding in your lawn. By understanding its vulnerabilities and committing to regular maintenance, you can ensure your pop-up sump pump discharge works when you need it most, keeping your home safe and dry.