Is Your Plumeria Trunk Dying? Here’s How to Save It
The plumeria, with its intoxicating fragrance and stunning spiral blooms, is the crown jewel of any tropical or subtropical garden. Seeing its sturdy trunk turn soft, discolored, or damaged can strike fear into the heart of any plant lover. But don’t panic; trunk damage is often a symptom of a solvable problem, and with quick, decisive action, you can usually bring your beloved frangipani back from the brink.
This comprehensive guide will walk you through diagnosing the underlying causes of plumeria trunk damage. We will explore the proven steps to treat the issue and provide long-term care strategies to ensure your plant thrives for years to come.
You'll Learn About
Decoding the Distress Signals: What’s Harming Your Plumeria’s Trunk?
A plumeria’s trunk is its lifeline, transporting water and nutrients from the roots to the leaves and flowers. When the trunk shows signs of distress, it’s a critical alert that something is wrong. Understanding these signals is the first step toward a solution.
The Telltale Signs of Trunk Trouble
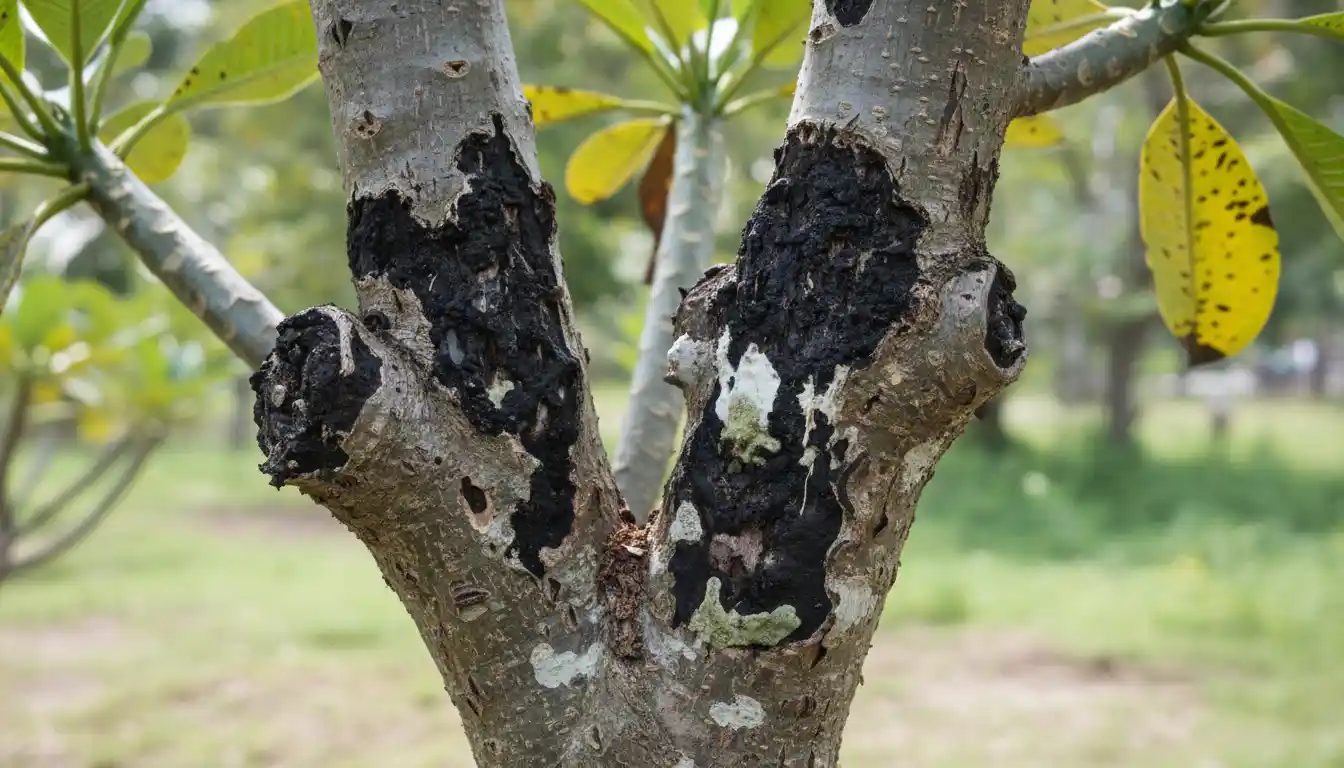
Be vigilant and inspect your plumeria’s trunk regularly for any changes. Early detection is crucial. Common signs of trouble include discoloration (brown, black, or yellow patches), a soft or mushy texture that feels like a waterlogged sponge, and shriveling or wrinkling of the bark. You might also notice oozing sap, unpleasant odors, or physical wounds like cracks and splits.
Leaves often provide clues as well. Yellowing leaves, wilting despite moist soil, and sudden leaf drop are all indicators that the trunk and the root system below it are struggling. Paying attention to these early warnings can make all the difference in a successful recovery.
Prime Suspect #1: The Menace of Rot (Fungal and Bacterial Infections)
By far the most common and dangerous threat to a plumeria trunk is rot, which is almost always a result of overwatering. Plumerias are succulents and are adapted to dry conditions. When their roots sit in constantly wet, poorly draining soil, they begin to decay, creating an entry point for fungal and bacterial pathogens. These pathogens then travel up into the trunk, causing the tissue to break down into a soft, black, or brown mess, a condition often called “black leg” or stem rot.
This type of rot moves quickly and can be fatal if not addressed immediately. Remember, it’s not the water itself that’s the problem, but the lack of oxygen in waterlogged soil that suffocates the roots and invites disease.
Environmental Villains: Frost, Sunburn, and Physical Injury
Plumerias are tropical plants and are not built to withstand freezing temperatures. An extended period of frost can cause the water inside the trunk’s cells to freeze and expand, rupturing the cell walls. When the plant thaws, the damaged areas will turn black, soft, and mushy, a condition easily mistaken for rot but caused by cold shock. While light frost may only damage the tips, a hard freeze can compromise the entire trunk.
Conversely, intense, direct sunlight, especially in hot climates, can scorch the bark. This can lead to discoloration and cracking, creating entry points for pests and diseases. Physical damage from lawnmowers, weed whackers, or even strong winds can also break the protective outer layer of the trunk, leaving it vulnerable.
Uninvited Guests: Pests That Target the Trunk
While less common, certain pests can inflict serious damage on a plumeria’s trunk. Insects like the longhorn beetle can bore into the wood to lay their eggs, weakening the trunk’s structural integrity. Other pests like scale insects attach themselves to the trunk and suck out vital sap, stressing the plant and leaving behind a sticky residue that can attract sooty mold. Inspecting for these pests is a crucial part of your diagnostic routine.
Your Action Plan: A Step-by-Step Guide to Saving a Damaged Plumeria Trunk
Once you’ve identified the signs of trunk damage, it’s time for immediate intervention. Acting like a plant surgeon, you will need to be decisive and thorough to give your plumeria the best chance of survival. This process involves removing the damaged tissue, treating the wound, and creating a new, healthy plant from any salvageable sections.
Step 1: Accurate Diagnosis is Key
Before making any cuts, confirm the cause. Is the base of the trunk soft and the soil perpetually wet? You are likely dealing with rot from overwatering. Did the damage appear right after a cold snap? Frost is the probable culprit. Do you see physical holes or insects on the bark? A pest issue is at hand. Correctly identifying the problem ensures you apply the right solution and prevent recurrence.
Step 2: Emergency Surgery – Removing the Damage
This is the most critical step. You must remove all of the infected or damaged tissue to stop its spread. First, sterilize your tools—a sharp knife or pruning saw—with rubbing alcohol or a bleach solution to prevent introducing new bacteria. Begin making cuts on the damaged section of the trunk, moving downward. After each cut, examine the exposed tissue. Healthy plumeria wood is white or creamy with a green outer ring; diseased tissue will be brown, black, or mushy.
Keep making small cuts down the stem until you see only 100% healthy, clean tissue. Be ruthless; leaving even a small amount of rot behind can allow the infection to continue spreading and will undermine your efforts.
Step 3: Treatment and Prevention of Infection
Once you have a clean cut on healthy wood, you need to protect this open wound from new infections. A common and effective method is to dust the cut surface with powdered cinnamon, which is a natural fungicide. Another option is to use a rooting hormone that also contains a fungicide. Allow the cut surface on the remaining part of the plant to dry and form a callus. This natural seal will protect it from moisture and disease.
Step 4: The Art of Rerooting a Healthy Cutting
If you were able to salvage a healthy top section of your plumeria, you can easily reroot it to create a new plant. Take the healthy cutting and place it in a dry, shady spot for about one to two weeks. This allows the cut end to callous over completely. Once a dry, hard seal has formed, you can plant the cutting. Dip the calloused end in rooting hormone and plant it about 2-3 inches deep in a pot with a fresh, fast-draining soil mix, like a cactus or succulent blend.
Beyond the Cut: Long-Term Care for a Resilient Plumeria
Saving your plumeria is just the beginning. To prevent future trunk damage, you must commit to providing the right growing conditions. Proper long-term care will build a stronger, more resilient plant that is less susceptible to disease, pests, and environmental stress.
Mastering the Art of Watering: The Golden Rule
The single most important aspect of plumeria care is proper watering. These plants are highly susceptible to root rot, so it’s essential to let the soil dry out completely between waterings. A good rule of thumb is to water deeply, allowing water to run out of the drainage holes, and then not water again until the top few inches of soil are bone dry. During the dormant winter months, reduce watering to a bare minimum, perhaps once a month, if at all.
The Perfect Home: Soil, Sun, and Potting
Plumerias need well-draining soil to thrive. A standard potting mix is too heavy and will retain too much moisture. Opt for a commercial cactus or succulent mix, or create your own by blending potting soil with equal parts perlite or pumice to improve aeration and drainage. Ensure the pot has ample drainage holes. When dealing with home maintenance, proper drainage is as important for your plants as it is for your house foundation; preventing moisture buildup is key, which is something to consider when you think about rim joist insulation cost and its role in keeping your home dry.
These sun-loving plants also require at least six hours of direct sunlight per day to produce strong growth and abundant flowers. A healthy, sun-strengthened plant is naturally more resistant to pests and diseases.
Proactive Protection: Shielding from Frost and Pests
If you live in a climate with freezing winters, you must protect your plumeria. Bring potted plants indoors or into a garage when temperatures are forecast to drop below 40°F. For in-ground plants, cover them with frost cloths—never plastic, which traps cold moisture against the plant. Just as proper weather stripping makes a front door hard to close but seals out the cold, the right cover protects your plant from damaging frost.
Regularly inspect your plant for pests. If you spot any, treat them promptly with insecticidal soap or neem oil. A healthy plant in the right environment is your best defense against infestations.
Advanced Trunk Health Strategies
Ensuring the long-term vitality of your plumeria’s trunk involves more than just basic care; it requires attention to its structural integrity. The bark is the plant’s first line of defense against disease. Minor nicks from garden tools or even pests can become entry points for fungal and bacterial pathogens that lead to rot. While many guides advise against sealing plant wounds, minor scrapes on a plumeria’s semi-succulent trunk can benefit from a breathable barrier that keeps pathogens out while allowing the wound to dry and heal. A simple paste made from natural clay and water can be thinly applied to minor abrasions, offering protection without trapping harmful moisture.
Furthermore, reinforcing the trunk from the inside out is a proactive strategy. The strength of plant cell walls is heavily dependent on micronutrients like calcium and silica. Supplementing your feeding regimen with these elements can help build a more robust and resilient trunk, better equipped to withstand physical stress and fend off disease. This nutritional approach to structural health is a key factor in cultivating a truly vigorous plumeria.
| Type of Damage | Primary Cause(s) | Appearance | Immediate Action Required |
|---|---|---|---|
| Stem/Trunk Rot | Overwatering, poor drainage | Black or brown, soft, mushy, foul odor | Cut away all rotted tissue to clean, white wood. Treat with fungicide. Repot in dry, fast-draining soil. |
| Frost Damage | Exposure to freezing temperatures | Black, soft, shriveled tips or sections | Cut away all damaged tissue to firm, healthy wood. Protect from future cold. |
| Sun Scorch | Sudden exposure to intense, direct sun | Discolored, bleached, or cracked bark | Move to a location with afternoon shade or provide temporary shade cloth. Do not remove damaged bark unless rot develops. |
| Physical Splitting/Cracking | Rapid growth spurts, wind damage | Vertical splits in the bark | Keep the area clean and dry to allow it to callus naturally. Monitor for signs of infection. |
| Pest Infestation | Boring insects, scale, mealybugs | Holes in trunk, sticky residue, visible pests | Treat with targeted insecticide, insecticidal soap, or neem oil. Prune heavily infested branches. |
Frequently Asked Questions (FAQs) About Plumeria Trunk Health
Can a completely soft plumeria trunk be saved?
Unfortunately, if the entire trunk from the soil line up is soft and mushy, the rot has likely reached the entire vascular system, and the plant is probably not salvageable. However, if there are any firm sections, especially higher up, you can take cuttings from those parts and attempt to root them.
Will new branches grow from a cut plumeria trunk?
Yes, plumerias are incredibly resilient. When you cut the trunk, the plant is often stimulated to produce new growth just below the cut point. It is common for two or three new branches to sprout from the area, resulting in a fuller, bushier plant.
Why is my plumeria trunk shriveling but not soft?
A shriveling or wrinkling trunk that remains firm is typically a sign of dehydration or that the plant is dormant. This is common during the winter. If it’s the growing season, this indicates underwatering, and you should check the soil moisture and water the plant thoroughly if it is dry.
How do I fix a physical crack in the trunk?
For most minor cracks or splits, the best course of action is to do nothing except keep the area dry and clean. The plant will naturally form a callus over the wound to protect itself. Thinking about repairs might bring to mind other household fixes, like learning how to fix holes in an aluminum window frame, but with plants, less intervention is often more effective.
Conclusion
Discovering damage to your plumeria’s trunk can be disheartening, but it is rarely a death sentence. By acting as a plant detective to diagnose the cause and a surgeon to remove the problem, you can effectively treat most issues. The key to long-term success lies in prevention: providing your plumeria with the sun, soil, and watering schedule it needs to build a strong, resilient foundation.
With prompt attention and proper care, your plumeria can recover fully, rewarding you with its lush foliage and iconic, fragrant blooms for many years to come.