Picture Frame Finish Concrete: The #1 Secret to a Luxury Patio
That sprawling gray concrete patio in your backyard feels… incomplete. It’s functional, sure, but it lacks the character and high-end feel you see in magazines. It’s a vast, monotonous sea of concrete that does little to elevate your home’s aesthetic.
Many homeowners face this exact problem. They settle for a standard broom finish because it’s practical, but they miss out on the incredible potential hiding within their concrete. The solution is a professional finishing technique that adds immense visual impact without breaking the bank: the picture frame finish.
A picture frame finish, also known as a decorative border, is a technique where a contrasting border is created around the perimeter of a concrete slab. This simple yet elegant detail breaks up the visual monotony and gives your patio, walkway, or driveway a custom, polished look that basic finishes can’t match.
You'll Learn About
What Exactly Is a Picture Frame Concrete Finish?
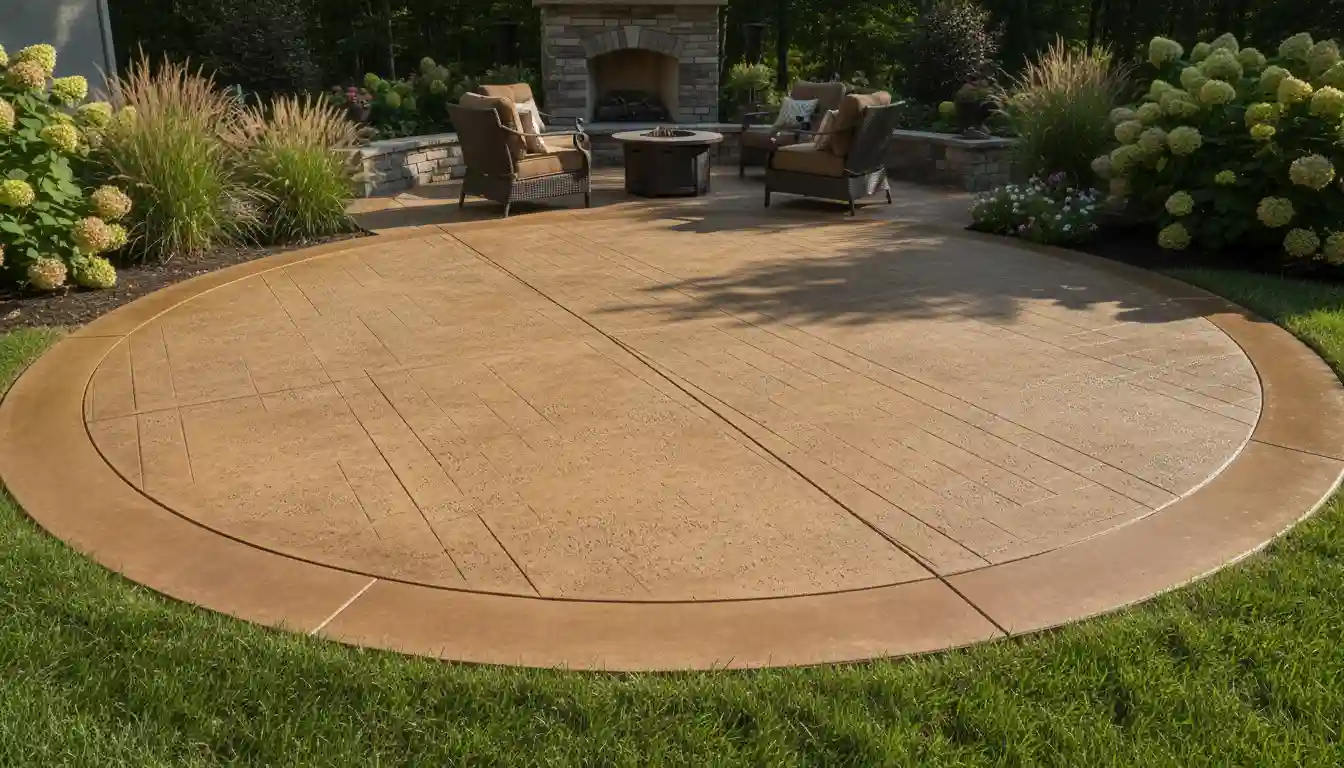
Think of your concrete slab as a piece of art; the picture frame finish is the custom frame that makes it pop. This technique involves creating a border around the main field of the concrete that has a different texture, color, or pattern. It’s a detail that is executed during the concrete pour, not an afterthought.
The most common combination is a smooth, hard-troweled border around a textured, broom-finished interior. This contrast is what creates the stunning visual effect. The smooth border cleanly defines the space, while the broom finish in the center provides excellent slip resistance, making it both beautiful and practical.
However, the options are nearly limitless. You can have colored borders, stamped borders that mimic brick or stone, or even exposed aggregate borders for a unique, textured look. It’s a mark of superior craftsmanship that elevates a simple slab into a deliberate design element of your landscape.
Why Your Boring Patio is Secretly Crying for a Picture Frame Finish
Opting for a picture frame border goes far beyond simple aesthetics. It’s a strategic design choice that offers tangible benefits, turning your outdoor space from ordinary to extraordinary.
The Unmatched Curb Appeal and Visual Interest
The primary benefit is the dramatic boost in curb appeal. A picture frame border breaks up large expanses of concrete, preventing the monolithic, utilitarian look that is all too common. It creates clean lines, defines outdoor “rooms,” and gives the entire space a sophisticated, intentional feel.
This technique introduces a sense of depth and dimension. The contrast between the border and the field draws the eye, making the entire patio or walkway more engaging and visually appealing. It’s a detail that signals quality and thoughtful design to guests and potential home buyers alike.
A Clever Way to Hide Control Joints
Here’s a secret that many professionals use: the picture frame border is the perfect place to hide essential control joints. Concrete naturally shrinks as it cures, and control joints are intentionally placed grooves that encourage cracks to happen in a neat, straight line rather than randomly across the surface.
While necessary for the slab’s longevity, these joints can be visually jarring in the middle of a plain finish. By incorporating them into the design of the picture frame, they become a seamless part of the border. This makes the finish both highly functional and aesthetically flawless.
Increased Property Value
Details matter in real estate. A custom-finished concrete patio or driveway is a feature that stands out. It suggests that the home has been well-cared-for and that quality materials and techniques were used.
This kind of upgrade is a cost-effective way to increase your home’s perceived value. For a relatively small increase in labor costs compared to a standard finish, you get a feature that looks far more luxurious and custom, providing an excellent return on investment.
The Core Techniques: How a Picture Frame Finish is Created
The magic of a picture frame finish happens entirely during the concrete finishing process. It requires precise timing, the right tools, and a clear understanding of how concrete behaves as it cures. It is not something that can be easily added to an existing slab.
Step 1: Planning and Forming The Foundation
A perfect finish starts with perfect preparation. The forms, which create the mold for the concrete, must be set up to be perfectly square, level, and securely braced. Any imperfections in the formwork will be permanently reflected in the finished product.
During this stage, the width of the border is decided, typically ranging from 6 to 18 inches, depending on the overall size of the slab. Meticulous forming is the non-negotiable first step to achieving crisp, clean lines in the final border.
Step 2: The Pour and Initial Float
Once the forms are ready, the concrete is poured and spread evenly throughout the area. A screed is used to level the concrete to the top of the forms. Immediately after, a bull float—a large float on a long handle—is pushed and pulled across the entire surface.
This initial floating pushes the coarse aggregate down and brings the “cream” (a mixture of cement and fine sand) to the surface. This step is crucial for creating a workable surface for the detailed finishing work to follow.
Step 3: Timing is Everything – Creating the Border
This is the most critical and skill-dependent phase. After the initial bull float, you must wait for the bleed water to evaporate from the surface and for the concrete to begin stiffening. This can take anywhere from 20 minutes to several hours, depending on weather conditions.
Once the concrete is firm enough to support a finisher’s weight on kneeboards and hold a clean edge, the border work begins. A hand float is used to further smooth the border area, and an edger tool is run along the form to create a clean, rounded edge. A groover is then used to cut the line separating the border from the interior field, establishing the “picture frame.”
Step 4: The Art of the Interior Finish
With the border clearly defined, the finisher can now apply the desired texture to the interior section of the slab. For a standard picture frame look, this is typically when the broom finish is applied.
A specialized concrete broom is dragged lightly across the surface, creating fine lines that provide excellent traction. The direction of the broom strokes can even be part of the design, with patterns like alternating squares adding another layer of custom detail.
Step 5: The Final Touch – Finishing the Border
After the interior is broomed, the finisher returns to the border for the final pass. Using a steel hand trowel held nearly flat against the surface, they make long, sweeping motions to create a smooth, dense, and often slightly darker finish.
This “hard trowel” finish creates the beautiful contrast with the textured interior. This two-stage process—defining the border, finishing the interior, and then final-troweling the border—is the key to a professional-grade picture frame finish.
Common Picture Frame Finish Combinations (And Which to Choose)
The classic smooth-border-and-broom-finish combination is popular for a reason, but it’s far from the only option. Different textures and techniques can be mixed and matched to suit your home’s style and the area’s function.
Choosing the right combination depends on your aesthetic goals, budget, and the practical needs of the space. Consider factors like slip resistance, maintenance, and how the finish complements your home’s existing materials.
| Finish Combination (Border / Field) | Best For | Pros | Cons |
|---|---|---|---|
| Smooth Trowel / Broom Finish | Patios, Walkways, Pool Decks | Classic look, excellent traction in the center, defines space clearly. | Smooth border can be slippery when wet. |
| Stamped Brick / Broom Finish | Driveways, Patios, Walkways | High-end look of real brick at a lower cost, great curb appeal. | More labor-intensive and costly than a simple trowel border. |
| Colored Border / Gray Broom Finish | Patios, Driveways | Adds a pop of color, highly customizable, creates strong visual interest. | Requires precise execution to prevent color bleeding. |
| Exposed Aggregate / Smooth Trowel | Walkways, Pool Decks | Excellent slip resistance in the field, unique textured look. | Aggregate can be rough on bare feet; requires sealing to protect. |
The #1 Mistake That Ruins a Picture Frame Finish (And How to Avoid It)
The single biggest mistake that can ruin an otherwise perfect picture frame finish is improper timing and the premature addition of water. Concrete finishing is a race against the clock, and a finisher’s intuition about when the slab is ready for each step is paramount.
A common but disastrous shortcut is to sprinkle water on a concrete surface that has become too dry to work easily. This practice, sometimes called “blessing the slab,” re-wets the surface but severely weakens it. It dramatically increases the risk of surface scaling, crazing (fine cracks), and discoloration, creating a weak, dusty surface that will fail over time.
A true professional understands that there is a critical window for each finishing step. Troweling the border at the right time brings the natural cream to the surface for a dense, durable finish. Rushing or delaying this step, and compensating with water, is the cardinal sin of concrete work and will compromise the integrity and appearance of your investment.
Beyond the Basics: Advanced Picture Frame Techniques
Once you’ve mastered the basics, a picture frame finish can be a canvas for even more creativity. Advanced techniques can introduce color, intricate patterns, and seamless integration with other landscape features.
Integrating Color
Color can be introduced to the border in two main ways. Integral color is a pigment mixed into the concrete truck, coloring the entire slab. A more advanced method for borders is using a color hardener, which is a powder broadcast onto the surface of the wet border concrete. This creates a vibrant, durable, and abrasion-resistant colored surface that contrasts sharply with the gray interior.
Stamped and Decorative Borders
For the ultimate custom look, the border can be stamped with patterns that mimic other materials. Brick, cobblestone, or slate patterns are popular choices. This allows you to get the aesthetic of expensive masonry with the durability and cost-effectiveness of concrete.
Adding Structures to Your Pictured Framed Patio
A beautifully finished patio is the perfect foundation for other outdoor structures like pergolas or deck railings. When planning to add such features, consider modern anchoring solutions. For example, if you’re building a deck adjacent to your new patio, innovative products can save time and effort. A product like the one detailed in this Titan Deck Foot Anchor review allows for the installation of deck posts without the need for digging and pouring new concrete footings, preserving the integrity of your new finish.
Frequently Asked Questions About Concrete Picture Frame Finishes
Even with a detailed overview, homeowners often have specific questions about this popular finish. Here are answers to some of the most common inquiries.
How much more does a picture frame finish cost?
The cost increase for a picture frame finish is primarily in labor, not materials. Because it’s a more detailed and time-consuming process, you can expect it to cost roughly 10-25% more than a standard, single-finish slab. However, this can vary based on the complexity of the design, such as adding color or stamps.
Can you add a picture frame finish to existing concrete?
No, a true picture frame finish must be done while the concrete is being poured and finished. It is an integral part of the slab itself. While you can apply overlays or stains to an existing patio to simulate a border, it will not have the same durability, texture, or authentic look as one created during the initial pour.
How wide should the picture frame border be?
There’s no single right answer, as the width should be proportional to the overall size of the patio or walkway. A common range is between 6 and 18 inches. A narrow walkway might look best with a 6-inch border, while a large, expansive patio could easily accommodate a grand 18-inch or even 24-inch frame.
Also Read: Baseboards on Concrete Floors? Your No-Fail Installation Guide
Is a Picture Frame Finish Worth It? The Final Verdict
For homeowners looking to maximize their outdoor living space’s appeal and value, the answer is a resounding yes. A picture frame finish transforms concrete from a purely functional material into a key element of your home’s design.
It provides a custom, high-end look that belies its relatively modest additional cost. By combining stunning aesthetics with the clever functionality of hiding control joints, the picture frame finish proves that thoughtful details can make all the difference.
Don’t let your patio be an afterthought. By choosing a picture frame finish, you’re investing in a durable, beautiful surface that will enhance your home’s curb appeal and your enjoyment of it for years to come. Also, be careful about self leveling concrete.