Parwal Plant Problems? Your Ultimate Guide to a Bountiful Harvest
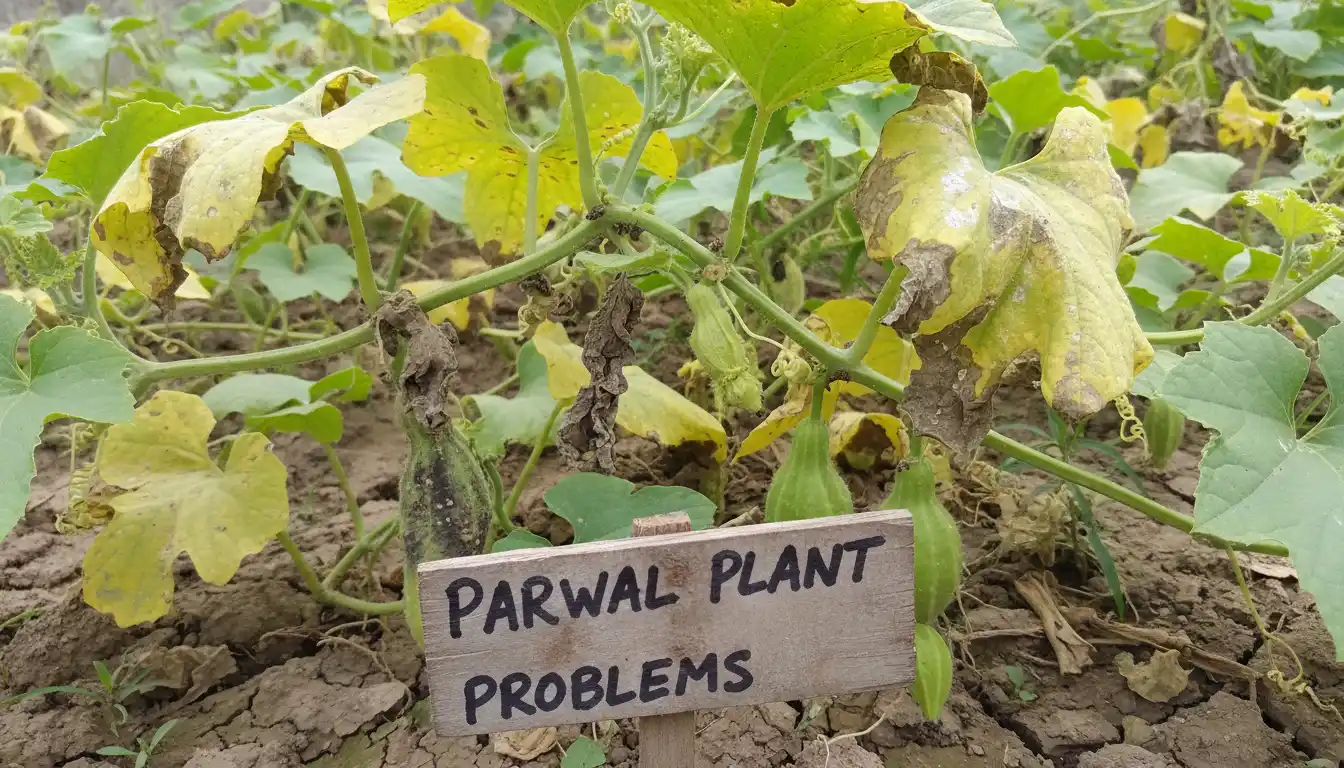
The dream of harvesting your own crisp, green parwal (pointed gourd) often starts with excitement. But for many home gardeners, that enthusiasm quickly turns to frustration. You might see a vine that grows wildly but never fruits, or worse, one that looks sickly and yellow from the start.
This common struggle leaves gardeners wondering where they went wrong. Is it the soil? The sun? A mysterious pest? The truth is, the success of your parwal plant hinges on understanding a few critical, yet often overlooked, details.
This guide tackles the core problems that plague aspiring parwal growers. We will move beyond generic advice to provide actionable solutions that address the root causes of failure, from the plant’s unique biology to the specific care it needs to thrive. Get ready to turn your disappointing vine into a productive powerhouse.
You'll Learn About
Decoding the Parwal Plant: More Than Just a Simple Gourd
Before you can solve the problems, you must understand the plant itself. The parwal, or Trichosanthes dioica, is a perennial vine native to the Indian subcontinent. It’s prized not just for its delicious fruit but also for its impressive nutritional profile, packed with vitamins and fiber.
Unlike more common garden vegetables like tomatoes or peppers, the parwal plant has a unique characteristic that is the number one reason for failure: it is dioecious. This means that individual plants are either male or female, and you absolutely need both for pollination and fruit production to occur. Simply planting one vine and hoping for the best is a recipe for a fruitless season.
Its vigorous vining nature is another key trait. In its native habitat, it scrambles over other vegetation, seeking sunlight. In a home garden, this means providing a strong support structure is not just a suggestion—it’s a requirement for a healthy and manageable plant.
The Root of the Problem: Why Your Parwal Plant Is Failing
If your parwal vine is struggling, the issue likely falls into one of a few common categories. By diagnosing the specific cause, you can apply the right solution and get your plant back on track. Let’s break down the most frequent culprits behind a failing parwal plant.
The Pollination Puzzle: Are You Missing a Crucial Partner?
The single most common reason for a parwal vine that produces plenty of flowers but no fruit is a pollination failure. Because the plants are dioecious, you need a male plant to pollinate a female plant. Without this partnership, the female flowers will simply wither and fall off without developing into gourds.
Identifying the sex of the flowers is straightforward. Male flowers grow on long, slender stalks (pedicels) and often appear in clusters. Female flowers have a very short stalk and a distinct, tiny, swollen gourd (the ovary) at their base, right behind the petals. If you only see one type of flower on your vine, you have your answer.
Soil and Site Selection: The Foundation of Health
A weak foundation will never support a strong structure, and the same is true for your parwal plant. Planting in the wrong location or in poor soil is a primary cause of stunted growth, yellowing leaves, and general lack of vigor. These plants are heavy feeders and demand the right conditions from day one.
Parwal thrives in rich, well-draining, sandy loam soil with a slightly acidic to neutral pH of 6.0 to 7.0. Heavy clay soil that retains too much water can lead to root rot, a deadly condition for these gourds. Equally important is sunlight; your parwal plant needs a location that receives at least 6 to 8 hours of direct sunlight each day to fuel its growth and fruit production.
Watering Woes: Too Much or Too Little?
Water is life, but the wrong amount can be a death sentence for your parwal. Overwatering is a frequent mistake, leading to waterlogged soil that suffocates the roots and invites fungal diseases. The telltale signs include yellowing lower leaves and a wilting appearance even when the soil is wet.
On the other hand, underwatering can cause the plant to become stressed, resulting in stunted growth, dropping flowers, and small, underdeveloped fruit. The key is consistency. The goal is to keep the soil consistently moist but never soggy, allowing the top inch or two to dry out between waterings.
Nutrient Deficiencies: Is Your Plant Starving?
A fast-growing vine like parwal has a big appetite. If the soil lacks essential nutrients, the plant’s health will quickly decline. The symptoms often provide clues about what’s missing.
A general yellowing of older, lower leaves might indicate a nitrogen deficiency. Poor flower or fruit development can point to a lack of phosphorus, while weak stems and an increased susceptibility to disease can be a sign of a potassium deficiency. Providing a balanced diet is crucial throughout the growing season.
The Ultimate Solution: Your Step-by-Step Parwal Care Guide
Now that you understand the potential problems, it’s time for the solutions. This step-by-step guide provides a clear, actionable plan to cultivate a thriving parwal plant and achieve the abundant harvest you’ve been hoping for. Follow these steps to create the perfect environment for your vine.
Step 1: Sourcing and Planting for Success
Your journey begins with sourcing the right plants. To avoid the pollination problem, it’s best to purchase plants from a nursery that are clearly labeled as male and female. A good ratio is one male plant for every 8 to 10 female plants. If growing from cuttings, ensure you get them from both types of parent plants.
When planting, prepare your garden bed by amending it with plenty of aged compost or well-rotted manure to improve fertility and drainage. Space the plants about 2 meters apart to give them ample room to grow and ensure good air circulation. Dig a hole twice as wide as the root ball and plant at the same depth it was in the pot.
Step 2: Building the Perfect Support System
A strong trellis, arbor, or fence is non-negotiable. A support structure keeps the vines and fruit off the ground, which prevents rot, improves air circulation to reduce the risk of fungal diseases, and makes harvesting significantly easier. A vertical structure also maximizes your garden space.
As the vine begins to grow, gently guide the main stems towards the trellis. They will naturally start to climb using their tendrils, but some initial training helps. A well-supported vine is a productive vine. To ensure your wooden trellis lasts for years against the elements, proper preparation is key. Just like finding the best primer after skim coat is crucial for a perfect wall finish, using a quality outdoor wood primer will protect the structure from moisture and decay.
Step 3: Mastering Hand-Pollination for a Guaranteed Harvest
Even with both male and female plants, natural pollinators like bees might not be sufficient to do the job, especially in urban or suburban gardens. Hand-pollination is the secret weapon for a guaranteed harvest. It’s a simple process that takes only a few minutes.
In the early morning when the flowers are fully open, locate a fresh male flower. Carefully pluck it and remove its petals to expose the pollen-laden anther in the center. Then, find an open female flower and gently dab or brush the male anther onto the stigma in the center of the female flower. That’s it! You’ve just done the work of a bee and ensured a fruit will develop.
Step 4: A Foolproof Fertilizing and Watering Schedule
To keep your hungry parwal vine fed, implement a regular fertilizing schedule. Start with a balanced, all-purpose fertilizer (such as a 10-10-10 formula) about a month after planting. Reapply every 4 to 6 weeks throughout the growing season.
Organic options like fish emulsion or a top-dressing of compost are also excellent choices. For watering, the best approach is deep, infrequent watering. This encourages the plant to develop a deep root system. Water thoroughly at the base of the plant, avoiding the leaves, and then allow the topsoil to dry before watering again.
Below is a simple seasonal care schedule to keep you on track.
| Season | Key Task | Details and Pro Tips |
|---|---|---|
| Early Spring | Soil Preparation | Amend soil with a generous amount of compost or aged manure. Ensure the pH is between 6.0 and 7.0. Consider soil solarization to reduce pests. |
| Late Spring | Planting & Initial Support | Plant male and female seedlings after the last frost. Install a sturdy trellis immediately. Train young vines onto the support structure. |
| Early Summer | Watering & Mulching | Water deeply 1-2 times per week, depending on heat and rainfall. Apply a 2-3 inch layer of organic mulch to retain moisture and suppress weeds. |
| Mid-Summer | Fertilizing & Pollination | Apply a balanced fertilizer. Begin hand-pollinating female flowers as they appear. Monitor for pests like fruit flies. |
| Late Summer | Harvesting & Pruning | Harvest gourds when they are young and tender (about 10-15 cm long). Prune any yellowing leaves or non-productive side shoots to improve air circulation. |
| Autumn | Final Harvest & Cleanup | Complete your final harvest before the first frost. Cut the vines back to the ground. In warmer climates, the roots may survive the winter. |
Pro-Level Pest and Disease Management
Even a well-cared-for plant can fall prey to pests and diseases. The key to effective management is early detection and swift, targeted action. A vigilant gardener can often stop a small problem from turning into a full-blown infestation that ruins the crop.
Identifying and Eliminating Common Pests
The most common adversaries for your parwal plant are fruit flies, aphids, and cucumber beetles. Fruit flies are particularly damaging, as they lay eggs in the young, developing gourds, causing them to rot from the inside. To combat them, use yellow sticky traps and consider bagging the young fruits after pollination with small mesh bags.
Aphids are tiny insects that cluster on new growth and the undersides of leaves, sucking the sap and weakening the plant. A strong spray of water can dislodge them, or you can use insecticidal soap or neem oil for heavier infestations. Cucumber beetles chew holes in leaves and can transmit diseases like bacterial wilt, so it’s important to control them upon sight.
Preventing and Treating Fungal Diseases
Powdery mildew and downy mildew are two of the most common fungal diseases affecting parwal. They appear as a white, dusty coating (powdery mildew) or yellow spots on leaves with a fuzzy purplish mold underneath (downy mildew). Both thrive in humid conditions with poor air circulation.
Prevention is always the best cure. Ensure proper spacing between plants, prune excess foliage to promote airflow, and always water at the base of the plant, not overhead. If an infection does take hold, applications of a copper-based fungicide or a neem oil solution can be effective.
Harvesting and Storing Your Bountiful Parwal
After all your hard work, the reward is a delicious harvest. For the best flavor and a tender texture, it’s crucial to pick parwal at the right stage. The ideal time to harvest is when the gourds are still young, bright green, and smooth, typically about 10-15 cm long.
If you wait too long, the skin will become tough and the seeds inside will harden, making them less palatable. Use a sharp knife or pruning shears to cut the gourds from the vine, leaving a small piece of the stem attached. Regular harvesting encourages the plant to produce more fruit, so check your vines every couple of days during the peak season.
Freshly harvested parwal can be stored in the refrigerator’s crisper drawer for up to a week. Do not wash them until you are ready to use them, as excess moisture can hasten spoilage.
Beyond the Basics: Advanced Tips for the Parwal Enthusiast
Once you’ve mastered the fundamentals, you can incorporate advanced techniques to further boost your plant’s health and yield. These pro-level strategies can make a significant difference in the long-term success of your crop and the overall health of your garden ecosystem.
Soil Solarization for Ultimate Pest Control
For a truly proactive approach to pest management, consider soil solarization before you even plant. This organic technique involves covering moist garden soil with a clear plastic sheet for 4-6 weeks during the hottest part of the year. The sun’s heat gets trapped, raising the soil temperature high enough to kill many soil-borne pests like root-knot nematodes, as well as weed seeds and fungal pathogens. This creates a sanitized and incredibly healthy environment for your parwal roots to establish themselves without early competition or threat.
Strategic Pruning for Increased Productivity
While letting a vine grow wild might seem natural, strategic pruning can dramatically increase your harvest. Once the main vine has reached the top of your trellis, you can pinch off its growing tip. This encourages the plant to put its energy into developing lateral (side) shoots, which are often where the majority of the female flowers, and thus the fruit, are produced. Additionally, selectively pruning some of the denser foliage from the lower parts of the plant improves air circulation, further reducing the risk of fungal diseases.
Harnessing Companion Planting for a Healthier Vine
Companion planting is the art of using other plants to benefit your parwal. Planting marigolds around the base of your vine can help deter root-knot nematodes in the soil. Nasturtiums can act as a “trap crop” for aphids, drawing them away from your prized gourd plants. Aromatic herbs like oregano or thyme planted nearby can help confuse and repel pests like cucumber beetles. This creates a more resilient and balanced mini-ecosystem in your garden, reducing the need for chemical interventions. Efficient water use is paramount in a thriving garden. While your parwal needs consistent moisture, a waterlogged bed is a recipe for disaster. This principle of controlled water management is similar to how a modern dripless air conditioner handles condensation to prevent leaks and water damage.