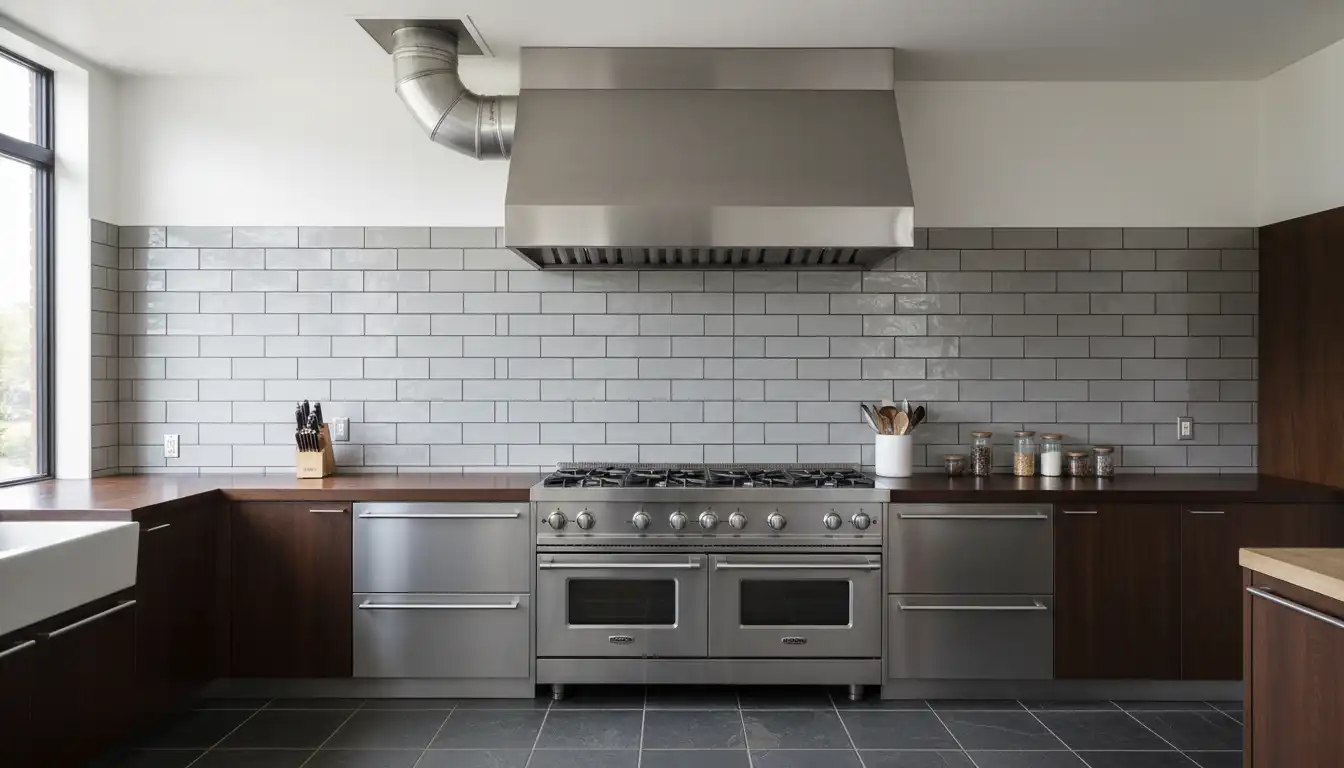
Offset Range Hood: Your #1 Fix for Misaligned Vents?
The kitchen renovation is nearly complete. The cabinets are perfect, the countertops gleam, and the new professional-grade cooktop is the centerpiece. But then you look up and discover a glaring problem: the vent duct in the ceiling is not centered over the stove.
This is a surprisingly common and deeply frustrating issue for homeowners. It can be caused by structural elements like ceiling joists or pipes that prevent ideal placement, or simply a planning oversight during construction.
Left unaddressed, this misalignment isn’t just a cosmetic flaw. It’s a direct threat to your kitchen’s air quality, your peace of mind, and even your home’s safety.
You'll Learn About
Why a Misaligned Vent Is More Than Just an Eyesore
Many homeowners are tempted to ignore a slight misalignment, but the consequences can be significant. The primary job of a range hood is to capture and exhaust smoke, grease, and odors effectively. When the duct is off-center, the entire system’s efficiency is compromised.
This is a direct cause of poor ventilation performance. We will now discuss in greater detail the technical aspects that are affected by this issue.
The Airflow Sabotage: Losing CFM Power
Every range hood has a CFM (Cubic Feet per Minute) rating, which measures its suction power. A poorly aligned duct forces you to use awkward, inefficient connections, which creates turbulence and backpressure inside the ductwork. This resistance fights against the fan’s motor, drastically reducing the effective CFM.
Your 600 CFM range hood might only perform like a 300 CFM unit, leaving your kitchen hazy with smoke and cooking smells. This isn’t just an annoyance; it means grease-laden vapor isn’t being properly removed, and instead settles on your cabinets, walls, and ceiling.
The Noise Nightmare and Wasted Energy
When airflow is restricted and turbulent, the range hood’s fan has to work much harder to try and move air. This strain results in a much louder operation, turning your powerful appliance into a constant, droning source of noise pollution in your home.
Furthermore, a motor working overtime is a motor that consumes more electricity. Your energy bills will be higher for a system that is fundamentally underperforming, a classic case of paying more for less.
The Hidden Dangers: Grease Buildup and Fire Risk
Herein lies the most critical, yet often overlooked, danger of an improper offset. When airflow is slow and turbulent, aerosolized grease falls out of the air stream and collects on the inside of the ducts. This is especially pronounced in awkward bends and inefficient connections.
This sticky, highly flammable grease buildup is a serious fire hazard waiting for a spark. A simple kitchen flare-up could ignite the grease in the ductwork, spreading fire rapidly through your walls and ceiling. This hidden risk underscores the importance of proper ventilation and highlights the need for other safety systems, as a well-placed detector can be a crucial first alert in an emergency. For instance, considering a low temperature smoke detector in areas like attics where ducts may pass through can add another layer of protection.
The Offset Range Hood: Your Strategic Solution
Fortunately, you do not have to tear open your ceiling or live with a dysfunctional kitchen. The solution is to create a planned, efficient offset range hood installation. This isn’t a single product, but rather a category of methods designed to create a smooth, gradual path for air to travel from directly over your cooktop to the off-center duct opening.
The goal is not just to connect two points, but to do so while preserving as much airflow efficiency as possible. A proper offset minimizes turbulence and maintains the power and safety of your ventilation system.
Method 1: The Rigid Duct & Adjustable Elbows Approach
This is one of the most common and DIY-friendly solutions for moderate offsets. It involves using sections of smooth-walled rigid metal ducting and one or two adjustable elbows, typically set at 45-degree angles, to create a gentle “jog” from the range hood collar to the ceiling vent.
The key to this method is using the fewest and most gradual bends possible. A straight line is always best for airflow, but two 45-degree bends are vastly superior to a single, sharp 90-degree turn, which acts like a wall that air has to slam into and navigate around.
For this method to succeed, you must use rigid ducting. Never use flexible, accordion-style ducting for this purpose, as its ridges create massive turbulence and trap grease.
Method 2: The Offset Adapter or Transition Box
For a more streamlined solution, you can use a pre-fabricated offset adapter, sometimes called a range hood transition. These are specially designed rectangular or square metal boxes that redirect airflow internally without the need for multiple elbows.
An adapter fits directly onto the range hood’s exhaust port and has an outlet on its side or top that aligns with your ductwork. Because they are engineered for this specific purpose, they often manage airflow more efficiently than a series of elbows, provided the offset distance matches the adapter’s specifications.
The main advantage is a cleaner installation with fewer separate parts to connect and seal. However, they are less flexible than the elbow method and may not work for all offset distances or configurations.
Method 3: The Custom Plenum Solution
When dealing with a significant offset or a very high-powered, professional-style range hood, the best solution is often a custom-built plenum. A plenum is a large metal box, typically fabricated by an HVAC professional, that is mounted between the range hood and the ceiling.
This box acts as a large air chamber, allowing the air to collect and then be channeled smoothly towards the off-center duct without creating significant backpressure. It’s the most efficient way to handle large offsets because it doesn’t try to force the air through narrow, winding paths.
While this is the most expensive option, it guarantees the best possible performance and is often the required method for commercial-grade ventilation systems installed in a residential setting.
Choosing Your Offset Strategy: A Practical Comparison
Making the right choice depends on the severity of your misalignment, your budget, and your comfort level with DIY projects. Each method offers a different balance of cost, complexity, and performance. This table breaks down the key factors to help you decide.
| Solution Method | Best For (Offset Distance) | DIY Friendliness | Estimated Cost | Performance Impact |
|---|---|---|---|---|
| Rigid Duct & 45° Elbows | Small to Medium (2-8 inches) | High | $50 – $150 | Minimal to Low (if done correctly) |
| Offset Adapter/Transition | Specific pre-set distances (4-10 inches) | Medium | $100 – $250 | Minimal |
| Custom Plenum | Large or complex (>8 inches) | Low (Professional install) | $400 – $1,000+ | Negligible (Best performance) |
| Relocating Ductwork | Any distance (ideal solution) | Very Low (Professional required) | $1,500 – $4,000+ | None (Optimal performance) |
Installation Secrets the Pros Won’t Tell You
Regardless of the method you choose, the quality of the installation is what determines success or failure. A high-quality custom plenum can perform poorly if it’s installed incorrectly, while a simple elbow installation can work flawlessly if done with care.
Following these professional tips will ensure your offset solution works as intended, preserving your kitchen’s air quality and the longevity of your appliance.
The “Smooth as Glass” Rule
The single most important factor for good airflow is the interior surface of the duct. You must use smooth-walled rigid metal ducting for all parts of the installation. Avoid flexible or corrugated ducting at all costs; its ribbed design is an efficiency killer that creates extreme turbulence and acts as a grease trap.
This seems like a small detail, but it is the cornerstone of an effective and safe ventilation system. A smooth path allows air to move freely with minimal friction and resistance.
Measure Thrice, Seal Once
Precision is paramount. Before cutting any ductwork, measure the distance and angles meticulously. A poorly aimed connection can create new problems or simply fail to align properly, leading to frustrating rework.
Once your components are cut and fitted, every single seam and joint must be sealed with aluminum foil tape. Do not use standard cloth “duct tape,” which will dry out and fail under the heat and grease exposure. A properly sealed system ensures that no air—or grease—leaks into your ceiling cavity, which is crucial if you are already dealing with a range hood vent not aligned issue.
Is Relocating the Ductwork Ever Worth It?
Sometimes, the misalignment is so severe that an offset solution is simply not practical or efficient. If the duct is several feet away from the range hood, or if you are installing a professional-grade hood that requires a straight vertical exhaust for warranty purposes, moving the ductwork may be the only viable option.
This is the “nuclear option” because it is the most invasive and expensive choice. It involves opening the ceiling, cutting and rerouting pipes or joists (which may require a structural engineer), installing new ductwork, and then patching and repainting the drywall.
The Financial and Structural Reality
The cost of relocating ductwork can run into the thousands of dollars, depending on the complexity of the job. It’s a significant undertaking that turns a simple appliance installation into a minor renovation project. You have to weigh this cost against the benefits.
However, it provides the absolute best performance with zero compromises on airflow. For those investing in a high-end kitchen, protecting that investment with optimal ventilation can be a wise financial decision, much like how one might consider if rewiring a house adds value in the long term. It’s about ensuring the core systems of your home function at their peak.
Conclusion: Reclaim Your Kitchen’s Air Quality and Peace of Mind
Discovering your range hood vent and cooktop are misaligned is a disheartening moment, but it is not an insurmountable problem. With the right strategy, you can create a safe, quiet, and highly effective ventilation system.
From a simple pair of adjustable elbows to a professionally fabricated custom plenum, an offset range hood solution allows you to bridge the gap without compromising on air quality. By prioritizing smooth airflow and sealing every connection perfectly, you can solve the alignment issue and ensure your kitchen remains a clean, safe, and enjoyable space for years to come.