New Cabinet Hinges Don’t Line Up? Your Ultimate Fix Guide
That moment of triumph is quickly replaced by pure frustration. You’ve bought shiny new hinges, spent time removing the old ones, and now your cabinet door hangs crooked, won’t close, or has an unsightly gap. When new cabinet hinges don’t line up, it can bring a simple DIY project to a screeching halt.
The good news is that the problem is almost never a faulty hinge. The issue typically lies in one of three areas: the type of hinge you’ve chosen, the placement of the screws, or the fine-tuning adjustments.
You'll Learn About
Why Your New Hinges Are Causing a Headache
Before you can fix the problem, you need to understand the root cause. A misaligned cabinet door is a symptom, and the disease is usually a mismatch between the hinge, the cabinet, and the door. Getting this part right is the most critical step.
Simply buying a hinge that looks similar to your old one is a common mistake. Tiny, almost imperceptible differences in geometry can lead to major alignment issues that no amount of screw-turning can fix.
The Hidden Mismatch: Hinge Overlay Explained
The single most common reason for hinge failure is ignoring the cabinet hinge overlay. Overlay is the distance that the cabinet door covers, or “overlays,” the cabinet frame on the hinge side when the door is closed. This is a critical measurement that dictates the type of hinge you need.
To find your overlay, close the cabinet door and place a piece of tape on the face frame, right up against the edge of the door. Open the door, and now you can measure from the edge of the tape to the edge of the cabinet opening. That measurement is your overlay, and it must match the specification of your new hinge.
Inset vs. Face-Frame vs. Frameless: A Crucial Distinction
Cabinets are not all built the same, and this dramatically affects your hinge choice. A hinge designed for a face-frame cabinet will not work on a frameless (or “European-style”) cabinet box. You must correctly identify your cabinet type before purchasing hardware.
Face-frame cabinets have a solid wood frame (typically 1.5 to 2 inches wide) attached to the front of the cabinet box. Frameless cabinets, as the name suggests, have no front frame, and the doors mount directly to the side walls of the cabinet box. Inset doors sit flush inside the face frame, requiring very specific inset hinges.
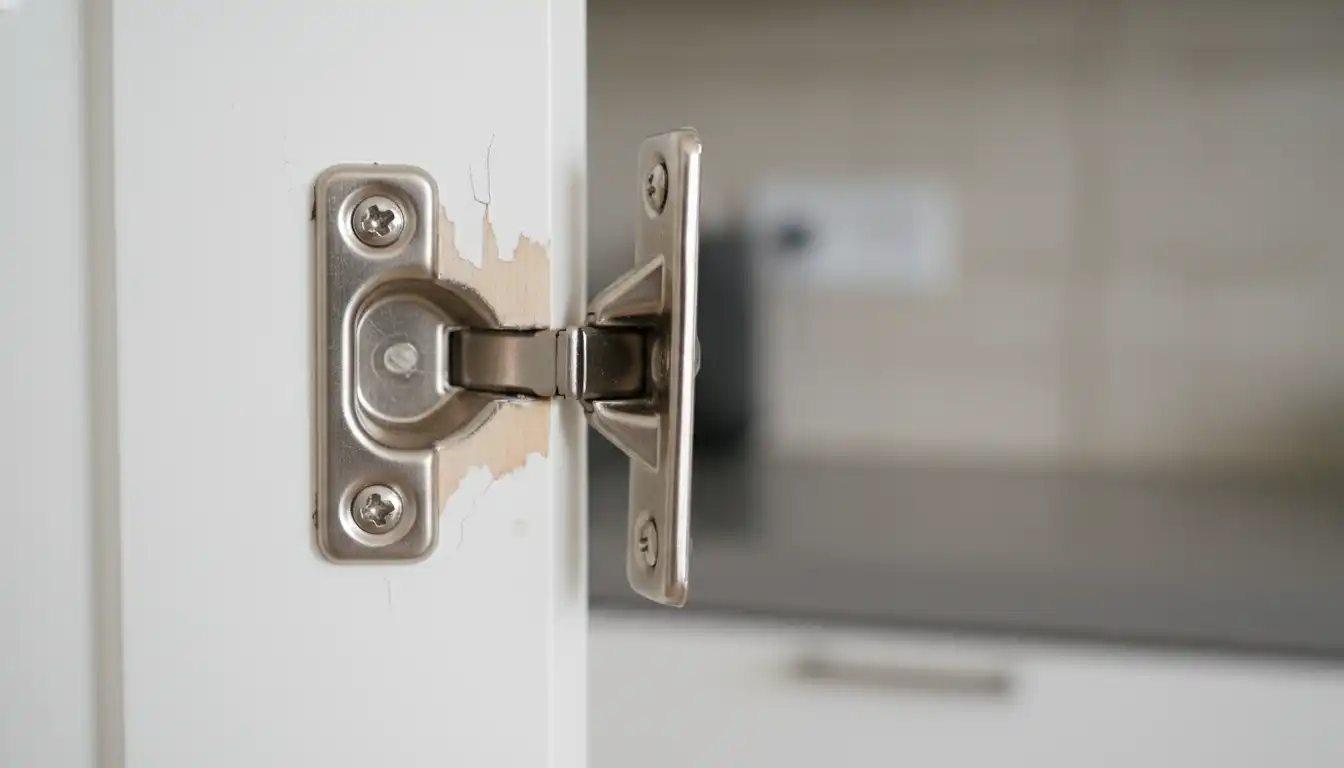
The Original Sin: Old Screw Holes
It seems logical to reuse the old screw holes, but this is often where the problem begins. If your new hinges are not an exact-for-exact replacement, the old holes will force them into the wrong position. Do not assume the old holes are in the right place.
Even a millimeter of difference can cause a significant alignment problem. It is almost always better to fill the old holes and drill new, perfectly placed pilot holes for the new hardware. This gives you a clean slate and ensures absolute precision.
The Ultimate Troubleshooting Guide to Perfect Alignment
Once you’ve confirmed you have the correct hinge type for your cabinet’s overlay and construction, the next step is installation and adjustment. This is where patience and a methodical approach pay off. A crooked door can throw off the entire aesthetic of your kitchen.
Getting the doors perfectly aligned is just as important as keeping the inside of white cabinets clean for a pristine kitchen appearance. Both details contribute to a polished, high-end look.
Mastering the 3 Adjustment Screws
Most modern concealed hinges, often called European hinges, feature three adjustment screws. Each screw controls one specific axis of movement, allowing you to dial in the door’s position with incredible precision. Understanding their function is non-negotiable.
The front screw handles the in-and-out depth adjustment, moving the door closer to or further from the cabinet box. The rear screw controls the vertical up-and-down movement. The middle screw is for side-to-side adjustment, moving the door left or right to close the gap between doors.
When Adjustment Screws Aren’t Enough
Sometimes you can turn the adjustment screws to their maximum limit and the door is still not aligned. This indicates a larger issue with the initial installation, not the adjustment mechanism. This can happen even with well-regarded cabinet lines where precision is key, such as those from B. Jorgsen & Co., if the installation isn’t perfect.
One common issue is a cabinet box that isn’t perfectly square or a slightly warped door. You can check for a warped door by laying it on a flat floor. If it rocks or doesn’t lie flat, the wood itself is the problem, and a new door may be the only solution.
Troubleshooting Hinge Problems: A Quick Guide
Use this table to quickly diagnose and solve the most common cabinet hinge alignment issues. Following these steps systematically will resolve the vast majority of problems you might encounter during your project.
| Problem | Likely Cause | Solution |
|---|---|---|
| Door is too high or too low. | Vertical (height) adjustment is off. | Turn the rear mounting screw on both hinges to raise or lower the door until it aligns with adjacent doors or drawers. |
| Gap between doors is uneven. | Side-to-side adjustment is needed. | Turn the middle screw (often the deepest one) to move the door left or right, creating a consistent gap. |
| Door is not flush with the cabinet. | Depth adjustment is incorrect. | Turn the front screw to move the door closer to or further from the cabinet frame until it sits perfectly flush when closed. |
| Door springs open slightly. | Hinge is binding or installed incorrectly. | Check that the hinge cup is seated fully in the door. Loosen all screws, reseat the hinge, and slowly retighten. |
Fixing Drilled Holes: A Woodworker’s Trick
If you’ve determined that your old screw holes are the problem, you need to fix them properly for a lasting solution. While you can use wood filler for small cosmetic fixes, it doesn’t provide the structural strength needed to hold a cabinet hinge under daily use. The professional method is to use wood dowels.
First, drill out the old screw hole with a drill bit that matches the diameter of your wood dowel. Squeeze a small amount of wood glue into the hole, then gently tap the dowel in until it’s flush. Once the glue is completely dry, you can sand the surface smooth and drill a new, perfectly placed pilot hole.
Beyond the Hinge: Final Touches for a Professional Look
Perfectly aligned hinges are the foundation of a successful cabinet refresh. Once your doors hang correctly with even gaps and a smooth closing action, you can move on to the finishing touches. This is where you install the cabinet hardware that completes the look.
Proper alignment is especially important if you are wrestling with unique hardware challenges. For instance, finding solutions for odd size cabinet pulls becomes much easier when the doors themselves are perfectly square and aligned.
From Frustration to Flawless
Fixing cabinet hinges that don’t line up is a process of elimination. By verifying you have the right hinge type, measuring your overlay correctly, and understanding the adjustment screws, you can solve nearly any alignment issue. It requires patience, but the result is a clean, professional look that totally transforms your space.
Don’t let a crooked cabinet door derail your project. Take a deep breath, follow these steps, and you’ll achieve that flawless finish you were hoping for. Your cabinets will look better than ever.
Frequently Asked Questions
Why don’t my new cabinet hinges line up with the old screw holes?
Cabinet hinge designs and standards can change over time. It’s also possible you purchased a hinge with a different overlay or cup placement than your original hardware. To ensure a match, it’s best to compare the new hinge with the old one side-by-side before purchasing.
What can I do if the new hinge holes are close to the old ones but don’t align perfectly?
If the new screw holes are slightly off from the old ones, you will need to fill the original holes with wood filler or a wooden dowel. Once the filler is dry, you can then drill new pilot holes to match the new hinges.
The screws for my new hinges are too small for the existing holes. What should I do?
A common solution is to fill the stripped or oversized holes. You can use wood glue combined with toothpicks or matchsticks to create a new surface for the screw to grip. After the glue dries, you can install the new hinge using its original screws.
My new hinges are installed, but the cabinet door is crooked. How do I fix it?
Most modern hinges are adjustable in three directions: height, side-to-side, and depth. Look for the corresponding screws on the hinge and make small adjustments until the door is properly aligned. This is often a process of trial and error to get the alignment just right.
Do I need special tools to install new cabinet hinges?
While basic installation can be done with a screwdriver, a few other tools can be very helpful. A drill for creating pilot holes is recommended to avoid splitting the wood. A concealed hinge jig can also be a great time-saver for accurately boring holes for cup-style hinges.