Nails Coming Up Hardwood Floors? The Shocking Reason Why
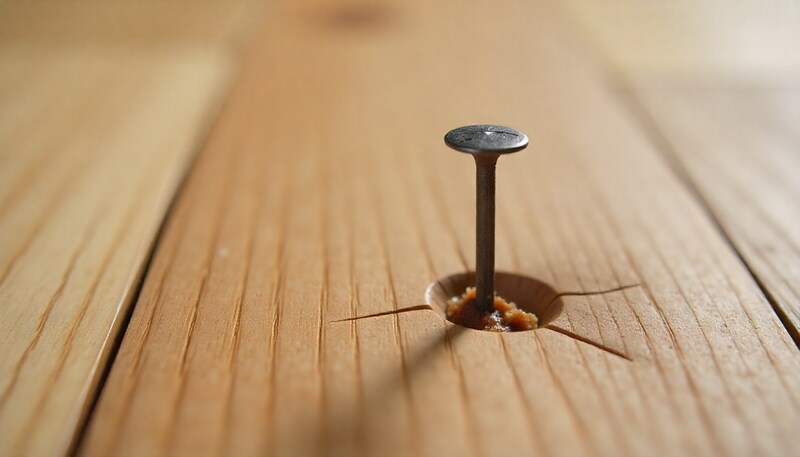
You walk across your beautiful hardwood floor and feel it—a slight snag on your sock. You look down to find a small, shiny nail head stubbornly protruding from a floorboard. This common nuisance, known as a “nail pop,” is more than just an annoyance; it’s a signal from your floor that something is amiss.
These tiny metallic bumps can ruin the smooth expanse of your flooring, pose a tripping hazard, and even cause painful splinters. While your first instinct might be to grab a hammer and pound it back down, that’s often just a temporary fix. To solve the problem for good, you need to understand why it’s happening in the first place.
You'll Learn About
The Hidden Forces at Play: Why Your Nails Are Really Popping Up
A nail popping up isn’t just a random event; it’s a reaction to powerful environmental and structural forces at work in your home. The primary culprit is the natural behavior of wood itself, especially in response to moisture and temperature changes. Understanding these underlying causes is the first step toward a permanent solution.
From seasonal humidity swings to subtle movements in your home’s foundation, several factors can conspire to push those nails upward. Ignoring these signs can lead to more widespread flooring issues, including squeaks, gaps, and loose boards. Let’s delve into the specific reasons your hardwood floors are rejecting their nails.
Cause 1: The Powerful Effect of Humidity and Temperature
Wood is a hygroscopic material, meaning it naturally absorbs and releases moisture from the air. This process causes the wood to expand when humidity is high (like in the summer) and contract when it’s low (like in the winter). This constant, subtle movement is the single most common reason for nail pops.
As your hardwood planks expand and contract, they grip and pull on the nail shanks. Over many cycles, this movement can gradually work the nails upward until their heads break the surface. This is not a flaw in your nails, but rather the wood asserting its natural tendencies.
Cause 2: Subfloor Movement and Flex
Your hardwood flooring is only as stable as the subfloor it rests on. If the subfloor has any flex or movement, it will cause the floorboards to move up and down with foot traffic. This constant motion effectively acts like a tiny lever, slowly prying the nails loose from the joists below.
Subfloor issues can stem from inadequate thickness, water damage, or joists that are spaced too far apart. Sometimes, the problem is as simple as the subfloor panels not being properly glued and screwed down during construction. This is a crucial detail often overlooked, much like how important it is to know how to remove carpet tack strips without damaging hardwood when preparing a floor for a new installation.
Cause 3: Improper Installation Techniques
Even with a perfect subfloor and stable humidity, poor installation can set the stage for future nail pops. Using the wrong type or length of fastener is a common mistake. Smooth-shank nails, for instance, have significantly less holding power than ring-shank or spiral-shank nails.
Another installation error is missing the floor joist entirely. If a nail is driven only into the subfloor and not securely into a joist, it has very little to grip onto and will almost certainly work its way loose over time. The pressure settings on pneumatic nail guns can also be a factor; over-driving a nail can damage the wood fibers, reducing its holding power.
Cause 4: Foundation Settling and Structural Shifts
While less common, nail pops can sometimes be an early warning sign of more significant structural issues. As a house settles over time, the foundation can shift slightly. This movement can transfer up through the frame of the house, causing walls and floors to move, which in turn puts stress on fasteners and can cause them to pop.
If you notice a sudden increase in nail pops accompanied by other signs like sticking doors, cracked drywall, or visible gaps between the floor and your baseboards, it may be wise to consult a structural engineer. It’s important to rule out these more serious issues before focusing on a cosmetic fix.
Your Permanent Fix: A Step-by-Step Guide to Taming Popped Nails
Simply hammering a popped nail back into place is like putting a bandage on a wound that needs stitches—it won’t hold. The wood fibers in the old hole are already compressed and won’t grip the nail tightly. To fix it permanently, you need a more robust approach.
This guide provides several methods, from a simple and effective reset to a complete replacement with a superior fastener. Your choice of method will depend on the severity of the problem and the tools you have available. Follow these steps to ensure those pesky nails stay down for good.
Method 1: The Classic Nail Set Solution (For Minor Pops)
This is the go-to method for a nail that has only recently popped up and is still relatively tight in its hole. The goal is to drive the nail deeper, below the wood surface, and then conceal the hole. It’s a quick and effective fix for isolated incidents.
First, you’ll need a nail set. This is a small, pencil-shaped steel tool that allows you to strike the nail head without hitting and denting the surrounding wood. Place the tip of the nail set directly on the nail head and give it a firm tap with a hammer. The goal is to sink the nail head about 1/8 inch below the surface.
Next, to add extra holding power, drive a new finish nail at a slight angle about an inch away from the original nail. This angled nail will help anchor the board more securely to the subfloor and joist. Finally, use a high-quality, color-matched wood putty to fill both nail holes, let it dry completely, and lightly sand it smooth if needed.
Method 2: Remove and Replace with a Screw (The Ultimate Fix)
For stubborn nails that keep reappearing, replacing them with a trim-head screw is the most permanent solution. Screws have far superior holding power and are not susceptible to the same forces that cause nails to back out. This method ensures the floorboard will stay firmly in place.
Start by carefully removing the offending nail. Use a pair of locking pliers to get a firm grip on the nail head, and place a small block of wood on the floor next to it to act as a fulcrum. Gently roll the pliers back over the block to lever the nail out without denting your floor.
Select a trim-head screw that is the same length as the nail you removed. Using a drill, drive the screw into the original nail hole until its head is slightly below the wood surface. Fill the resulting hole with color-matched wood putty for a seamless finish.
Method 3: The Wood Glue and Toothpick Trick
If you want to reuse the original nail but find the hole has become too loose, this clever trick can restore the lost gripping power. It involves filling the enlarged hole with new wood fibers and adhesive, creating a tight bond once the nail is re-inserted. It’s a simple yet surprisingly effective technique.
First, remove the popped nail as described in the previous method. Then, dip one or two wooden toothpicks in a small amount of wood glue and insert them into the nail hole, breaking them off flush with the surface. This essentially fills the void with fresh wood.
While the glue is still wet, hammer the original nail back into the hole. The toothpicks and glue will compress, creating a tight fit that grips the nail shank firmly once the glue dries. Wipe away any excess glue with a damp cloth before it sets.
Troubleshooting Common Hardwood Nail Issues
Dealing with popped nails can sometimes reveal other underlying issues with your flooring. The table below outlines some common problems you might encounter, their likely causes, and the recommended solutions to address them effectively.
| Problem | Likely Cause | Recommended Solution |
|---|---|---|
| Multiple nails are popping in a line. | The floorboard is likely situated over a flexing subfloor seam or is not secured to a joist. | Secure the entire board by driving trim-head screws into the joists at 16-inch intervals. |
| The nail pops are accompanied by a squeak. | The floorboard is rubbing against the subfloor or an adjacent board due to movement. | Use the screw replacement method. The screw will pull the flooring tight to the subfloor, eliminating movement and the squeak. |
| The wood around the nail head is splintered. | The nail was over-driven, or the wood has become brittle with age. | Carefully remove the nail. Apply a small amount of wood glue to the splinters and clamp them down until dry before filling the hole with putty. |
| The nail keeps popping up even after being reset. | The wood fibers in the hole are too damaged to grip a smooth nail. Significant seasonal wood movement. | Remove the nail and replace it with a ring-shank nail or a trim-head screw for superior holding power. |
Prevention: How to Stop Nail Pops Before They Start
The best way to deal with popped nails is to prevent them from ever happening. If you are installing a new hardwood floor, or even just aware of the conditions in your home, a few preventative measures can save you a lot of future headaches. These steps focus on stability and using the right materials from the start.
Many modern flooring options are designed to mitigate these issues. For example, engineered products often have greater dimensional stability than solid wood, a factor highlighted in many hydroshield flooring reviews. However, even with traditional materials, proper technique is key.
Control Your Home’s Climate
Since moisture is the primary driver of the wood movement that causes nail pops, maintaining a stable indoor environment is crucial. Aim to keep your home’s relative humidity between 35% and 55% year-round. Using a humidifier in the winter and a dehumidifier or air conditioning in the summer can make a huge difference.
This not only prevents nail pops but also protects your flooring from other moisture-related issues like cupping, crowning, and gapping. A stable environment keeps the wood happy and static, reducing the stress on the fasteners holding it in place.
Use the Right Fasteners from Day One
If you’re installing a floor, insist on using the correct fasteners. For hardwood flooring, this typically means 2-inch serrated flooring cleats or ring-shank nails. These types of fasteners have ridges along the shank that provide a much stronger mechanical grip on the wood fibers, making them highly resistant to backing out.
Avoid using standard, smooth-shank finish nails for securing flooring. While they may be acceptable for light-duty trim work, they simply do not have the holding power required to restrain the powerful forces of expanding and contracting hardwood. The history of flooring, from old-time ship floors to modern homes, teaches us the importance of robust fastening, a topic that even touches on why is it called car decking.
Ensure a Rock-Solid Subfloor
A flawless hardwood installation begins with a flawless subfloor. Before any flooring is laid, the subfloor should be inspected to ensure it is level, clean, and, most importantly, securely fastened to the floor joists. Any squeaks or bouncy spots should be addressed by adding screws to pull the subfloor tight against the joists.
The subfloor panels should be properly glued and screwed down, not just nailed. This creates a monolithic and rigid base that will minimize flex and movement, providing a stable foundation that will help keep your hardwood nails firmly in place for decades to come.