Snowblower Suddenly Hard to Push? Your Ultimate Fix-It Guide
There’s nothing more frustrating than wrestling with a heavy snowblower that refuses to move. You purchased this machine to make your life easier, but now you’re fighting a multi-hundred-pound piece of equipment in the freezing cold. When your snowblower is hard to push, it completely defeats its purpose.
The good news is that this common problem is often caused by a few specific issues that are surprisingly easy to diagnose and fix. You don’t need to be a seasoned mechanic to get your machine gliding smoothly again. This comprehensive guide will walk you through everything from simple checks to more detailed repairs, empowering you to solve the problem and get back to clearing snow effortlessly.
You'll Learn About
Why Your Snowblower is a Chore to Push: Top Causes Revealed
A snowblower that’s difficult to move is almost always a symptom of a problem within the self-propel system or an issue causing excessive friction. Understanding the potential culprits is the first step toward a fast and effective repair. Let’s break down the most common reasons your machine has become a workout to operate.
The Self-Propel System: Your Primary Suspect
The heart of your snowblower’s movement is the self-propel drive system. When you squeeze the drive lever on the handle, a cable engages a mechanism that transfers power from the engine to the wheels. If any part of this system fails, you’re left pushing the full weight of the machine on your own.
The most frequent failure points are the drive engagement cable, which can stretch and lose tension, and the friction disc, a rubber-coated wheel that wears down over time. An improperly adjusted cable or a worn-out friction disc are the top reasons a self-propel system stops working.
Tire Pressure: The Simple Fix Everyone Overlooks
Before you start taking things apart, check your tires. Just like on a car, low or uneven tire pressure can make your snowblower incredibly difficult to push and steer. An underinflated tire creates significantly more rolling resistance, making the machine feel sluggish and heavy.
This is the easiest problem to fix and should always be your first check. A quick look at the tire sidewall will tell you the recommended PSI, and a few moments with an air compressor or bike pump can make a world of difference.
Obstructions and Debris: The Silent Resistors
Your snowblower operates in a harsh environment of snow, ice, and whatever lies beneath. It’s common for grass, twine, or other debris to get wrapped tightly around the wheel axles, creating significant drag. Ice buildup around the wheels or inside the drive mechanism can also physically prevent parts from moving freely.
A thorough inspection for foreign objects is a critical diagnostic step. Sometimes, the solution is as simple as cutting away tangled debris or clearing out ice chunks that are binding the drive system.
Worn or Damaged Components
Over time, parts naturally wear out. The drive belt that connects the engine to the drive system can stretch, crack, or break. The friction disc, as mentioned, is a consumable part designed to wear down. Furthermore, the wheel axle bushings can wear out, causing excessive play and resistance.
If you hear a snowblower making grinding noise, it could point to a failing bearing or gear within the drive transmission. These issues require part replacement but are essential for restoring proper function.
Step-by-Step Guide: How to Make Your Snowblower Glide Again
Now that you know the likely causes, it’s time to roll up your sleeves and perform some diagnostics. This step-by-step process will help you pinpoint the exact issue and guide you through the repair. With a few basic tools and a little patience, you can solve this problem yourself.
Safety First: Prepare Your Snowblower for Inspection
Before performing any maintenance, your safety is paramount. You must prevent any possibility of the engine starting accidentally while you are working on it. This is a non-negotiable first step.
Always disconnect the spark plug wire and secure it away from the spark plug itself. This action physically prevents the engine from firing. Also, ensure the machine is on a level, stable surface and that all moving parts, like the auger and impeller, have come to a complete stop.
Step 1: Check and Inflate the Tires
This is the simplest check and can save you a lot of unnecessary work. Locate the recommended tire pressure (PSI) printed on the sidewall of your tires. Use a reliable pressure gauge to check the current inflation level.
If the pressure is low, use an air compressor or a manual pump to inflate both tires to the specified PSI. Ensure both tires are inflated evenly. Uneven pressure can cause the snowblower pulling to one side, another common issue that is easily corrected.
Step 2: Inspect Axles and Wheels for Debris
Carefully inspect the area where the wheels connect to the machine. Look closely at the axles for anything that might be wrapped around them, such as string, vines, or plastic bags. This is a very common source of resistance.
If you find an obstruction, use a utility knife or scissors to carefully cut it away. Rotate the wheels by hand to ensure they spin freely without any binding or catching.
Step 3: Adjust the Drive Engagement Cable
The drive cable tells the machine when to move forward. If this cable has stretched over time, it won’t pull the engagement mechanism far enough to make solid contact, resulting in weak or non-existent propulsion. Adjusting it is often the solution.
Follow the cable from the drive lever on your handle down toward the engine. You will find an adjustment point, often a bracket with a nut or a turnbuckle. To increase tension (tighten the cable), you typically turn the adjustment screw clockwise or move the bracket downward. Make small adjustments, then test the engagement. You want just enough tension to fully engage the drive when the lever is squeezed, with a tiny bit of slack when it’s released to prevent premature wear.
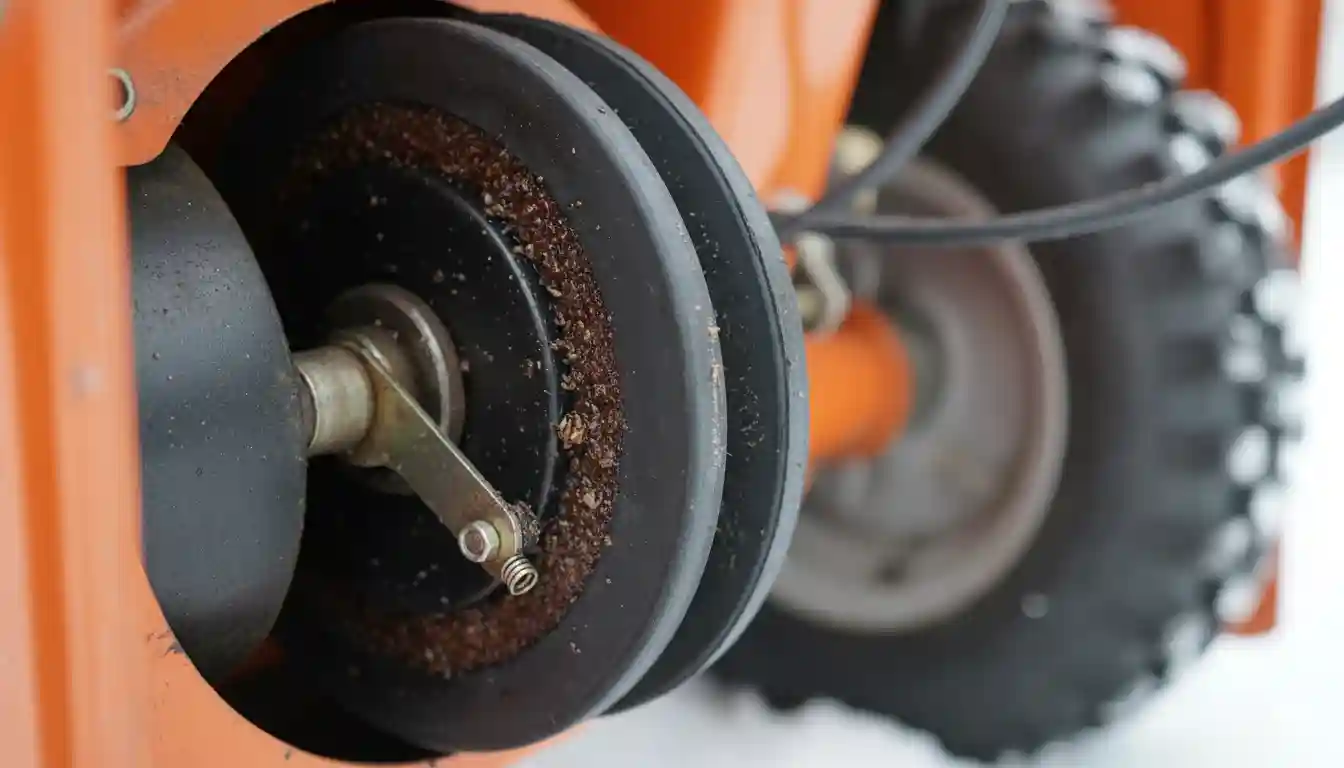
Step 4: Inspect the Friction Disc and Drive Plate
If the cable is adjusted correctly but the wheels still don’t turn with authority, the friction disc is the next likely culprit. To access it, you’ll need to tip the snowblower forward onto its housing and remove the metal belly pan on the underside.
Once the pan is off, you will see the drive system. The large, flat metal wheel is the drive plate, and the smaller, rubber-edged wheel that presses against it is the friction disc. Look for three things: oil contamination, glazing, and wear. Any oil or grease on these surfaces will cause slipping; clean them thoroughly with brake cleaner. If the rubber on the friction disc looks shiny (glazed), rough it up with sandpaper. If the rubber is cracked, chunked, or worn down significantly compared to a new one, it must be replaced.
Troubleshooting at a Glance: Common Problems and Solutions
Navigating snowblower issues can be straightforward with the right information. This table provides a quick reference for diagnosing and addressing the most common reasons your machine might be hard to push, helping you get back to work faster.
| Symptom | Most Likely Cause | Solution | Difficulty |
|---|---|---|---|
| Feels very heavy, hard to push even when off | Low Tire Pressure | Inflate tires to the PSI listed on the sidewall. | Easy |
| Self-propel is weak or doesn’t work at all | Drive Engagement Cable is too loose | Adjust the cable to increase tension. | Easy |
| Wheels stop turning under heavy snow load | Worn Friction Disc or Slipping Drive Belt | Inspect and replace the friction disc. Check and replace the drive belt if cracked or stretched. | Moderate |
| Wheels are locked or very hard to turn by hand | Debris wrapped around axle or drive engaged | Clear any debris from axles. Ensure the drive cable has slight slack when disengaged. | Easy |
| Machine pulls strongly to one side | Uneven Tire Pressure or Axle Issue | Equalize tire pressure. Check for a missing pin on the “dead” wheel’s axle. | Easy |
| Grinding or squealing noise from underneath | Worn Bearing or Contaminated Drive Plate | Inspect and clean the drive plate. If noise persists, a bearing may need replacement. | Moderate to Hard |
Proactive Maintenance: The Key to an Effortless Winter
The best way to deal with a snowblower that’s hard to push is to prevent the problem from ever happening. A little proactive maintenance goes a long way in ensuring your machine is reliable, powerful, and easy to operate all season long.
The Pre-Season Checkup You Can’t Afford to Skip
Before the first snowflake falls, give your snowblower a thorough inspection. Check the tire pressure, inspect all belts for cracks or wear, and test the engagement of both the auger and drive levers. This is also the perfect time to lubricate the wheel axles.
To do this, remove each wheel, clean any rust off the axle with sandpaper, and apply a thin coat of low-temperature grease. This simple act prevents the wheels from seizing to the axle, which is a major headache if you ever need to perform repairs on the drive system.
Understanding Drive System Dynamics and Snow Conditions
Not all snow is created equal, and different conditions place different demands on your snowblower’s drive system. Light, fluffy powder requires very little effort from the self-propel system. However, heavy, wet, or compacted snow dramatically increases the load on the machine.
In these challenging conditions, a perfectly functional drive system can feel like it’s struggling. This is because the auger is working harder, drawing more power from the engine, and the machine is pushing against a heavier load. A slightly worn belt or a friction disc that’s nearing the end of its life will start to slip under this increased load, making the machine feel hard to push. This is a key indicator that maintenance is due soon.
When to Call a Professional
While most of the issues that make a snowblower hard to push are manageable for a DIYer, there are times when it’s best to consult a professional. If you’ve performed all the checks and adjustments outlined above and the problem persists, you may have a more complex internal issue, such as a failed transmission gear or a bad bearing.
If you’re not comfortable disassembling the main drive shaft and transmission components, or if you lack the specialized tools required, a qualified small engine repair shop can diagnose and fix the problem correctly and safely. Knowing your limits is just as important as knowing how to do the repair.