Moving Gas Pipe Behind Oven? Stop! One Mistake Can Be Deadly
You just bought a beautiful new slide-in gas range. Delivery day was perfect, but now there’s a problem. The stove juts out from the wall, leaving an ugly, four-inch gap. The culprit? A stubbornly placed gas pipe that prevents the appliance from sitting flush against the wall.
This isn’t just a cosmetic issue; it’s a frustrating and common problem, especially in older homes. More importantly, attempting to solve it yourself can have catastrophic consequences, including gas leaks, fires, and even explosions. Your home’s safety is on the line.
This guide will walk you through the correct, safe, and legal steps to move that gas pipe. We will explore why this problem happens, the professional solutions available, and the critical safety rules you cannot afford to ignore. This is your ultimate resource for getting that seamless, professional look in your kitchen without risking your family’s safety.
You'll Learn About
Why Your New Stove Won’t Sit Flush: The Gas Pipe Problem
The issue often stems from a mismatch between older home construction and modern appliance design. Older stoves typically had a large, open cavity at the back, making the exact placement of the gas pipe less critical. However, modern ranges, especially slide-in and convection models, are packed with more technology, leaving much less free space behind them.
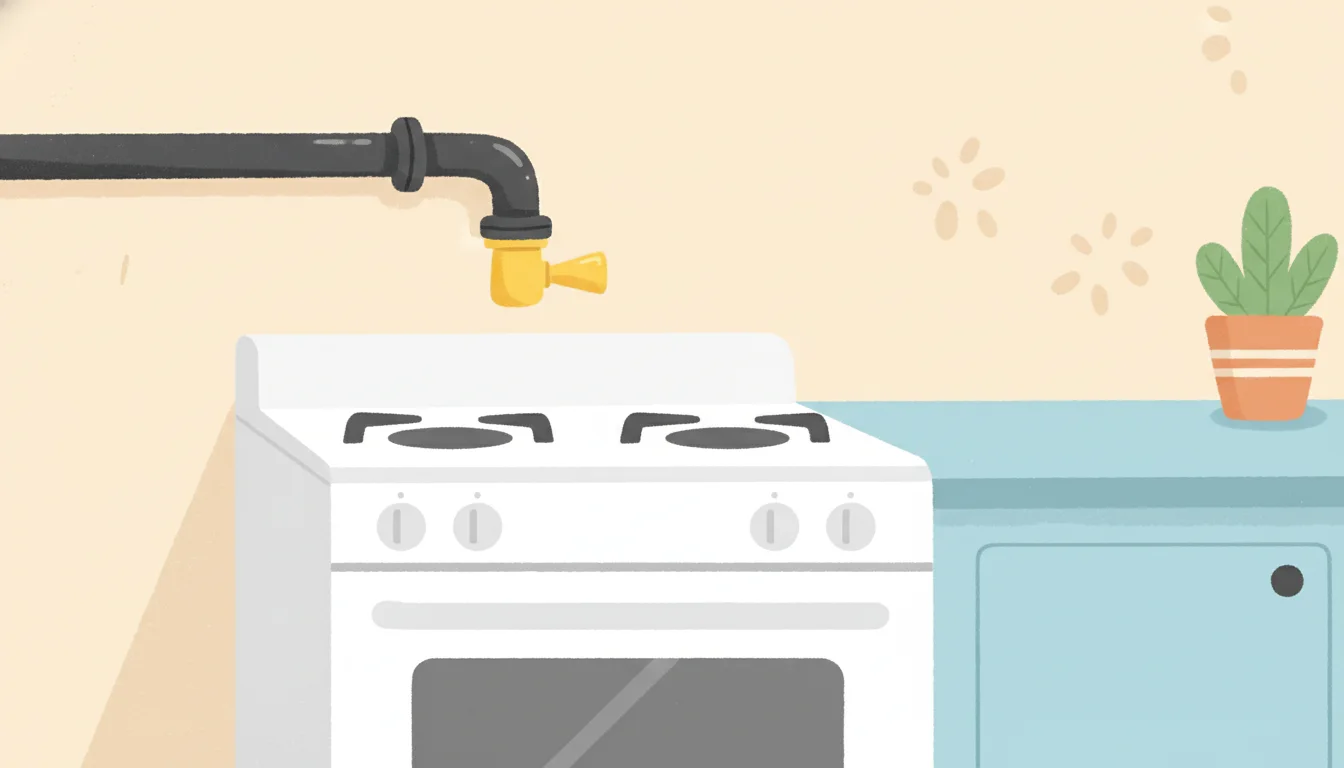
Most new stoves have a specific recessed area—a small, designated pocket—where the gas connection and electrical outlet are meant to fit. If your home’s gas stub-out (the pipe coming from the wall or floor) doesn’t align perfectly with this recess, the appliance simply can’t slide all the way back.
The protruding pipe, along with its shut-off valve and flexible connector, physically blocks the stove. This conflict is the number one reason for that unsightly gap that collects dust, food crumbs, and creates a potential tipping hazard for the appliance.
Before You Touch Anything: The Critical Safety Checklist
Let’s be perfectly clear: moving a gas pipe is NOT a do-it-yourself project. The risks associated with improperly handled gas lines are severe. A tiny, undetected leak can fill your home with flammable gas, creating a ticking time bomb.
Before any work begins, a professional will follow a strict safety protocol. This involves shutting off the main gas supply to the house at the meter. This is a critical first step to ensure no gas is flowing through the pipes while they are being modified.
Call a Licensed Professional: Your First and Only Step
The only person who should ever modify a gas line is a licensed and insured plumber or a qualified gas fitter. These professionals have the training, specialized tools, and knowledge of local codes to do the job safely and correctly. Knowing who can move a gas line is the most important step in this process; hiring an unqualified handyman or attempting it yourself could void your homeowner’s insurance and endanger your life.
Understanding Permits and Inspections
In virtually every jurisdiction, moving or altering a gas line requires a permit from your local building department. This isn’t just bureaucratic red tape; it’s a crucial safety measure. A permit ensures that the work will be inspected by a qualified official to confirm it meets strict safety standards, such as those laid out in the International Fuel Gas Code (IFGC).
The Solution: How to Correctly Move a Gas Pipe Behind Your Oven
When you hire a professional, they will assess your specific situation and recommend the best course of action. This usually involves one of two primary solutions: recessing the connection into the wall or modifying the existing pipework to sit lower and closer to the wall.
The Gold Standard: Recessing the Gas Line with an Outlet Box
The cleanest and most effective solution is to install a recessed gas outlet box. This is similar in concept to an electrical outlet box but is designed specifically for a gas valve. The process involves cutting a clean opening in the drywall behind the stove, right where the appliance’s recessed area is located.
The plumber will then re-route the gas pipe to terminate inside this box. The shut-off valve is contained within the box, sitting flush with or slightly behind the wall surface. This method completely removes the obstruction, allowing your stove to slide snugly against the wall for a truly built-in look.
This approach is the preferred modern standard. It not only solves the clearance issue but also provides a neat, protected, and easily accessible connection point for the flexible gas line that attaches to your stove.
Alternative Solution: Shortening and Rerouting the Pipe
In some cases, especially with gas pipes coming up from the floor or in situations where cutting into the wall is difficult, a full recess may not be feasible. In this scenario, a plumber can modify the existing pipe, known as the stub-out.
This involves carefully cutting the existing black iron pipe, threading the new end, and installing a new shut-off valve and fittings (like a 90-degree elbow) to keep the connection as low and close to the wall as possible. The goal is to position the valve so it fits within the stove’s recessed area without obstruction. While effective, this method requires precise measurements of the new appliance’s rear cavity.
Code Requirements and Clearances: The Rules You Can’t Ignore
Safety codes governing gas installation are strict for a reason. The International Fuel Gas Code (IFGC) and local amendments provide detailed requirements that a licensed professional will follow. A key rule is that the gas shut-off valve must be in the same room as the appliance and be readily accessible.
This is why simply placing the pipe deep inside a wall without an accessible outlet box is against code. In an emergency, you or a first responder must be able to shut off the gas to the appliance quickly. A recessed box with a faceplate ensures this access is maintained.
Furthermore, codes dictate the proper materials to be used. Black iron pipe is the traditional standard for gas lines. Another option is Corrugated Stainless Steel Tubing (CSST), a flexible pipe that can be easier to route in tight spaces but has its own specific installation requirements, including proper bonding to the home’s electrical ground.
Comparing Gas Pipe Relocation Solutions
Choosing the right method depends on your home’s construction, your appliance, and your budget. A professional can guide you, but understanding the options is crucial.
| Solution | Pros | Cons | Best For |
|---|---|---|---|
| Recessed Gas Outlet Box | Provides maximum clearance for a flush fit. Clean, modern, and professional appearance. Fully code-compliant and safe. | Requires cutting into drywall. May be slightly more expensive due to labor. | Most situations, especially with new slide-in ranges and kitchen remodels. |
| Shorten/Reroute Pipe | Less invasive than cutting drywall. Can be more cost-effective. Good for pipes coming from the floor. | Requires precise measurements. May not provide as much clearance as a recessed box. | Installations where the stove has a larger rear recess or when wall modification is not possible. |
| DIY Attempt (Not Recommended) | None. | Extremely dangerous (fire/explosion risk). Illegal in most areas, voids insurance, and likely violates code. | Never an option. |
The Cost of Moving a Gas Pipe Behind an Oven
The cost to professionally move a gas line for a stove can vary, but homeowners can generally expect to pay between $250 and $750. On average, the cost is around $15 to $25 per linear foot.
Several factors influence the final price. The complexity of the job is the biggest driver; a simple pipe shortening will cost less than a full recess that requires opening a wall. Other factors include local labor rates for licensed plumbers, the cost of materials, and permit and inspection fees charged by your municipality. While it may seem like a high cost for a small adjustment, it pales in comparison to the potential cost of property damage or injury from a gas leak.
Common Mistakes to Avoid: A Recipe for Disaster
Beyond the cardinal sin of attempting this as a DIY project, there are other critical mistakes that must be avoided. A professional will know these, but it’s important for you as a homeowner to be aware of them.
A common error is reusing an old flexible gas connector. These connectors are designed for single use only. They should be replaced every time the appliance is replaced to prevent cracks and leaks. Another dangerous mistake is using the wrong materials, such as improper pipe sealant or galvanized pipes, which can flake and clog gas valves. Any issues with pipes concealed within walls can be especially dangerous, a topic you can learn more about in our guide on what to do if you have a gas line in wall.
The Importance of a Leak Test
After any modification, a professional will perform a pressure test to ensure the new connections are 100% leak-free. They will use a specialized tool called a manometer or apply a leak detection solution to every joint. This final step is non-negotiable and is essential for confirming the safety of the installation.
Conclusion: Peace of Mind is Worth the Professional Cost
That annoying gap behind your new stove is more than a cosmetic flaw; it’s a sign that your gas connection needs professional attention. While the temptation to find a quick fix may be strong, the risks associated with moving a gas pipe are far too great to leave to chance.
Hiring a licensed plumber or gas fitter is the only safe and legal way to solve the problem. They will ensure the job is done correctly, adheres to all safety codes, and passes inspection. Investing in a professional solution not only gives you that clean, flush-mount look for your new oven but also provides the invaluable peace of mind that comes from knowing your home and family are safe.