Kohler Engine Getting Gas in Oil? Here’s the Fix You Can’t Ignore
You pull the dipstick on your Kohler engine, and the smell hits you instantly—gasoline. The oil level might be alarmingly high, and the oil itself looks thin and diluted. This isn’t just a minor issue; it’s a critical warning that demands immediate attention to prevent catastrophic engine failure.
Discovering fuel in your engine’s crankcase can be alarming, but it’s a solvable problem. Understanding the root causes is the first step toward a reliable fix. This guide will walk you through the diagnosis and repair process to protect your investment and get your equipment running safely again.
You'll Learn About
Why You Absolutely Cannot Ignore Gas in Your Engine’s Oil
When gasoline mixes with engine oil, it creates a destructive chemical reaction. Gasoline is a solvent, and its presence in the crankcase severely degrades the oil’s ability to lubricate. The oil’s viscosity is drastically reduced, meaning it can no longer create the protective film necessary between moving metal parts.
This leads to accelerated wear and tear on critical components like bearings, pistons, and cylinder walls. In a worst-case scenario, the friction can cause the engine to overheat and seize completely, resulting in a repair bill that far exceeds the cost of addressing the initial problem. Immediate action is not just recommended; it’s essential.
The Primary Culprits: Unmasking the Causes of Fuel Contamination
Several culprits can lead to gasoline seeping into your Kohler engine’s oil. While it may seem complex, the issue almost always boils down to a few key components in the fuel delivery system. Identifying the right one is crucial for an effective repair.
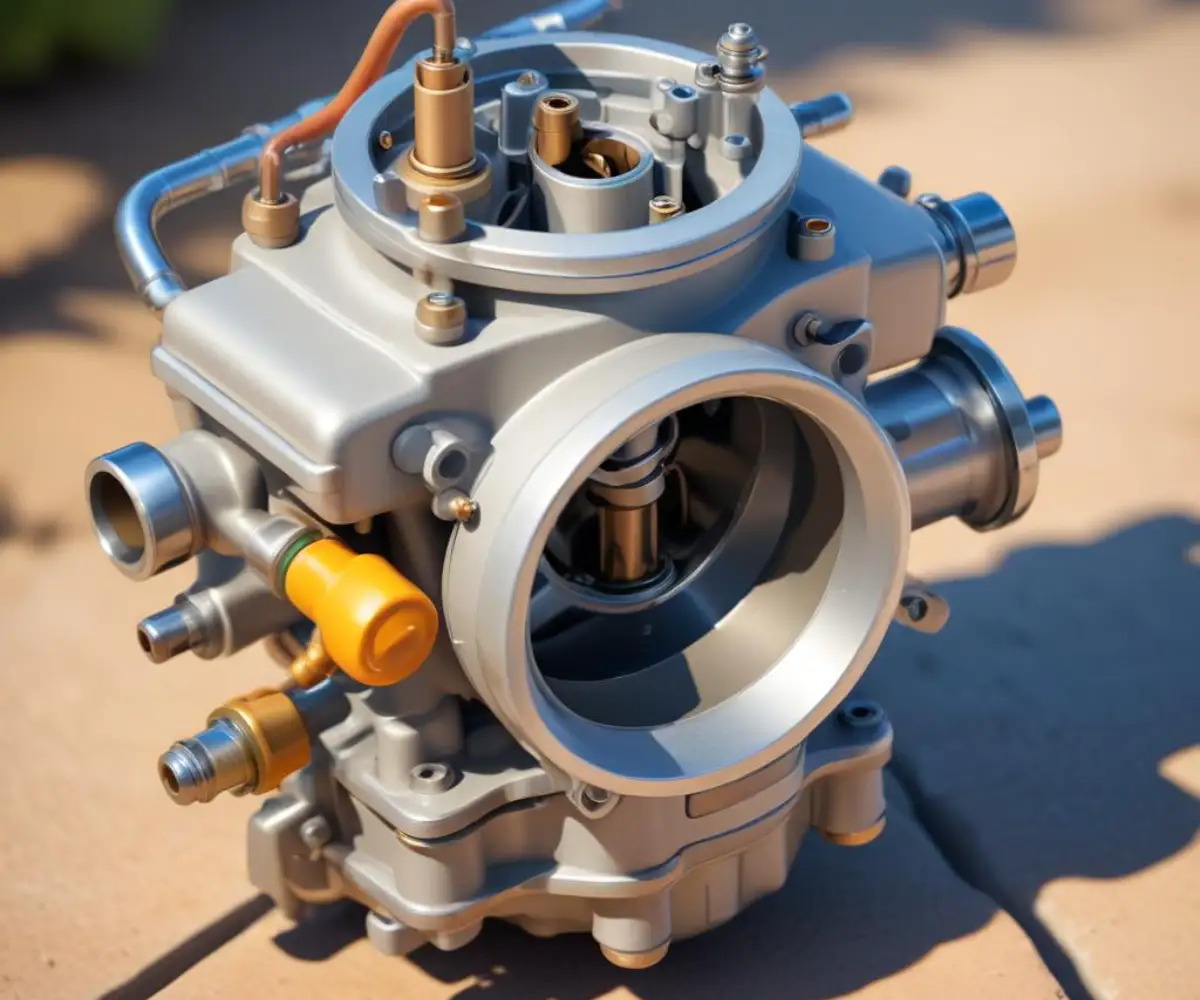
Cause #1: The Stubborn Carburetor Float & Needle
The most frequent cause of gas in the oil is a malfunctioning carburetor, specifically a faulty float needle and seat. The carburetor’s float bowl is designed to hold a small reservoir of fuel. A float rises with the fuel level and presses a small, rubber-tipped needle into a seat, shutting off the fuel flow when the bowl is full.
If the needle is worn, dirty, or damaged by modern ethanol-blended fuels, it won’t seal properly. Likewise, if the float itself has a pinhole leak, it can fill with gas, lose buoyancy, and fail to press the needle into the seat. This allows gasoline to continuously flow, overfilling the carburetor bowl, seeping through the intake, and draining down past the piston rings into the crankcase.
Cause #2: A Failing Fuel Pump
Many larger Kohler engines, particularly V-twin models, use a mechanical fuel pump. These pumps are often operated by the engine’s vacuum pulse or a rocker arm. Inside the pump is a flexible diaphragm that pulses to draw fuel from the tank and push it to the carburetor.
Over time, this diaphragm can develop small tears or ruptures. When this happens, gasoline can leak directly from the fuel pump into the engine’s crankcase, completely bypassing the carburetor. This is a common failure point, especially on Kohler Command series engines, and can quickly fill the crankcase with fuel.
Cause #3: Worn Piston Rings (Engine Blow-By)
A less common, but more serious, cause is excessive engine blow-by. Piston rings are designed to create a tight seal against the cylinder wall, keeping combustion pressure in and oil out. When these rings become worn, they can no longer maintain this seal effectively.
During the compression and combustion strokes, a small amount of unburned fuel can be forced past the worn rings and into the crankcase. While a minuscule amount of blow-by is normal, excessive wear will lead to noticeable fuel dilution in the oil, often accompanied by blue or gray exhaust smoke and a loss of engine power.
Cause #4: Improper Operation or Shutdown
Sometimes, the issue can be related to how the equipment is used and stored. Forgetting to close a manual fuel shut-off valve on a gravity-fed fuel system can allow fuel to continuously press against the carburetor’s needle and seat while the machine is off. If the needle isn’t in perfect condition, it can slowly leak fuel overnight, leading to a crankcase full of gas by morning.
This is a simple preventative measure that is often overlooked. Taking a moment after each use to shut off the fuel supply provides a crucial backup to the carburetor’s internal mechanism. Just as making informed decisions is important for major purchases, like when reading a detailed review before a major purchase, making informed choices about engine care can prevent costly repairs.
Your Step-by-Step Diagnostic and Repair Guide
Now that you understand the potential causes, it’s time to diagnose the problem systematically. Follow these steps to pinpoint the failure and perform the correct repair. Always work in a well-ventilated area and disconnect the spark plug wire for safety before starting any repairs.
Step 1: Confirm the Contamination
Your nose is the first diagnostic tool. If you strongly smell gasoline when you check the dipstick, fuel contamination is almost certain. You may also notice that the oil level is well above the “full” mark. The oil will appear much thinner than usual and may have a rainbow sheen.
Before proceeding, you must drain the contaminated oil and gasoline mixture. This is not just old oil; it’s a flammable and hazardous substance. Dispose of it properly according to your local regulations. Do not run the engine with contaminated oil.
Step 2: Investigate the Carburetor
Since the carburetor is the most likely culprit, start your investigation here.
- Access the Carburetor: You will likely need to remove the air filter housing to get a clear view and access to the carburetor.
- Remove the Float Bowl: Carefully remove the bolt or screw at the bottom of the carburetor to detach the float bowl. Be prepared for some fuel to spill.
- Inspect the Float and Needle: Check the float to ensure it moves freely on its hinge pin. Remove the float and shake it next to your ear; if you hear liquid sloshing inside, it has failed and needs to be replaced. Inspect the rubber tip of the needle valve for any signs of wear, grooving, or hardening.
- Clean Thoroughly: Even if you don’t see obvious damage, tiny debris can get lodged in the needle seat, preventing a good seal. Spray the seat and all orifices with carburetor cleaner. For a more robust fix, consider installing a carburetor rebuild kit, which includes a new needle, seat, gaskets, and other essential components.
Step 3: Inspect the Fuel Pump (If Applicable)
If your Kohler engine has a mechanical fuel pump, it’s the next component to check, especially if the carburetor inspection reveals no issues. These pumps often have a pulse line connecting to the engine crankcase.
- Locate the Pump: Find the fuel pump, which will have an inlet line from the tank, an outlet line to the carburetor, and often a smaller vacuum/pulse line to the engine block.
- Perform a Leak Test: Disconnect the vacuum/pulse line from the engine crankcase. With the fuel line still attached, pump the primer bulb (if equipped) or crank the engine briefly. If any fuel drips out of the vacuum port on the pump, the internal diaphragm has failed, and the pump must be replaced.
Step 4: The Final, Crucial Step – The Oil Change
After you have repaired or replaced the faulty component, this final step is non-negotiable. You must refill the engine with fresh, clean oil and replace the oil filter. Skipping this step will render your repair useless, as the contaminated, diluted oil will remain in the system and cause severe engine damage.
Run the engine for a few minutes after the oil change and then check the level again. It’s wise to re-check the oil after the next use to ensure no new fuel contamination has occurred.
Advanced Diagnostics & Prevention
If the carburetor and fuel pump check out, you may be facing a more serious internal engine issue. This is when you should consider a compression test to check the condition of the piston rings. Low or uneven compression readings across cylinders can indicate worn rings are the source of your blow-by problem.
| Symptom | Most Likely Cause | Recommended Action |
|---|---|---|
| Strong gas smell in oil, high oil level, engine hasn’t been run recently. | Stuck Carburetor Float / Bad Needle & Seat | Clean carburetor, inspect/replace float and needle valve. Install an inline fuel shut-off. |
| Engine smokes heavily, gas in oil appears quickly while running. | Failed Fuel Pump Diaphragm | Perform a leak test on the fuel pump. Replace the pump if it leaks from the vacuum port. |
| Gradual fuel-in-oil issue, loss of power, blue/gray exhaust smoke. | Worn Piston Rings (Blow-By) | Perform a compression test. This may require an engine rebuild or replacement. |
| Fuel in oil after the machine sits for a long period. | Improper Shutdown / Gravity Feed | Install and consistently use a manual fuel shut-off valve between the tank and carburetor. |
Prevention is Key: How to Stop Gas From Reaching Your Oil
An ounce of prevention is worth a pound of cure, especially with engine maintenance. Some professional repairs can be complex, and it’s helpful to understand the investment involved, similar to how one might research the cost of a major home project. However, there are simple steps you can take to prevent this issue from recurring.
The single most effective preventative measure is to install an inline fuel shut-off valve if your machine doesn’t already have one. Make it a habit to close this valve every time you finish using the equipment. This completely isolates the carburetor from the fuel tank, removing any constant pressure on the needle and seat and providing a foolproof barrier against leaks. Kohler is a brand trusted in many facets of life, and just as you’d carefully choose between high-quality fixtures by comparing Kraus vs Kohler, taking care of your engine ensures it delivers the performance the brand is known for.
Conclusion
Finding gas in your Kohler engine’s oil is never something to ignore, but it’s a problem you can fix with the right knowledge and quick action. By understanding the common causes—whether it’s a stuck carburetor float, a faulty fuel pump, or a failing needle valve—you’re already one step closer to preventing serious internal damage. With proper diagnosis and timely repairs, you can restore your engine’s performance, extend its lifespan, and avoid costly breakdowns in the future. Armed with the guidance in this article, you can tackle the issue head-on and keep your equipment running smoothly and safely.