The Hidden Truth About Your KitchenAid Oven Blue Interior
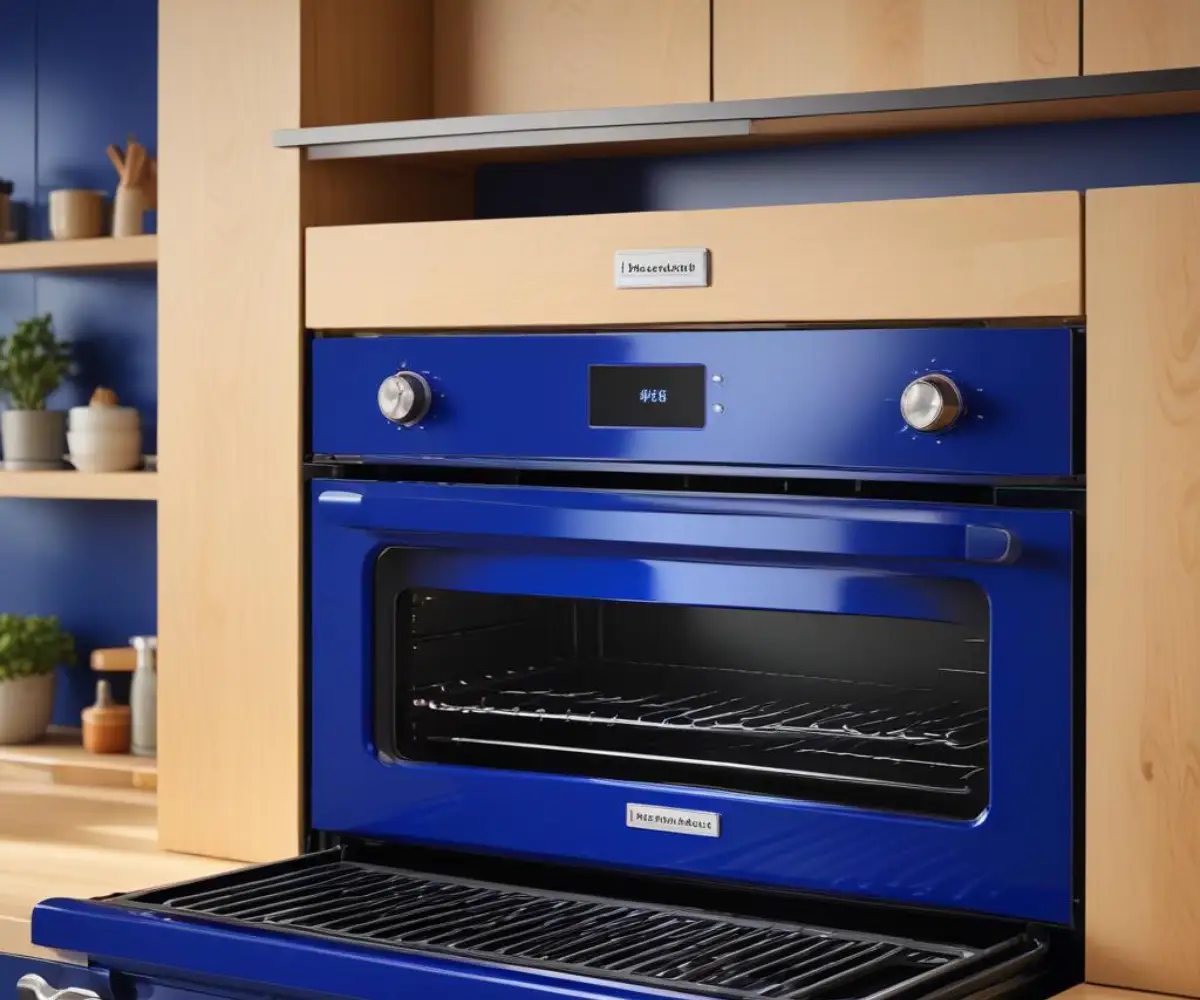
That stunning, vibrant cobalt blue interior is a signature feature of KitchenAid ovens, promising a premium cooking experience. It looks incredible in the showroom and adds a touch of professional flair to your kitchen. But owners often discover that this beautiful surface comes with a hidden learning curve. Many find themselves asking: How do I clean it without causing damage? And what should I do if the beautiful blue enamel starts to chip?
The problem isn’t the blue interior itself, but the specific care it requires. Standard oven cleaning methods can be too harsh for the porcelain enamel, leading to scratches, dullness, or even chipping. This guide provides the definitive answers to caring for, cleaning, and troubleshooting your KitchenAid oven’s blue interior, ensuring it remains as functional and beautiful as the day you bought it.
You'll Learn About
Why Blue? Unpacking the Science and Style of Cobalt Enamel
The choice of a cobalt blue interior is far from just a cosmetic decision. It’s a carefully engineered feature designed to enhance both the cooking process and the user experience. This signature finish is a testament to KitchenAid’s commitment to performance and design, setting their appliances apart from the sea of standard gray and black interiors.
The Functional Beauty of Porcelain Enamel
At its core, the blue interior is a high-grade porcelain enamel coating fused to the steel oven cavity. This glass-based material is chosen for several key properties that directly impact cooking performance. Its smooth, non-porous surface is less likely to have food bake onto it, which is the first step in making cleaning easier. Furthermore, the reflective nature of the glossy blue finish helps to distribute heat more evenly throughout the oven, reducing hot spots and promoting consistent results in your baking and roasting.
The bright cobalt color serves another crucial, practical purpose: superior visibility. The stark contrast between the blue walls and your food makes it significantly easier to monitor cooking progress without opening the oven door. This allows you to check for browning and doneness at a glance, preserving oven temperature and ensuring your delicate dishes aren’t disturbed by fluctuating heat.
The Ultimate Cleaning Guide: Protecting Your Blue Enamel for Life
The most common point of failure for a blue enamel interior is improper cleaning. The glossy surface is durable but not indestructible. Using the wrong tools or harsh chemicals can permanently damage the finish. The key is to use gentle methods consistently and to understand the specific cleaning technology built into your oven.
Daily Maintenance and Minor Spills
The first rule of maintaining your blue interior is to address spills as they happen, once the oven has completely cooled. For minor splatters and daily upkeep, a simple solution is best. Use a soft, damp cloth with a few drops of mild dish soap to wipe down the interior. Never wipe a hot porcelain surface with a cool, damp cloth, as this can cause thermal shock and lead to crazing or hairline cracks.
Avoid abrasive materials at all costs. This includes steel wool, scouring pads, and gritty cleansers. These will create micro-scratches on the surface, which will dull the finish and make it more susceptible to staining and food buildup over time.
Tackling Stubborn, Baked-On Grease
For more significant messes, you don’t need to resort to aggressive chemicals. A homemade paste of baking soda and water is a highly effective and safe alternative. Mix baking soda with just enough water to form a thick paste, spread it over the soiled areas (avoiding the heating elements), and let it sit for several hours or even overnight. The alkaline nature of the baking soda will break down the grease without harming the enamel. Once it has done its work, simply wipe it away with a damp cloth.
For any remaining stubborn spots, a plastic scraper can be used to gently lift the debris. Regular maintenance of home appliances is crucial; just as you’d learn about fireplace gas valve cover plate removal for an annual check-up, routine oven care preserves its function and appearance.
Mastering AquaLift® Self-Clean Technology
Many modern KitchenAid ovens feature AquaLift® technology, a cleaning system designed specifically for the blue porcelain interior. Unlike traditional high-heat self-cleaning cycles that can stress the enamel, AquaLift® uses low heat and water to gently loosen baked-on spills. It operates below 200°F and is odor-free, completing its cycle in under an hour.
To use it effectively, first remove all racks and accessories. Pour two cups of distilled or filtered water onto the oven floor and close the door. Select the AquaLift® cycle and let it run. When the cycle is complete, use a sponge or soft cloth to wipe away the loosened soil and residual water. It is important to note that AquaLift® is designed for light to moderate soils and works best when used regularly, rather than as a solution for heavy, long-term buildup.
Troubleshooting Common Issues: Chips, Stains, and More
Even with proper care, issues can sometimes arise. Understanding the potential problems and how to address them can save you from unnecessary worry and expense. From cosmetic blemishes to more serious concerns, here’s how to handle the most common challenges with your blue oven interior.
The Nightmare Scenario: Chipping and Flaking Enamel
Perhaps the most alarming issue for any owner is discovering a chip or flake in the porcelain enamel. This problem, while not exclusive to KitchenAid, is a known concern across many brands featuring colored enamel interiors. The primary causes are typically impact from heavy cookware, scraping with metal utensils, or severe thermal shock. In some rare cases, it can be a manufacturing defect.
The immediate question is one of safety. For a small, cosmetic chip, it is generally considered safe to continue using the oven. The risk of a tiny piece of enamel getting into your food is minimal. However, if you notice larger flakes or the chipping is extensive, especially if accompanied by rust, you should contact KitchenAid service. Ingesting sharp enamel flakes could be harmful. Do not use high-heat self-cleaning cycles if your enamel is chipped, as this can worsen the damage significantly.
Unfortunately, repairing chipped oven enamel is not a simple DIY task. Touch-up paints are available for appliance exteriors but are often not rated for the high temperatures inside an oven cavity. The only proper solution is a professional replacement of the oven cavity, which can be costly if not under warranty.
Banishing Tough Stains and Discoloration
Over time, you might notice stains or a dulling of the vibrant blue finish, often caused by polymerized grease or burnt-on sugars. For these tough spots that a baking soda paste can’t handle, you can escalate your cleaning approach slightly. Products like Bar Keepers Friend (the powder version made into a paste) can be effective, but should be used with caution and tested on a small, inconspicuous area first.
Another effective tool is a razor blade scraper held at a low angle to gently lift away carbonized spills from the flat surfaces and the oven window. This must be done with extreme care to avoid scratching the surface. Always follow up with a thorough rinse with a damp cloth to remove any cleaning residue.
| Action | Do | Don’t |
|---|---|---|
| Regular Cleaning | Wipe spills after the oven cools with a soft, damp cloth and mild soap. | Use abrasive scourers, steel wool, or harsh chemical oven cleaners. |
| Self-Cleaning | Use the AquaLift® low-heat steam cycle regularly for light soil. | Run a high-heat self-clean cycle, especially if you notice any chips. |
| Cookware | Lift pots and pans in and out of the oven carefully. | Slide heavy cast iron or stoneware across the oven floor or racks. |
| Spill Prevention | Place a baking sheet on a lower rack to catch drips from pies or casseroles. | Place aluminum foil directly on the oven bottom, as it can melt and fuse to the enamel. |
| Stain Removal | Use a baking soda paste for baked-on grease and food. | Use sharp metal tools to scrape at stubborn spots. |
Maximizing Your Oven’s Lifespan and Performance
Beyond cleaning and troubleshooting, a few best practices in your daily use can significantly extend the life and beauty of your KitchenAid’s blue interior. These simple habits help prevent damage before it starts, ensuring your oven remains a reliable centerpiece of your kitchen for years to come.
Best Practices for Everyday Cooking
Preventative care is always the best strategy. Always avoid placing aluminum foil on the bottom of the oven. The intense heat can cause the foil to melt and permanently bond with the porcelain surface, causing irreparable damage. If you need to protect against spills, place a cookie sheet or an oven-safe liner on the rack below what you are baking.
Be mindful when placing and removing bakeware. Avoid banging heavy pots, pans, or baking stones against the interior walls or floor. When adjusting oven racks, lift them completely out of their supports to reposition them rather than dragging them along the sides of the oven cavity, which can scrape and wear down the enamel over time.
The Blue Interior’s Role in Superior Cooking
Ultimately, the blue interior is part of a system designed for better cooking. When kept clean, its reflective surface works in concert with features like KitchenAid’s Even-Heat™ True Convection to circulate air and distribute heat evenly. A clean surface reflects heat more effectively than one covered in grime, leading to more accurate temperatures and better cooking results.
Maintaining a high-performance kitchen requires attention to detail, from the appliances you use to the very structure of the room. A solid kitchen foundation is paramount, and it’s wise to avoid problematic shortcuts. For instance, understanding issues like those with expanding foam under laminate flooring can save you headaches in the long run, ensuring your culinary space is built to last. Whether you’re maintaining an oven or clearing snow with a dependable tool like a Toro CCR 1000, using the right approach and proper maintenance is key to long-term success.
The Final Verdict: Is the Blue Interior Worth It?
The KitchenAid oven’s signature blue interior is more than just a stylish choice; it’s a feature designed with performance in mind. Its smooth porcelain enamel surface aids in even heat distribution and makes monitoring your food easier than ever before. While it demands more mindful care than a standard gray-speckled interior, its benefits are clear for the discerning home cook.
By following the proper cleaning procedures, using the gentle AquaLift® technology, and adopting preventative habits, you can easily maintain its brilliant finish. While the risk of chipping is real, it is often preventable with careful use. For those who value both high performance and high design in their kitchen, the iconic KitchenAid blue interior proves to be a feature that is absolutely worth the investment.