What are Karran Sink Clips and How are they Installed?
There’s a sinking feeling that has nothing to do with emotions and everything to do with your kitchen. It’s the dreaded sag. You walk into your kitchen and notice a small, yet ominous, gap forming between your undermount sink and the countertop. This isn’t just a cosmetic issue; it’s a ticking time bomb for water damage, mold growth, and potential cabinet ruin. A failing sink mount compromises the heart of your kitchen, turning a simple task like washing dishes into a source of anxiety. The primary culprit is often a reliance on adhesive alone, which degrades over time under the constant assault of weight, moisture, and vibrations from the garbage disposal.
The good news is that there is a robust, permanent solution that doesn’t rely on hope and a tube of silicone. Karran sink clips provide the essential mechanical support needed to secure your sink for the long haul. These specially designed clips anchor your sink firmly to the underside of the countertop, bearing the load that was once precariously held by failing adhesive. Think of them as a suspension bridge for your sink—a durable, engineered solution designed to prevent catastrophic failure and give you back your peace of mind. This guide will walk you through everything you need to know about why sinks fail and how Karran sink clips are the definitive answer to the problem.
You'll Learn About
Why Your Undermount Sink is Failing: The Hidden Culprits
Understanding why your sink is sagging is the first step toward a permanent fix. An undermount sink can fail for several reasons, and it’s often a combination of factors that leads to the eventual separation from the countertop. Simply reapplying sealant without addressing the root cause is a temporary patch that is doomed to fail again.
One of the most common reasons for failure is poor initial installation. Many installers rely heavily, sometimes exclusively, on silicone or epoxy to hold the sink in place. While adhesive is a critical component for creating a waterproof seal, it was never intended to be the sole source of structural support. Over time, the constant weight of the sink—filled with water and heavy dishes—puts immense strain on the adhesive bond, leading to delamination. Another installation error is the use of too few clips or clips that are not appropriate for the countertop material.
Even with a decent installation, adhesive breakdown is inevitable. The kitchen environment is harsh; constant exposure to moisture, steam, and temperature fluctuations causes sealants to lose their elasticity and bonding strength. Vibrations from a garbage disposal can accelerate this process significantly, shaking the sink and breaking the adhesive’s grip. The result is a slow but steady descent, starting with a hairline gap that widens over time, allowing water to seep in and cause further damage.
The Domino Effect of a Sagging Sink
A loose undermount sink is more than just an eyesore. That initial gap allows water to penetrate the space between the sink flange and the countertop. This moisture can wreak havoc on your cabinetry, causing the wood or particleboard to swell, warp, and grow mold. If the issue isn’t addressed, you could be looking at a much more extensive and expensive repair than just re-securing a sink. Sometimes, what seems like a small issue, like dealing with drywall tape showing through mud on a wall, can be a sign of underlying moisture problems that need immediate attention. You can explore more about such related home repair topics by reading our article on what to do when drywall tape showing through mud_gem1.
The countertop itself is also at risk. For porous materials like granite or marble, trapped moisture can lead to staining. In the case of laminate or wood countertops, water intrusion can cause delamination and irreparable damage to the core material. By addressing the sagging sink with a proper mechanical fastening system, you are not just fixing the sink; you are protecting the significant investment you’ve made in your countertops and cabinets.
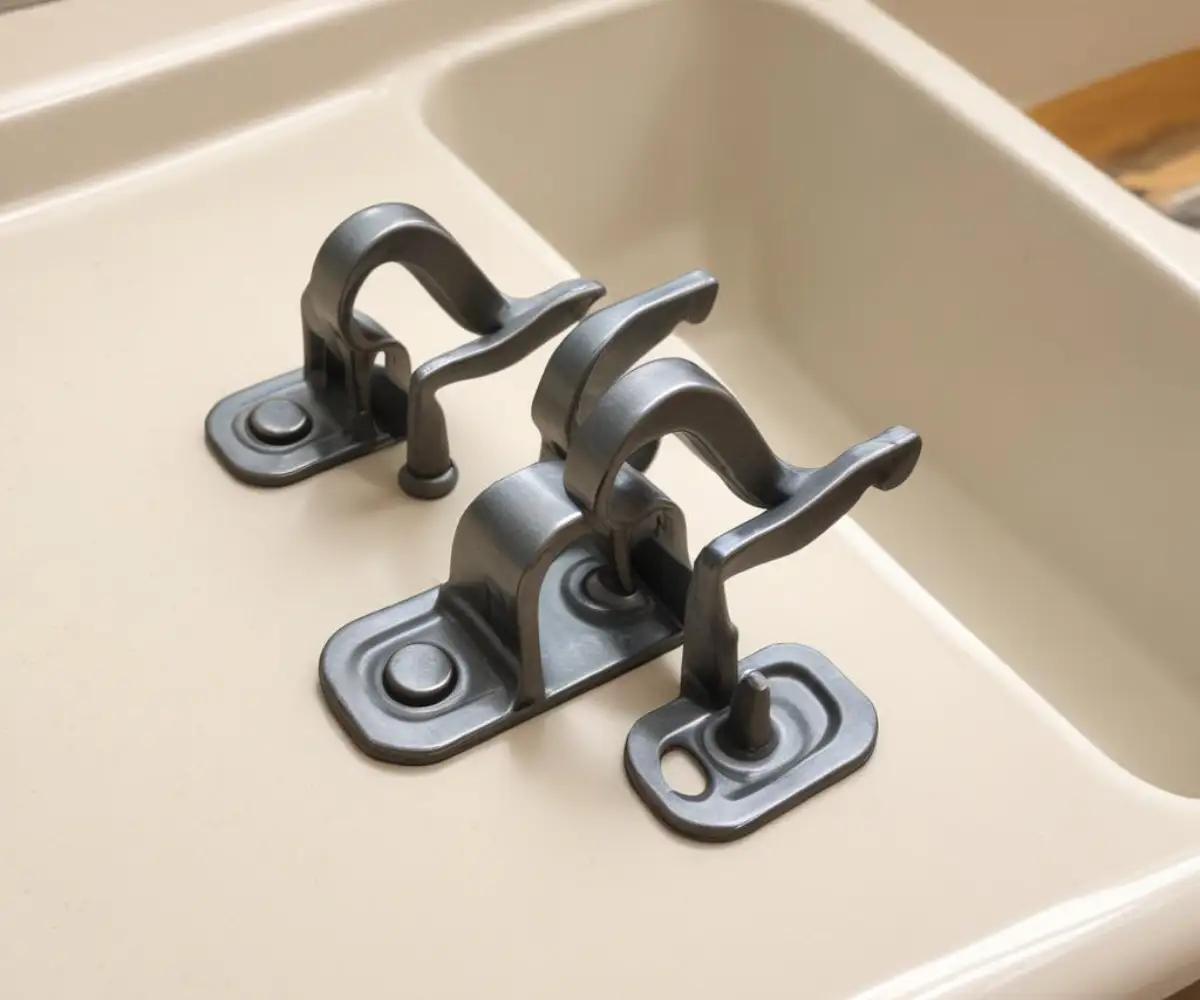
Karran Sink Clips to the Rescue: What Makes Them Different?
Karran has established itself as a leader in sink innovation, and their mounting hardware is no exception. Karran sink clips are specifically engineered to provide unwavering mechanical support for undermount sinks, effectively eliminating the risk of sagging. Unlike generic clips, Karran offers solutions tailored to different countertop materials, ensuring a secure and lasting installation no matter your kitchen’s design.
The fundamental principle behind these clips is to transfer the weight of the sink from the fragile adhesive seal to the strong, rigid structure of the countertop or cabinet. They work by creating upward pressure on the sink’s rim, pulling it tight against the underside of the counter. This mechanical clamping force ensures the sink remains perfectly positioned and stable, even when fully loaded or with the garbage disposal running. Made from high-quality, corrosion-resistant steel, these clips are built to withstand the humid environment beneath a sink for years to come.
Opting for a robust solution like Karran clips is part of a broader mindset of proactive home maintenance. Just as you might secure your property’s perimeter with a sturdy fence, you should secure critical fixtures inside your home. It’s about choosing durability over quick fixes. If you’re tackling other outdoor projects, you might find useful tips in our guide on how to shorten split rail fence rails_gem1.
Choosing the Right Karran Sink Clips for Your Countertop
Not all countertops are created equal, and the type of sink clip you use should reflect that. Karran offers a variety of clip systems designed for specific materials, from natural stone to laminate. Using the correct clip is crucial for a successful and damage-free installation. For instance, installing clips on a granite countertop requires a different approach than securing a sink to a wood or laminate base.
To help you navigate the options, we’ve created a table that breaks down the most common types of sink clips and their ideal applications. This will ensure you select a product that provides maximum support and is compatible with your kitchen setup. Choosing the right hardware is the first and most important step in guaranteeing your sink never sags again.
| Clip Model/Type | Ideal Countertop Material | Key Feature | Installation Note |
|---|---|---|---|
| Epoxy-Based Stud Clips | Granite, Quartz, Solid Surface | Studs are permanently epoxied to the underside of the stone. | Requires a strong two-part epoxy. The surface must be thoroughly cleaned with denatured alcohol for a proper bond. |
| Drill-In Insert Clips | Granite, Quartz, Concrete | A small hole is drilled for a threaded insert, providing immense holding power. | Recommended for professional installation to avoid cracking the countertop. Uses brass inserts to prevent splitting the stone. |
| Cabinet-Mounted Brackets | All Materials (especially thin or fragile ones) | Brackets screw into the cabinet walls and extend to support the sink rim. | Excellent for retrofitting a sagging sink as it requires no drilling or gluing to the countertop itself. |
| Laminate/Wood Screw Clips | Laminate, Butcher Block, Wood | A simple bracket that screws directly into the wood substrate of the countertop. | Ensure screws are not too long to pierce the top surface. Pre-drilling a pilot hole is recommended. |
The Ultimate Step-by-Step Guide to Installing Karran Sink Clips
Installing Karran sink clips is a manageable DIY project that can save you hundreds in professional fees and prevent thousands in potential water damage. With the right tools and a methodical approach, you can have your undermount sink secured properly in an afternoon. This guide will focus on retrofitting clips to an existing, sagging sink.
Step 1: Safety First & Preparation
Before you begin, your safety and the protection of your kitchen are paramount. Start by clearing everything out from under the sink cabinet to give yourself ample room to work. Turn off the hot and cold water supply valves by turning them clockwise until they stop. Open the faucet to release any pressure and drain residual water. Place a bucket underneath the drain pipes to catch any water that will spill when you disconnect the plumbing. Using an adjustable wrench, disconnect the P-trap, the water supply lines, and the garbage disposal if you have one. It is a good idea to have a towel handy for drips and spills.
Your tool checklist should include the Karran sink clips appropriate for your countertop, a high-quality 100% silicone sealant, a caulk gun, denatured alcohol, clean rags, a utility knife, and safety glasses. Having everything within arm’s reach will make the process much smoother.
Step 2: Supporting the Sink
With the plumbing disconnected, the only thing holding your sink up is the failing adhesive. To prevent it from falling completely, you must support it from below. The most effective method is to use a 2×4 piece of wood laid across the countertop opening. Then, use a bar clamp extended through the sink’s drain hole and tightened against another small piece of wood underneath the sink. This setup will securely hold the sink in place while you work and allow you to precisely control its height when you are ready to re-seal it.
Step 3: Removing the Old Clips and Adhesive
If there are any old, failing clips, remove them now. They are likely loose and ineffective. Next, you need to remove the old, deteriorated silicone. Use a utility knife to carefully cut the seal between the sink rim and the countertop. Be patient and methodical to avoid scratching the sink or the counter. Once the seal is broken, you may need to lower the sink slightly using your clamp support system to get better access. Scrape away as much of the old adhesive as possible from both the sink and the countertop surfaces.
Step 4: Cleaning and Prepping the Surfaces
This is arguably the most critical step for ensuring a permanent bond. Any residue from the old adhesive, grease, or dirt will compromise the new silicone’s ability to seal and adhere. Thoroughly clean the sink’s flange and the underside of the countertop around the cutout with a rag soaked in denatured alcohol. The alcohol will cut through any greasy film and evaporate completely, leaving a pristine surface for the new sealant.
Step 5: Installing the New Karran Clips
The installation method will depend on the type of clips you chose from the table above. For epoxy-based stud clips on a stone countertop, you will mix a two-part epoxy and apply it to the base of the threaded studs. Press the studs firmly onto the clean underside of the countertop, spaced evenly around the sink’s perimeter (typically every 8-10 inches). Allow the epoxy to cure fully as directed by the manufacturer, which could be anywhere from 30 minutes to several hours. For cabinet-mounted brackets, you will simply screw the brackets into the cabinet walls at a height where they can support the sink’s rim.
Step 6: Applying New Adhesive and Raising the Sink
With your clips ready, apply a continuous, generous bead (about 1/4-inch thick) of 100% silicone sealant to the top rim of the sink. Do not use acrylic caulk or other adhesives; only pure silicone provides the waterproof flexibility needed. Once the sealant is applied, slowly tighten your bar clamp to raise the sink until it presses firmly against the countertop. You should see a small amount of silicone squeeze out evenly around the entire perimeter. This is a good sign that you have a solid seal.
Step 7: Final Touches and Curing
Attach the clip brackets onto the newly installed studs and hand-tighten the wing nuts until they are snug. The goal is to apply firm upward pressure, but do not overtighten, as this can damage the countertop or the sink. The clips are there for mechanical support, not to create a high-pressure seal—that’s the silicone’s job. Wipe away the excess silicone from the inside of the sink for a clean finish. Now, the most important part: patience. Allow the silicone to cure for a full 24 hours before removing the support clamp and reconnecting the plumbing.
Pro Tips for a Flawless, Long-Lasting Installation
A successful installation is in the details. Going the extra mile with a few professional tricks can ensure your sink repair lasts a lifetime. These small steps can make a big difference in the durability and longevity of your undermount sink installation.
First and foremost, never rely on adhesive alone. This is the mistake that likely led to your sink sagging in the first place. Mechanical fasteners like Karran sink clips are not optional; they are essential for a safe and permanent installation. Second, always perform a “dry fit” before using any epoxy or silicone. Position your clips around the sink to ensure you have proper spacing and that they don’t interfere with any plumbing or the faucet.
When tightening the clips, do so in an alternating pattern, much like you would tighten the lug nuts on a car tire. This ensures even pressure is applied across the sink’s rim, preventing any warping or uneven sealing. A thoughtful approach to home maintenance, whether indoors or out, can prevent a host of problems. This principle applies to everything from securing your sink to protecting your home from pests, which is a consideration for any homeowner. For those in apartments, even simple measures can make a difference, as discussed in our piece on mosquito netting apartment balcony_gem1.
Troubleshooting Common Issues with Sink Clip Installation
Even with the best preparation, you might run into a snag. If you find your clips won’t grab or fit correctly, double-check that you have the right model for your countertop’s material and thickness. The studs for epoxy clips may be too long or short for your specific sink and counter combination, so measuring is key.
What if the sink is still not tight after installation? The most common reason is that the support clamp was removed before the silicone had fully cured. It needs a solid 24 hours to develop its full bonding strength. Another possibility is that the clips were not tightened evenly, creating a high spot. Go back and check that each wing nut is snug and applying consistent pressure.
Conclusion: Secure Your Sink, Secure Your Peace of Mind
A sagging undermount sink is a common problem that can lead to significant damage if ignored. However, it is a problem with a clear and permanent solution. By moving beyond a simple adhesive fix and embracing the mechanical support of Karran sink clips, you are investing in the long-term integrity of your kitchen. The clips provide the structural reinforcement necessary to hold the weight of your sink, while a proper silicone seal provides the waterproof barrier.
This detailed guide has equipped you with the knowledge to understand the problem, select the right hardware, and perform the installation with confidence. Taking the time to secure your sink properly will not only restore its function and appearance but also grant you the invaluable peace of mind that comes from a job done right. You can wash your heaviest pots and pans without a flicker of worry, knowing your sink is firmly and safely anchored where it belongs.