John Deere L110 Blade Engagement Lever Stuck? The Ultimate Fix
Nothing is more frustrating than a lawn mower that won’t mow. You hop on your reliable John Deere L110, pull the blade engagement lever, and nothing happens. The engine is running, but the blades won’t spin.
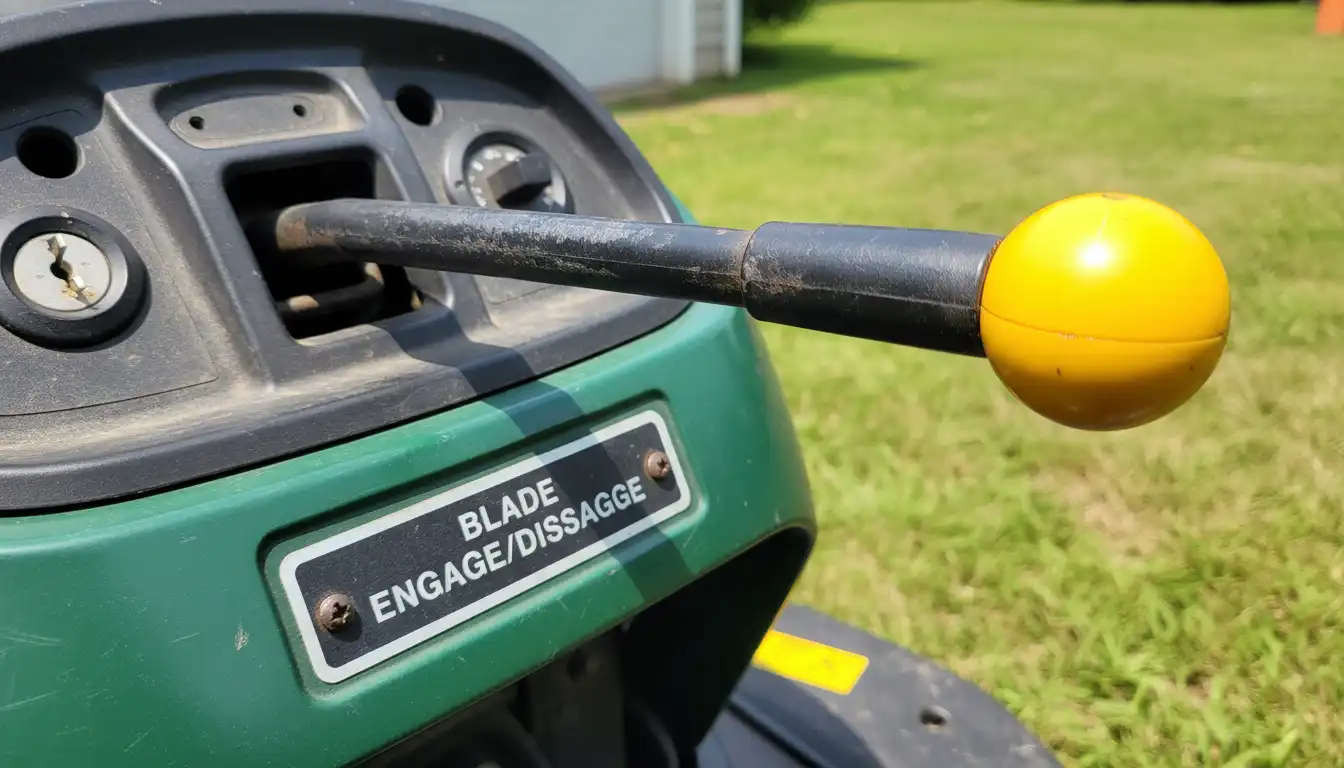
This common problem can bring your yard work to a screeching halt. The blade engagement lever, also known as the Power Take-Off (PTO) lever, is the direct link between you and the cutting deck, and when it fails, your mower is little more than a yard vehicle.
You'll Learn About
Why Your John Deere L110 Blade Engagement Is Failing
Understanding the root cause of a stuck, loose, or unresponsive lever is the first step toward a solution. The mechanism seems simple, but several components must work in perfect harmony to engage the mower blades correctly.
When one part fails, the entire system can break down. We will explore the most common reasons your blade engagement lever is giving you trouble.
The Common Culprits Behind a Stuck or Loose Lever
Several issues can plague the John Deere L110’s blade engagement system. These problems typically range from simple blockages to worn-out mechanical parts that require replacement.
Identifying the specific point of failure is crucial for an effective repair. Let’s break down the most likely suspects.
Debris and Corrosion are often the silent killers of mechanical parts. Grass clippings, dirt, and moisture can build up around the lever’s pivot points and on the mower deck, causing the mechanism to seize.
Over time, rust can form on the springs and cable, preventing smooth operation and eventually leading to a complete failure. A thorough cleaning is often the first and simplest diagnostic step.
The PTO Engagement Cable is the most common point of failure. This long steel cable connects your dashboard lever to the idler arm on the mower deck, and it lives a hard life under constant tension and exposure to the elements.
Cables can stretch over time, leading to a loose or sloppy lever feel. They can also fray, kink, or snap entirely, leaving you with no connection to the blades.
Many owners overlook the Faulty Safety Switches. John Deere mowers are equipped with multiple safety interlocks, including one on the seat and often one linked to the PTO system itself.
If a switch fails or its wiring is damaged, the mower’s electronic brain will prevent the blades from engaging as a safety precaution. The lever might move, but the electronic signal to start the blades is never sent.
A Worn or Damaged Tensioner Spring is another key suspect. The PTO cable pulls on an idler arm, which is held in place by a strong spring. This spring provides the tension needed to tighten the deck belt and spin the blades.
If this spring becomes stretched, weak, or breaks, the idler arm won’t apply enough pressure. The lever will feel loose, and the blades will fail to engage or will spin weakly.
Before You Begin: Essential Safety Precautions
Before attempting any diagnostic or repair work, safety must be your top priority. You will be working with sharp blades and mechanical parts under tension.
Always start by parking the mower on a flat, level surface and setting the parking brake firmly. Chock the wheels if you are on even a slight incline to prevent any possibility of rolling.
Most importantly, turn off the engine, remove the key, and disconnect the spark plug wire. This step is non-negotiable, as it eliminates any risk of the engine accidentally starting while you are working on the mower deck or near the blades.
Step-by-Step Guide to Diagnosing and Fixing Your L110 Blade Lever
With your mower safely prepared, it’s time to diagnose the problem systematically. Following these steps will help you pinpoint the exact cause of the issue, saving you time and money.
We’ll start with the simplest checks and move toward more involved inspections. Grab some work gloves, basic tools, and let’s get started.
Step 1: The Visual Inspection
Your first task is a thorough visual inspection of the entire system. Start with the engagement lever itself and follow its path down to the mower deck.
Use a compressed air hose or a stiff brush to clean away all caked-on grass, dirt, and debris from the mower deck, especially around the pulleys and springs. You may be surprised to find a stick or rock jammed in the mechanism, preventing its movement.
Step 2: Checking the PTO Engagement Cable
Focus your attention on the long cable running from the lever to the deck. Have a helper move the engagement lever back and forth while you observe the cable’s action at the deck end.
Does the cable move smoothly, or does it bind and stick? Look closely for any signs of fraying, sharp kinks, or rust. A damaged cable sheath can allow moisture inside, causing the inner wire to seize.
If the lever moves but the cable end at the deck doesn’t, the cable is likely snapped internally or has become disconnected at the lever. If the lever feels incredibly stiff, the cable has probably seized from internal corrosion.
| Symptom | Likely Cable Issue | Recommended Action |
|---|---|---|
| Lever feels loose or “sloppy” | Stretched Cable | Attempt adjustment; replacement is likely needed. |
| Lever is extremely hard to move | Seized or Kinked Cable | Replace the cable immediately. |
| Lever moves, but nothing happens at the deck | Snapped or Disconnected Cable | Inspect both ends and replace the cable. |
| Grinding noise when engaging | Frayed Cable (partially engaging) | Inspect and replace the cable before it fails completely. |
Step 3: Testing the Safety Switches
The electrical system can mimic a mechanical failure, so it’s important to rule it out. The primary safety feature is the seat switch, which ensures an operator is present when the blades are engaged.
Sit firmly in the seat and try to engage the blades. If they still don’t work, you can test the switch itself with a multimeter if you are comfortable with electrical diagnostics. A faulty switch will interrupt the circuit and prevent the electric PTO clutch from engaging.
Step 4: Inspecting the Tensioner Spring and Pulleys
While observing the PTO cable’s connection point on the mower deck, locate the large tensioner spring. This spring is responsible for pulling the idler pulley against the belt.
Check if the spring is securely attached at both ends. Look for signs of stretching or any visible breaks in the coils. A weak spring is a common reason why blades fail to engage properly or slip under a heavy load.
The Ultimate Fix: Replacing the PTO Engagement Cable
After a thorough diagnosis, the most frequent repair for a faulty John Deere L110 blade engagement lever is replacing the PTO cable. It’s an affordable part and a straightforward job for the average homeowner.
You will need a new PTO cable specific to the L110 model, a set of sockets or wrenches, and possibly a pair of pliers to help with springs and clips.
Removing the Old Cable
Start by lowering the mower deck to its lowest position to relieve tension. First, disconnect the cable from the mower deck. This usually involves unhooking the large tensioner spring and then freeing the “Z” shaped end of the cable from the idler arm.
Next, you’ll need to access the back of the dashboard where the engagement lever is located. This may require removing a few screws to lift the mower’s hood assembly. Carefully observe how the old cable is attached to the lever mechanism before disconnecting it.
Once both ends are free, unclip the cable from any plastic guides along the mower’s frame. You can now pull the old cable out completely.
Installing the New Cable
Routing the new cable is the most critical step. Make sure you follow the exact same path as the old one, avoiding any areas where it could be pinched or rub against moving parts.
It’s generally easiest to connect the dashboard lever end first. Secure it into the mechanism just like the old one. Then, route the cable down to the mower deck and connect the “Z” end to the idler arm, followed by reattaching the tensioner spring.
Beyond the Cable: Advanced Troubleshooting
Sometimes, a new cable doesn’t completely solve the problem. There are a few more nuanced issues that can affect the performance of your blade engagement system.
These advanced steps can help you fine-tune the repair for perfect operation. Taking the time to get these details right ensures long-term reliability.
Adjusting Cable Tension
A new cable may require a slight adjustment to achieve the correct tension. Some L110 models have an adjustment nut or bracket that allows you to fine-tune the cable’s effective length.
The goal is to have the lever engage the blades firmly without requiring excessive force. There should also be a small amount of “play” in the lever when it’s in the disengaged position, ensuring the belt is fully loose.
What If the Lever Is Still Loose?
If you’ve replaced a stretched cable and the lever itself still feels wobbly, the problem may be in the lever’s pivot mechanism. The plastic or metal bushings where the lever mounts to the dashboard can wear out over many years of use.
This wear introduces “slop” into the system that a new cable can’t fix. Inspect these components for excessive wear and replace them if necessary to restore a solid, positive feel to the lever.
When to Call a Professional
If you have replaced the cable, checked the springs, and confirmed the safety switches are working, but the blades still won’t engage, you may have a more complex issue. Problems like a seized idler arm pivot or a faulty electric clutch can be difficult to diagnose and repair without specialized tools.
There is no shame in seeking expert help. A qualified John Deere technician can resolve these deeper mechanical or electrical issues safely and efficiently.
Proactive Maintenance: Preventing Future Lever Problems
The best repair is the one you never have to make. A little proactive maintenance can dramatically extend the life of your blade engagement system and prevent frustrating breakdowns.
Make these simple checks a regular part of your lawn care routine. An ounce of prevention is truly worth a pound of cure when it comes to outdoor power equipment.
At the end of each mowing session, use a leaf blower or air compressor to blow accumulated grass clippings off the mower deck. This prevents moisture from being trapped against the metal components, which is the primary cause of rust and corrosion.
A little lubrication goes a long way. At the beginning of each season, apply a light coat of general-purpose grease or a spray lubricant to the pivot points on the idler arm and the engagement lever itself. This ensures a smooth, easy pull every time.
Performing seasonal checks on your mower is just as important as preparing your winter equipment for the first snowfall. You wouldn’t want your Ariens snowblower auger to keep turning when it’s supposed to be off, and the same principle of preventative care applies to your mower’s PTO system.
Whether it’s a trusty lawn mower or a classic Honda HS55 snowblower, regular inspection is the key to reliability. Taking five minutes to check the PTO cable, spring, and lever before you start mowing can help you catch small issues before they become major headaches.
Think of it like caring for a vintage machine, such as the venerable TRS27 John Deere; consistent upkeep is what guarantees performance year after year. By following these steps, you can ensure your John Deere L110’s blade engagement lever works flawlessly every time you need it.
Final word
When your John Deere L110’s blades refuse to engage, it’s more than an inconvenience—it’s a full stop to your productivity. The PTO lever is the heart of the cutting system, and when it fails, the entire mower becomes ineffective. By understanding how this mechanism works and identifying the signs of trouble early, you can keep small issues from turning into major repairs. With proper maintenance and timely troubleshooting, your mower will stay ready to tackle the lawn whenever you are.