John Deere 185 Hydro Drive Belt Diagram: Your Ultimate Fix Guide
There’s nothing more frustrating for a homeowner than a trusty lawn tractor that suddenly loses its will to move. Your John Deere 185, a reliable workhorse, can one day feel sluggish, refuse to climb a gentle slope, or stop moving altogether. This sudden loss of power often points directly to a critical component: the hydrostatic drive belt.
Understanding the role of this belt is the first step toward a solution. It’s the vital link that transfers power from your engine to the hydrostatic transmission, which in turn drives the wheels. When this belt stretches, cracks, or breaks, your mower is effectively crippled, leaving your lawn half-mown and your weekend plans on hold.
You'll Learn About
Recognizing the Red Flags: Is Your Hydro Drive Belt Failing?
Before the drive belt fails completely, it usually sends out several warning signals. Recognizing these symptoms early can save you from being stranded in the middle of your yard. Pay close attention to how your tractor operates; subtle changes in performance are often the first indication of a developing issue.
A primary symptom is a noticeable loss of speed and power, especially when going up hills or navigating uneven terrain. You might also experience jerky or hesitant movement when you engage the forward or reverse pedals. Other tell-tale signs include unusual noises like squealing, slapping, or a faint grinding sound coming from beneath the tractor.
Visual Clues and Physical Symptoms
Beyond performance issues, a visual inspection can confirm your suspicions. A healthy belt is pliable and has a consistent surface. A failing belt will often show visible signs of wear and tear, such as deep cracks, frayed edges, or a smooth, shiny surface known as “glazing,” which indicates slipping.
To help you diagnose the problem accurately, consult the table below. It outlines common symptoms and their likely causes related to the drive belt system, empowering you to make an informed decision about your repair.
| Symptom | Likely Cause | Recommended Action |
|---|---|---|
| Tractor moves slowly or lacks power | Belt is stretched or glazed, causing slippage on the pulleys. | Inspect belt for wear and replace if necessary. |
| Jerky or hesitant movement | Inconsistent tension from a worn belt or a failing tensioner spring. | Check belt tension and inspect the tensioner assembly. |
| Loud squealing or chirping noise | Belt is slipping due to wear, incorrect tension, or fluid contamination. | Inspect belt condition, check tension, and clean pulleys. |
| Tractor will not move at all | The drive belt has broken or has completely come off the pulleys. | Immediate replacement of the drive belt is required. |
| Burning rubber smell | Belt is slipping excessively or is rubbing against a stationary part. | Stop the engine immediately and inspect belt routing and pulley alignment. |
The Heart of the Machine: Understanding the John Deere 185 Hydro Drive System
To confidently tackle a belt replacement, it helps to understand the system you’re working on. The hydrostatic transmission is a marvel of engineering that uses fluid pressure to provide smooth, variable speed control without traditional gears. The hydro drive belt is the linchpin of this entire system.
It acts as the crucial connection between the engine’s crankshaft and the input pulley on the hydrostatic transaxle. When the engine is running, it constantly turns this belt. The belt’s tension and grip on the pulleys ensure that the engine’s rotational power is effectively delivered to the transmission, which then propels your tractor forward or backward.
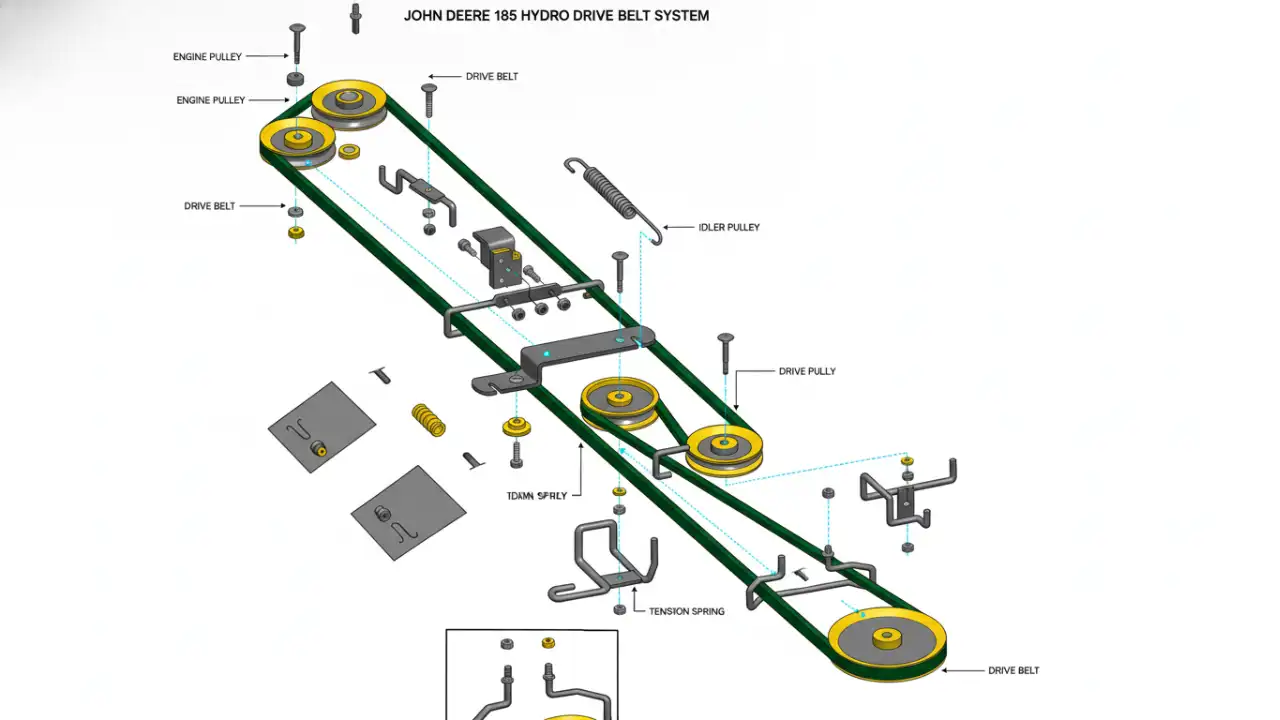
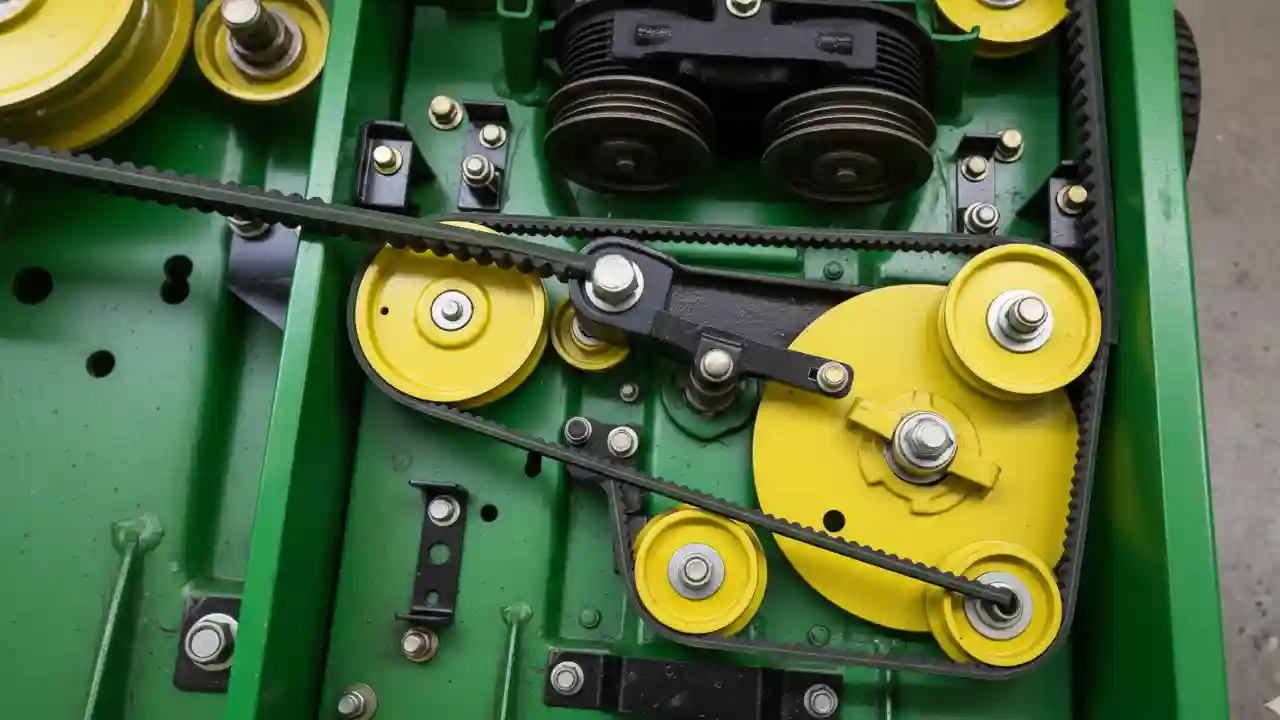
Key Players on the Diagram: Pulleys and Their Roles
A drive belt diagram might look complex, but it’s essentially a map showing the path the belt takes around several critical pulleys. Each pulley has a specific job. The engine pulley provides the power, while the transaxle pulley receives it. In between, idler and tensioner pulleys work to maintain the correct tension and guide the belt, preventing it from coming off during operation. Understanding this layout is essential for a successful replacement.
The Ultimate Guide to John Deere 185 Hydro Drive Belt Replacement
Replacing the hydro drive belt is a manageable DIY project that can restore your tractor’s performance and save you a costly trip to the repair shop. With the right tools, a bit of patience, and a clear guide, you can have your John Deere 185 running like new. This section will walk you through the entire process, from preparation to final testing.
Preparation is Key: Tools and Safety First
Before you begin, gather all the necessary tools and prioritize safety. You will need a socket set with wrenches, a spring puller tool or locking pliers, durable work gloves, and safety glasses. Always work on a level, stable surface. Most importantly, disconnect the battery’s negative terminal to prevent any accidental starting of the engine, and engage the parking brake firmly.
Step-by-Step Removal of the Old Belt
The first major step is gaining access to the drive belt, which requires removing the mower deck. This is typically done by lowering the deck to its lowest setting, disconnecting the PTO cable, and removing the hanger pins that secure the deck to the tractor frame. Once disconnected, carefully slide the deck out from underneath the tractor.
Next, you must relieve the tension on the drive belt. Locate the tensioner pulley assembly. You will need to carefully release the tension spring that holds the idler arm tight against the belt. Taking a clear photo of the belt’s routing before you remove it is a pro tip that can save you a significant amount of guesswork later. With the tension released, you can now carefully work the old belt off the engine pulley, around the various guides, and off the transaxle pulley at the rear.
Interpreting the Diagram & Installing the New Belt
With the old belt removed, it’s time to install the new one using your diagram (or the photo you took) as a guide. Always use a genuine OEM (Original Equipment Manufacturer) belt, such as the John Deere M84472, to ensure proper fit and longevity. Start by routing the new belt around the rear transaxle pulley, ensuring the V-shape of the belt seats correctly in the pulley’s groove.
Carefully thread the belt forward, following the correct path around all stationary idler pulleys and guides. The most challenging part is often navigating the belt through tight spaces and around belt keepers. Once the belt is properly routed, guide it onto the main engine pulley. Finally, re-engage the tensioner spring to apply the correct pressure to the belt. Double-check that the belt is properly seated in every pulley and moves freely without binding.
Finalizing the Installation: Tensioning and Testing
After the new belt is installed and tensioned, give it a final inspection. Manually rotate the engine pulley a few times to ensure the belt tracks correctly and stays aligned. Once you are satisfied, you can slide the mower deck back under the tractor and reattach all linkage points and the PTO cable. Reconnect the battery, start the engine, and cautiously test the forward and reverse controls to ensure the transmission engages smoothly and powerfully.
Beyond Replacement: Proactive Maintenance and Troubleshooting
Simply replacing a broken part is only half the battle. True home and garden mastery comes from proactive maintenance that prevents failures in the first place. A little attention to your tractor’s drive system each season can dramatically extend its life and improve reliability, ensuring it’s always ready when you need it.
How to Inspect Your Drive Belt for Future Problems
Make it a habit to inspect your hydro drive belt at the beginning and end of each mowing season. Look for more than just obvious cracks. Feel the belt’s surface; if it feels hard and looks shiny or “glazed,” it has lost its gripping ability and should be replaced, even if it’s not cracked. Check for areas where the belt may have narrowed or stretched, as this also indicates it’s time for a replacement.
Troubleshooting Common Post-Installation Issues
Even with careful installation, you might encounter issues. If your new belt comes off immediately, the most common causes are incorrect routing, a worn pulley with damaged edges, or using the wrong size belt. If the tractor still feels weak after installation, double-check the belt tensioner to ensure it’s providing adequate pressure. An old, weak spring on the tensioner arm may not be strong enough for a new, stiff belt.
Maintaining Your Whole Home and Garden System
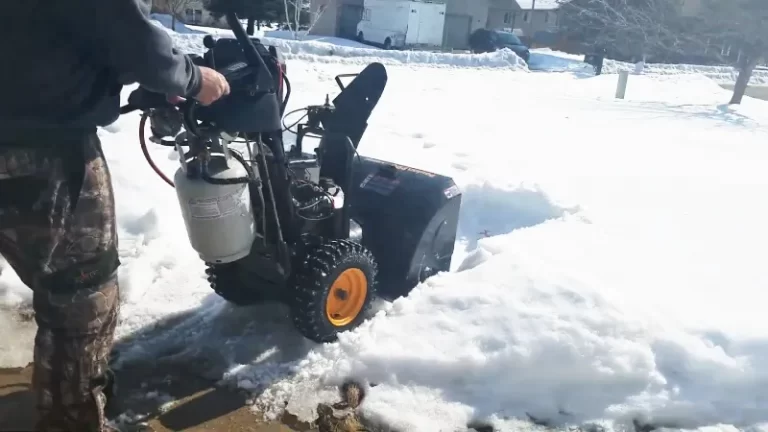
Keeping your John Deere 185 in top mechanical shape is a rewarding part of maintaining your property. This focus on machinery health is similar to overseeing the other systems in your home. Just as you might tackle a specific fix like an Ariens friction disc adjustment on your snowblower, it’s wise to consider the health of your home’s larger appliances.
This long-term view is crucial for major home systems. For instance, being proactive about your home’s infrastructure can help you decide if you should replace a 30-year-old water heater before it fails unexpectedly. Managing both your outdoor equipment and indoor utilities ensures your entire home runs smoothly.
A well-maintained home extends to its appearance as well. While focusing on the functional aspects of your property, don’t forget about aesthetic updates. Over time, you might find yourself dealing with dated elements, such as finding a modern solution for old 12×12 ceiling tiles, to keep your living space current and enjoyable. This holistic approach to homeownership combines mechanical skill with thoughtful home improvement.
Conclusion: Taking Control of Your Tractor’s Health
Your John Deere 185 is more than just a lawn mower; it’s a key tool in maintaining your home’s curb appeal. A failing hydro drive belt can bring your yard work to a screeching halt, but it doesn’t have to mean an expensive repair bill. By understanding the symptoms of a worn belt, familiarizing yourself with the drive system, and following a clear replacement guide, you can confidently perform this repair yourself.
This DIY project not only saves you time and money but also empowers you with a deeper understanding of your equipment. With a new belt installed, your John Deere 185 will be back to performing at its best, tackling hills and turning tight corners with renewed strength and reliability for years to come.