Install Garbage Disposal Switch: Your Ultimate DIY Guide
You’ve successfully installed a powerful new garbage disposal, a fantastic upgrade for any modern kitchen. There’s just one glaring problem: you have no convenient way to turn it on. Reaching under a dark, cramped sink cabinet to find a hidden switch is not just annoying, it’s a daily frustration you don’t need.
Ignoring this issue can lead to unsafe practices, like leaving the disposal constantly powered or fumbling near plumbing and electrical connections with wet hands. A dedicated, properly installed switch isn’t a luxury; it’s a critical component for both safety and functionality. This guide will walk you through the entire process, ensuring a safe and professional installation.
You'll Learn About
Why a Proper Switch is Non-Negotiable
Before diving into the installation, it’s essential to understand why a correctly installed switch is so important. The primary benefit is, without a doubt, safety. A conveniently located switch allows for immediate shutdown in an emergency and prevents accidental activation, which is especially crucial in homes with children.
Beyond safety, it’s about convenience. A well-placed switch streamlines your kitchen workflow, making food prep and cleanup faster and more efficient. Whether you opt for a traditional wall switch or a modern air switch, the goal is to make operating your disposal seamless and intuitive.
Choosing the Right Switch for Your Kitchen
There are two primary types of switches to consider for your garbage disposal, each with unique advantages. Your choice will likely depend on your kitchen’s layout, your comfort with electrical work, and your budget.
A wall switch is the classic choice, familiar and reliable. It’s typically installed on the backsplash near the sink for easy access. While it requires running new electrical wiring, it’s a permanent and robust solution. The second option is an air switch, a modern and increasingly popular choice, especially for kitchen islands where a wall switch isn’t feasible. An air switch uses a puff of air to activate a power module under the sink, eliminating the need for high-voltage wiring at the countertop level.
Pre-Installation: Tools, Materials, and Safety
A successful project starts with proper preparation. Rushing this stage can lead to mistakes and safety hazards. Before you begin, gather all the necessary tools and materials and, most importantly, commit to a safety-first mindset.
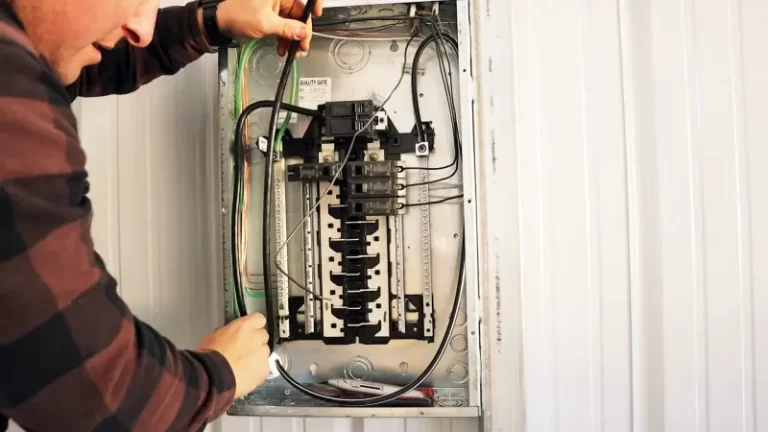
Your absolute first step is to turn off the power. Go to your home’s circuit breaker panel and shut off the circuit that powers the outlet under your sink. Use a non-contact voltage tester to confirm there is no power before touching any wires. This is the most critical step for preventing electrical shock.
Essential Tools and Materials
Having everything you need on hand before you start will make the installation process smooth and efficient. The table below outlines the tools and materials required for both wall switch and air switch installations.
| Tool/Material | Purpose | Switch Type |
|---|---|---|
| Voltage Tester | To confirm power is off before starting work. | Both |
| Screwdriver Set | For securing wires, switches, and cover plates. | Both |
| Wire Strippers/Cutters | To strip insulation from wires and make clean cuts. | Wall Switch |
| Drill with Hole Saw | To create a hole for the air switch button. | Air Switch |
| Drywall Saw | To cut an opening for the electrical box. | Wall Switch |
| Single-Pole Switch & Cover | The switch mechanism and faceplate. | Wall Switch |
| Air Switch Kit | Includes button, tubing, and power module. | Air Switch |
| Electrical Cable (Romex) | To run power from the outlet to the switch. | Wall Switch |
| Wire Nuts | To securely connect wires. | Wall Switch |
How to Install a Wall-Mounted Garbage Disposal Switch
Installing a traditional wall switch is a common DIY project that provides a reliable way to control your disposal. This process involves basic electrical wiring. If you’re ever unsure, stop and consult a qualified electrician.
Step 1: Choose and Prepare the Location
Select a location for your switch on the wall near the sink. It should be convenient to reach but far enough away from the faucet to avoid direct water splashes. Use a stud finder to ensure you’re not cutting into a wall stud. Trace the outline of your new electrical box onto the drywall and carefully cut the opening with a drywall saw.
Step 2: Run the Electrical Cable
Next, you’ll need to run a length of 14/2 NM (non-metallic) electrical cable from the under-sink outlet to the new switch opening. This is often the most challenging part. You may need to fish the wire through the wall cavity. Ensure you leave about 8-10 inches of excess wire at both ends.
Step 3: Wire the Under-Sink Outlet
At the outlet under the sink, carefully remove the receptacle from its box. You’re going to interrupt the power flow to one half of the outlet. On the “hot” side of the receptacle (usually marked by brass-colored screws), you will see a small tab connecting the top and bottom outlets; break this tab off with needle-nose pliers. Connect the black (hot) wire from your new cable to the top brass screw, and connect the main power source’s black wire to the bottom brass screw. All white (neutral) wires and bare copper (ground) wires should be connected together.
Step 4: Wire the Wall Switch
At the new switch location, feed the cable through the back of the electrical box and secure the box in the wall. Connect the bare copper ground wire to the green screw on the switch first. Then, connect the two black (hot) wires to the two brass screws on the switch. The order does not matter on a simple single-pole switch. The white wire in this cable is not used and should be capped with a wire nut.
Step 5: Finalize and Test
Gently push the wired switch back into the electrical box and secure it with the provided screws. Attach the cover plate. Back under the sink, reinstall the outlet. Restore power at the circuit breaker and test your new switch. The disposal should now power on only when the switch is in the “ON” position.
How to Install an Air Switch for Your Garbage Disposal
An air switch is an elegant and safe alternative, perfect for kitchen islands or anyone hesitant about running new electrical lines. The installation is generally simpler and faster than a wall switch.
Step 1: Drill the Mounting Hole
Choose a location for the air switch button, typically on the countertop or on the sink deck itself. Most air switch buttons require a 1 ¼-inch hole. Before you drill, be absolutely certain there is clearance underneath for the button’s housing. Drilling into different countertop materials requires specific techniques; for instance, a project like a Corian sink replacement highlights the importance of using the right tools for the material.
Step 2: Mount the Button and Connect the Tube
Feed the air switch button through the hole from the top, ensuring any gaskets are properly placed. From underneath the sink, thread the plastic nut onto the button’s housing and tighten it by hand until it’s snug. Next, firmly push one end of the flexible air tubing onto the nipple at the bottom of the air switch button.
Step 3: Set Up the Power Module
Connect the other end of the air tube to the power control module. This module is the heart of the system. Plug the power module into the under-sink wall outlet that is designated for the garbage disposal. Then, plug the garbage disposal’s power cord directly into the power module.
Step 4: Test Your New Air Switch
With everything connected, the installation is complete. Press the button on your countertop. You should hear a click from the power module and your garbage disposal will turn on. Press it again to turn it off. It’s a simple, effective, and safe way to control your unit.
Troubleshooting Common Installation Problems
Even with careful installation, you might encounter issues. If the disposal doesn’t turn on, start with the basics. Double-check that the power is restored at the breaker. For a wall switch, use your voltage tester to ensure power is reaching the switch and the outlet. Often, the issue is a loose wire connection, so re-check all your work.
If the disposal hums but doesn’t spin, it is likely jammed. Never reach your hand into the disposal. Turn off the power, then use the small wrench that came with the unit to manually turn the blades from the bottom of the disposal, which should free the jam. Electrical issues discovered during home maintenance, much like those a buyer is asking for a lot of repairs on, should be addressed promptly and professionally.
Conclusion: A Safer, More Convenient Kitchen
Installing a garbage disposal switch is a transformative weekend project that significantly enhances your kitchen’s safety and efficiency. By following these steps carefully, you can confidently complete the installation yourself, saving money and gaining a valuable new skill. Your new switch will make daily kitchen tasks quicker and more pleasant.
Upgrading your kitchen’s functionality doesn’t have to stop here. Small improvements, like learning how to warm up shower water faster, contribute to a more comfortable and efficient home. Enjoy the convenience and peace of mind that comes with a job well done.