Hoya Seed Pods: The Ultimate Guide to Nature’s Surprise
For many home and garden enthusiasts, seeing a Hoya plant burst into its iconic, star-shaped flowers is the pinnacle of achievement. But what if there was another, more mysterious milestone? Many growers cultivate these beloved wax plants for years, completely unaware that a greater prize exists: the elusive hoya seed pod.
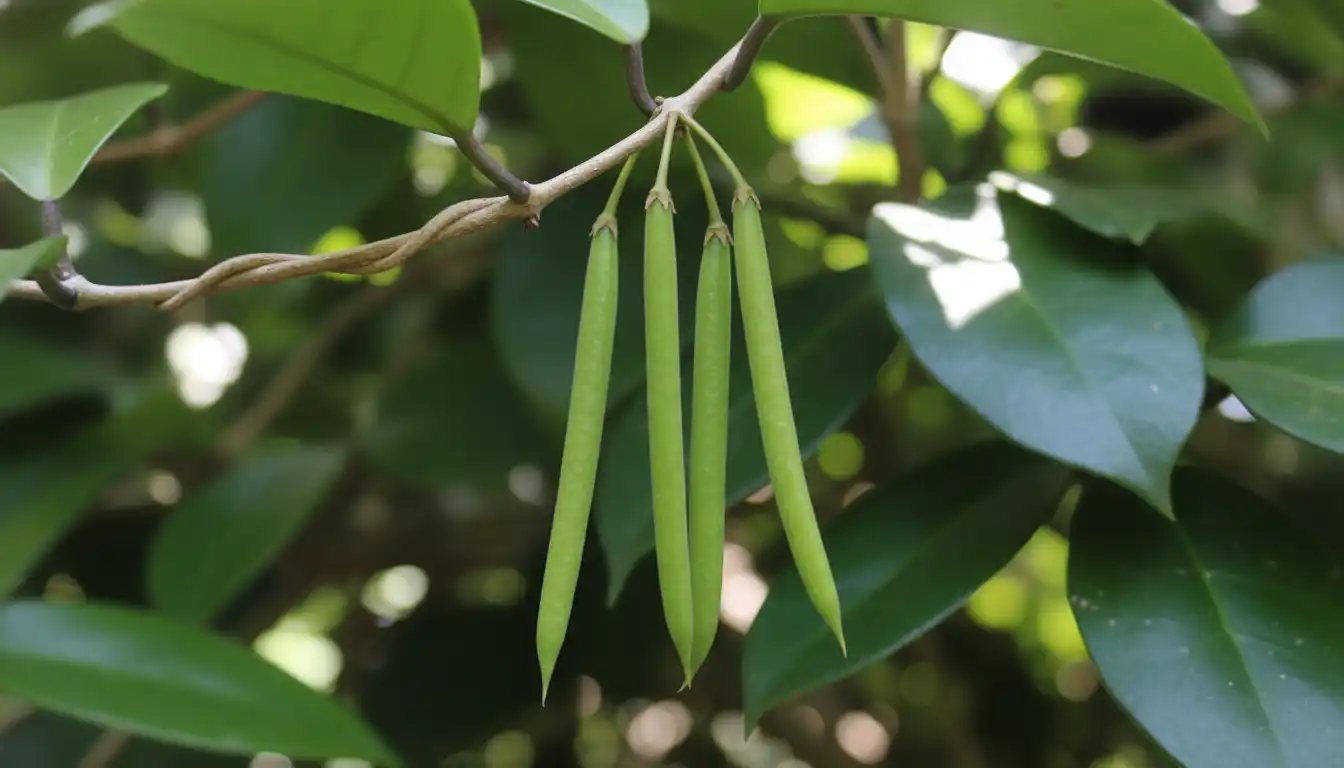
The sudden appearance of a long, green, bean-like pod can be baffling. This guide unravels the mystery, transforming that confusion into a confident plan to cultivate the next generation of your favorite Hoya from scratch.
You'll Learn About
The Core Problem: Why Are Hoya Seed Pods So Rare Indoors?
The primary reason you may have never seen a hoya seed pod is simple: pollination. In their native tropical habitats in Asia and Australia, Hoyas rely on specific nocturnal pollinators, like moths, to do the intricate work of transferring pollen between flowers.
Indoors, these natural pollinators are absent. Without them, the complex reproductive cycle of the Hoya cannot be completed, and the flowers simply wither and fall off after their bloom is spent. Achieving pollination is the first and most significant hurdle for any indoor gardener.
Understanding Hoya Flower Anatomy
To solve the pollination problem, one must first understand the flower’s unique structure. Hoya flowers are complex. They consist of the outer, star-shaped corolla and an inner, smaller star called the corona.
The pollen is not loose dust but is contained within waxy sacs called pollinia. For pollination to occur, a pollinium from one flower must be transferred and precisely inserted into the stigmatic groove of another. It’s a lock-and-key mechanism that insects are perfectly equipped for, but which is challenging for humans.
The Solution: Becoming the Pollinator Through Hand-Pollination
Since natural pollinators are not available indoors, you must take matters into your own hands. Hand-pollination is a delicate but rewarding process that dramatically increases the chances of developing seed pods. It requires patience, a steady hand, and a few simple tools.
This is the secret that separates casual growers from dedicated Hoya breeders. While it may seem daunting, mastering this technique is the key to unlocking the full life cycle of your plant.
Step-by-Step Guide to Hand-Pollinating Hoya Flowers
The best time to attempt pollination is in the early morning or evening when the flowers are most fragrant and receptive. You will need a magnifying glass to see the small structures and a very fine tool to transfer the pollinia.
Tools for the Job:
- A magnifying glass or jeweler’s loupe.
- A thin, stiff filament like a cat’s whisker (ethically sourced, of course), a very fine wire, or the bristle from a stiff brush.
- A steady hand and ample light.
The Process:
- Locate the Pollinia: Using your magnifying glass, peer into the center of the Hoya flower. You will see the five points of the corona. Between these points, in small slits, you can often see tiny, dark dots—these are the pollinia.
- Extract the Pollinia: Carefully insert your thin tool into the slit next to a pollinium. Gently pull upwards and outwards. The goal is to hook the pollinium, which is attached to a wishbone-like structure, and pull it free from the flower. It is incredibly small, so be patient.
- Insert into the Target Flower: Choose a different flower on the same plant or another Hoya plant. Locate the same slit on the new flower. Carefully guide your tool, with the pollinium attached, into this slit. The goal is to wedge the pollinium into the stigmatic groove so it stays in place.
- Tag and Wait: Mark the flower you pollinated with a small piece of string or a tag. If pollination is successful, the base of the flower (the pedicel) will remain on the plant after the bloom fades, and a tiny green nub will begin to form.
Success is not guaranteed on the first try. It often takes practice to get the feel for the delicate pressure required. But when you succeed, you have initiated the incredible process of creating new life.
Life After Pollination: Identifying and Caring for Hoya Seed Pods
If your hand-pollination was successful, you will see a small green shoot emerge from where the flower was. This is the beginning of a seed pod. Often, they grow in pairs, resembling a set of green beans or horns.
These pods will grow slowly over several months. It is crucial during this time to provide your Hoya with consistent care. Avoid moving the plant, making drastic changes to its watering schedule, or letting it dry out completely, as stress can cause the plant to abort the pods.
The development period is a test of patience. The plant is investing a tremendous amount of energy into creating viable seeds, so continue to provide it with bright, indirect light and appropriate fertilizer to support its efforts.
Harvesting Your Precious Seeds
After several months, the seed pod will mature. It will stop growing, harden, and may change color, often turning a brownish or yellowish hue. The most critical sign of maturity is when a seam along the length of the pod begins to show signs of splitting.
This is the moment to act. Hoya seeds are attached to a silky, feathery material called a coma, which acts like a parachute. If the pod splits open on its own, these seeds will become airborne and fly all over the room. To prevent losing your harvest, tie a small, breathable organza bag or a piece of old nylon stocking around the pod as it nears maturity.
Once the pod splits inside the bag, you can carefully snip it off the plant. You have successfully harvested the next generation of Hoya.
From Seed to Seedling: The Final Stage of Your Journey
Growing Hoyas from seed is a completely different experience than propagating from cuttings. Each seed is a unique genetic individual, meaning the resulting plants could have variations in leaf shape, color, or even flower characteristics. This is the true excitement of breeding.
Hoya seeds have a very short viability period. For the best germination rates, it is essential to plant them as fresh as possible, ideally within a few days of harvesting. Letting them dry out for too long can render them useless.
Sowing and Germination
The key to successful germination is providing a consistently moist, warm, and humid environment. A clear plastic container with a lid, like a takeout container, makes an excellent mini-greenhouse.
The Steps:
- Prepare the Medium: Fill your container with a sterile, well-draining germination mix. A mix of sphagnum moss and perlite or a fine-grade seedling mix works well. Moisten the mix thoroughly, but ensure it is not waterlogged.
- Sow the Seeds: Gently separate the seeds from their fluffy coma. This can be tedious, but it helps prevent mold. Lay the seeds flat on the surface of the moist medium. Do not bury them; they need light to germinate.
- Create Humidity: Lightly mist the seeds and the surface of the medium, then close the lid of your container. If your container doesn’t have ventilation, you may need to open it for a few minutes each day to allow for air exchange. This can be a good time to inspect for any mold growth.
- Provide Warmth and Light: Place the container in a warm spot with bright, indirect light. A seedling heat mat can speed up germination, which typically occurs within a few days to a few weeks.
- Care for Seedlings: Once the seeds sprout and develop their first set of true leaves, you can slowly acclimate them to lower humidity by propping the lid open. They are still very delicate at this stage, so maintain consistent moisture.
For more advanced setups, modifying your propagation trays can improve drainage and airflow. Using a specialized tool like a corner grooving tool can help create custom channels in plastic trays, ensuring that your delicate seedlings are never sitting in stagnant water.
Troubleshooting Common Hoya Seed Pod Problems
Even with careful attention, issues can arise. Understanding what to look for can help you solve problems before they derail your efforts. Just as you perform seasonal maintenance on outdoor equipment, like ensuring a snowblower isn’t running rich before winter, your indoor garden projects require regular check-ups.
| Problem | Potential Cause | Solution |
|---|---|---|
| Flowers drop after hand-pollination attempt. | Pollination was unsuccessful or the flower was damaged. | Review your technique. Ensure you are not being too forceful. Try again on a new cluster of blooms. |
| Seed pod forms then falls off prematurely. | Plant stress from inconsistent watering, temperature change, or low light. | Maintain a very consistent care routine. Ensure the plant is in a stable environment away from drafts. |
| Harvested seeds do not germinate. | Seeds were not viable, were too old, or germination conditions were incorrect. | Plant seeds immediately after harvesting. Ensure your medium is sterile and moist, not wet, and provide high humidity and warmth. |
| Seedlings sprout then die (“damping off”). | Fungal infection caused by overly wet conditions and poor air circulation. | Increase ventilation by opening the propagation container daily. Avoid overwatering and use a sterile medium. |
A Note on Plant Maturity and Environment
It’s important to remember that only mature, healthy, and well-established Hoya plants will have the energy reserves to produce flowers and sustain seed pod development. A plant that is struggling will prioritize its own survival over reproduction.
Ensuring your Hoya has optimal conditions—bright indirect light, a well-draining potting mix, and appropriate humidity—is the foundational step. A happy plant is far more likely to flower, giving you the opportunity to attempt this fascinating process. For those finishing a larger garden or greenhouse space, details like proper trim, such as using a high-quality 2.5 inch t molding, can create the clean, professional environment where these plants thrive.
A Rewarding Journey for the Dedicated Gardener
Witnessing a Hoya seed pod develop is a sign of a thriving plant and a dedicated caretaker. It elevates the hobby from simply keeping a plant alive to participating in its entire life cycle. The process, from the delicate act of hand-pollination to the patient nurturing of tiny seedlings, offers a deep sense of connection and accomplishment.
While propagating Hoyas from cuttings is faster and easier, growing from seed is a journey into the genetic possibilities of the plant. It is an exercise in patience and precision that rewards the gardener with truly unique, homegrown plants that are a testament to their skill and dedication.