How to Transplant Solomon’s Seal? Unlock Your Garden’s Potential
The graceful, arching stems of Solomon’s seal bring an elegant structure to any shade garden. But as these beloved perennials spread, a common problem arises: overcrowding. Many gardeners hesitate to move them, fearing they might damage or even kill the plant they’ve nurtured. This guide will eliminate that fear, providing a clear path to successfully transplanting Solomon’s seal, ensuring your plants thrive for years to come.
Moving these plants is not just about managing their spread; it’s about invigorating them. By dividing and transplanting, you can multiply your stock, share with fellow gardeners, and ensure each plant has the resources it needs to flourish.
You'll Learn About
Why Timing Your Transplant is Crucial
Transplanting Solomon’s seal is more than just a chore; it’s a strategic move to improve the health and vigor of your garden. Over time, clumps can become dense, leading to competition for nutrients and moisture, which can make them more susceptible to disease. Thoughtful relocation allows you to redesign your garden layout, filling in sparse areas with mature, elegant foliage.
This process is also the primary method of propagation. The underground rhizomes can be easily divided, turning one large clump into several new, healthy plants. This not only expands your garden’s beauty but also allows you to share this wonderful plant with others, confident that it will establish well in its new home.
Your Essential Toolkit for a Flawless Transplant
Success begins with preparation. Gathering the right tools before you start ensures a smooth and efficient process, minimizing stress on both you and the plant. You don’t need expensive equipment, just a few garden shed staples.
Your checklist should include a sharp spade or garden fork for lifting the rhizomes, a tarp or wheelbarrow to hold the plant, high-quality compost or organic matter, a watering can or hose, and protective gardening gloves. Having everything within reach will make the task at hand much more manageable.
Choosing the Perfect New Home for Your Plant
Solomon’s seal is a woodland plant at heart and craves conditions that mimic its native habitat. Look for a location with partial to full shade, as direct afternoon sun can scorch its leaves. The ideal spot is one that receives gentle morning sun or dappled light filtered through the canopy of larger trees.
The soil should be moist, rich, and well-draining. Before you even think about digging up the plant, prepare its new home. Dig a hole that is wider and just as deep as the root ball you intend to move. Enrich the excavated soil with a generous amount of compost to provide the nutrients your transplant will need to establish itself quickly.
The Golden Window: Best Seasons for Transplanting
Timing is arguably the most critical factor in transplanting success. Moving a plant during its active growth phase can induce significant stress, but catching it during dormancy allows it to acclimate with minimal shock. For Solomon’s seal, there are two ideal windows for this task.
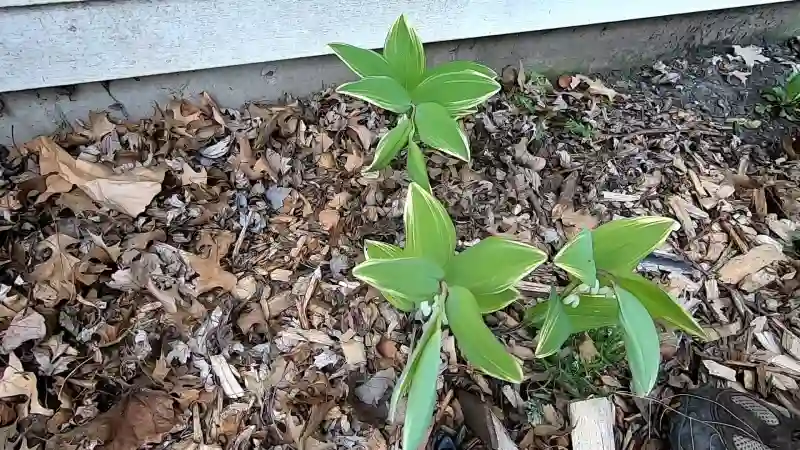
The first and often preferred time is in the late fall after the first frost has sent the plant into dormancy. The second window is in early spring, just as the new shoots, known as “pips,” are beginning to emerge from the soil. Transplanting during these periods ensures the plant’s energy is focused on root establishment rather than supporting foliage and flowers.
| Feature | Spring Transplanting | Fall Transplanting |
|---|---|---|
| Timing | Early spring, as new shoots emerge | Late fall, after foliage dies back |
| Plant State | Emerging from dormancy | Entering dormancy |
| Pros | You can see the new growth points clearly, and the plant establishes quickly. | Minimal shock to the plant; roots establish over winter for robust spring growth. |
| Cons | Risk of damaging fragile new shoots. | You have to wait until the following spring to see the results. |
| Water Needs | Requires consistent watering as temperatures rise. | Requires less immediate watering as the ground cools. |
How to Divide and Transplant Solomon’s Seal in 5 Easy Steps
With your tools gathered and new location prepared, you are ready for the main event. This process is straightforward and rewarding. Follow these steps carefully for a successful transplant that will enhance your garden’s beauty.
Step 1: Prepare the New Planting Site
As mentioned, this should always be your first step. Dig a hole in your chosen shady spot that is at least twice the width of the plant clump you plan to move. Loosen the soil at the bottom of the hole and mix in a healthy amount of compost. Preparing the new site first minimizes the time the plant’s roots are exposed to the air.
Step 2: Carefully Excavate the Rhizomes
Begin digging around the perimeter of the Solomon’s seal clump, staying several inches away from the visible stems to avoid damaging the underground rhizomes. Use a garden fork or spade to gently loosen the soil on all sides. The goal is to lift the entire root system with as much soil attached as possible.
Step 3: Lift and Divide the Plant
Once the soil is loose, carefully lift the entire clump from the ground. Gently shake off excess soil to get a better look at the network of thick, white rhizomes. These are the plant’s fleshy, underground stems. You will see buds or “eyes” on the rhizomes, which are the points for next year’s growth.
Using a sharp, clean knife or the edge of your spade, divide the rhizomes into sections. Ensure each new section has at least two or three buds. This is a critical moment to inspect the rhizomes; discard any parts that appear soft, mushy, or diseased, as this ensures only healthy material is planted in the new location.
Step 4: Replanting the Divisions
Take your divided rhizome sections to their new, prepared home. Place one section in each hole, positioning it so the top of the rhizome sits about 2 to 4 inches below the soil surface. Make sure the growth buds are pointing upwards.
Backfill the hole with the amended soil you excavated earlier. Gently firm the soil around the rhizome with your hands to eliminate any large air pockets, which can dry out the roots. Proper planting depth is key to protecting the rhizome and encouraging strong growth.
Step 5: Watering and Mulching for a Healthy Start
Immediately after planting, water your new transplants thoroughly. This deep watering helps settle the soil around the rhizomes and provides essential moisture. Consistent moisture is critical for the first few weeks as the plant begins to establish new roots.
Finish by applying a 2 to 3-inch layer of organic mulch, such as shredded leaves or wood chips, around the base of the plant. Mulch helps to conserve soil moisture, regulate soil temperature, and suppress weeds, giving your Solomon’s seal the best possible start in its new location.
After the Move: Ensuring Your Solomon’s Seal Thrives
The care you provide in the weeks and months following the transplant is crucial for long-term success. While Solomon’s seal is a resilient plant, a little extra attention will help it recover from the stress of being moved. The primary focus should be on providing consistent moisture.
Keep the soil evenly moist but not waterlogged. Check the soil every few days, especially during dry spells. You can expect the plant to show signs of new growth in the following spring, but be patient, as it may take a full season for it to become fully established and produce flowers.
What If Something Goes Wrong? Common Transplanting Issues
Even with careful planning, you might encounter some issues. Troubleshooting these problems is often a matter of understanding the plant’s response to stress. Just as diagnosing home repairs requires a keen eye, whether you’re trying to figure out why a plant is struggling or attempting to fix a LiftMaster error code 4-1, identifying the root cause is the key to an effective solution.
My Transplanted Solomon’s Seal is Wilting!
Wilting is a common sign of transplant shock. The roots have been disturbed and are temporarily unable to take up enough water to support the foliage. Ensure the plant is well-watered and, if it’s in a sunnier spot than anticipated, provide temporary shade to reduce moisture loss from the leaves.
No Flowers After Transplanting?
Don’t be alarmed if your Solomon’s seal doesn’t flower in the first year after being moved. The plant is directing its energy toward establishing a strong root system. With proper care, you can expect its delicate, bell-shaped flowers to return the following season.
Yellowing Leaves After a Spring Transplant
Yellowing leaves can be another symptom of transplant shock or an indication of too much sun or improper watering. Double-check your watering schedule and the location’s light exposure. It’s often best to simply allow the plant time to adjust, and it will typically recover on its own.
Beyond the Basics: Expert Tips for Solomon’s Seal
Once you’ve mastered the art of transplanting, you can explore more advanced aspects of caring for this elegant perennial. Consider companion planting with other shade-lovers like hostas, ferns, and astilbes to create a lush, textured woodland garden. The arching form of Solomon’s seal provides a beautiful contrast to the mounding shapes of these other plants.
Regular division every three to five years is a proactive way to maintain plant health. This isn’t just a method of propagation; it’s a form of renewal. Just as a disintegrating toilet flapper indicates that a replacement is needed, an overly dense clump of Solomon’s seal signals that it’s time for division to ensure continued vitality. This practice prevents the center of the clump from dying out and encourages vigorous new growth from all parts of the plant.