How to Save a Sticker Without Destroying It (The Ultimate Guide)
That favorite sticker on your old laptop, the vintage decal on a thrift store find, or the perfectly placed art on a water bottle you’re replacing—we’ve all faced the dilemma. You want to save the sticker, but it seems fused to the surface, destined to be ripped, torn, and lost forever. This isn’t just a piece of sticky paper; it’s a memory, a statement, or a piece of art you’ve grown attached to.
The core problem lies in the very nature of a sticker’s design: its adhesive is meant to be permanent. Trying to peel it off often results in torn paper, stubborn residue, and a completely ruined design. But what if there was a way to defy its purpose? A way to carefully and cleanly remove, preserve, and even reuse that cherished sticker?
Fortunately, with the right techniques and a little patience, you can successfully rescue your favorite stickers from their adhesive prison. This guide provides a comprehensive approach to removing, restoring, and archiving your stickers, ensuring they live on for another day, another surface, or as a treasured part of a collection.
You'll Learn About
Understanding the Enemy: Sticker Types and Adhesives
Before you can save a sticker, it helps to understand what you’re up against. Stickers are not all created equal. Their material and the type of adhesive used will dictate the best removal strategy. Rushing in with the wrong method can lead to irreversible damage.
Most stickers you encounter will be made of vinyl or paper. Vinyl stickers are the most durable and easiest to save. Their plastic-like nature means they are less likely to tear during removal. Paper stickers, on the other hand, are delicate and prone to ripping, requiring a much gentler approach. The adhesive can also vary, from removable glues designed for temporary placement to aggressive, permanent bonds that require more persuasion.
Phase 1: The Great Removal – How to Peel a Sticker Intact
The initial removal is the most critical stage. The goal here is to separate the sticker from its surface without causing any tears or leaving significant adhesive behind. Patience is your most important tool. Slow, careful movements are essential for a clean lift.
Several household items can be used to gently coax the adhesive to release its grip. The key is to weaken the bond between the glue and the surface. Heat is often the most effective and least invasive method, making it the perfect starting point for most situations.
A simple hairdryer is your best friend for this task. Set it to a low or medium heat setting and hold it a few inches away from the sticker. Move the hairdryer in a circular motion for about 30-45 seconds to warm the adhesive underneath. You will notice the edges of the sticker begin to soften and lift slightly. This is your cue to begin peeling.
Using a thin, flat tool like a plastic scraper, a credit card, or even your fingernail, gently work at one of the corners. Once you have enough of an edge to grip, begin to peel the sticker back slowly and at a low angle. If you feel resistance, apply more heat to keep the adhesive pliable as you continue to peel.
Dealing with Stubborn Adhesives and Delicate Surfaces
Some stickers, especially older ones, may not respond to heat alone. In these cases, you may need to introduce a solvent to help dissolve the glue. However, it is crucial to first consider the surface you are working on, as some solvents can cause damage.
For robust surfaces like glass, metal, and most plastics, rubbing alcohol is an excellent choice. Apply a small amount to a cotton swab and gently work it around the edges of the sticker. Let it sit for a few minutes to penetrate the adhesive. The alcohol will begin to break down the glue, allowing you to peel the sticker away more easily.
For more delicate surfaces like painted wood or certain types of finished electronics, an oil-based solution is a safer alternative. A small amount of cooking oil, mineral oil, or even peanut butter can be applied to the sticker. The oils will soften the adhesive without harming the underlying surface. Allow the oil to sit for 15-20 minutes before attempting to peel and wipe away any excess residue with a clean cloth.
Phase 2: Restoration – Making Your Sticker Sticky Again
Once you’ve successfully removed your sticker, you’ll likely find that its original adhesive has lost most of its tackiness. To reuse it, you’ll need to apply a new layer of adhesive. There are several effective methods to bring your sticker back to life, depending on your intended use and the materials you have on hand.
One of the cleanest and most professional methods is using a Xyron sticker maker. These small, affordable devices apply a fresh, even layer of adhesive to the back of your item, essentially turning it into a brand-new sticker. Simply feed your saved sticker into the machine, pull it through, and it emerges with a new sticky back, ready for application.
If you don’t have a sticker maker, a repositionable adhesive spray is another excellent option. These can be found at most craft or hardware stores. Place your sticker face down on a piece of scrap paper, apply a thin, even coat of the spray adhesive, and let it dry for the time recommended by the manufacturer. This method provides a strong, lasting bond while often allowing for some repositioning.
For a quicker, more straightforward solution, high-quality double-sided tape can also work well. Apply strips of tape to the back of the sticker, covering as much surface area as possible. Trim any excess tape from the edges before applying the sticker to its new home. This is a great choice for thicker vinyl stickers but may be visible through thinner paper ones.
Phase 3: Preservation and Archiving – Beyond Re-Sticking
Sometimes, the goal isn’t to re-stick, but to preserve. You may want to start a collection or simply keep a sticker safe until you find the perfect place for it. Proper storage is key to preventing damage and preserving the sticker’s condition for the long term.
The best way to store a saved sticker is on sticker release paper or wax paper. This special paper has a slick surface that allows the sticker’s adhesive to hold lightly without forming a permanent bond. You can easily peel it off again when you’re ready to use it. Simply place your removed sticker onto a sheet of release paper and smooth it down. You can then trim around the sticker and store it flat.
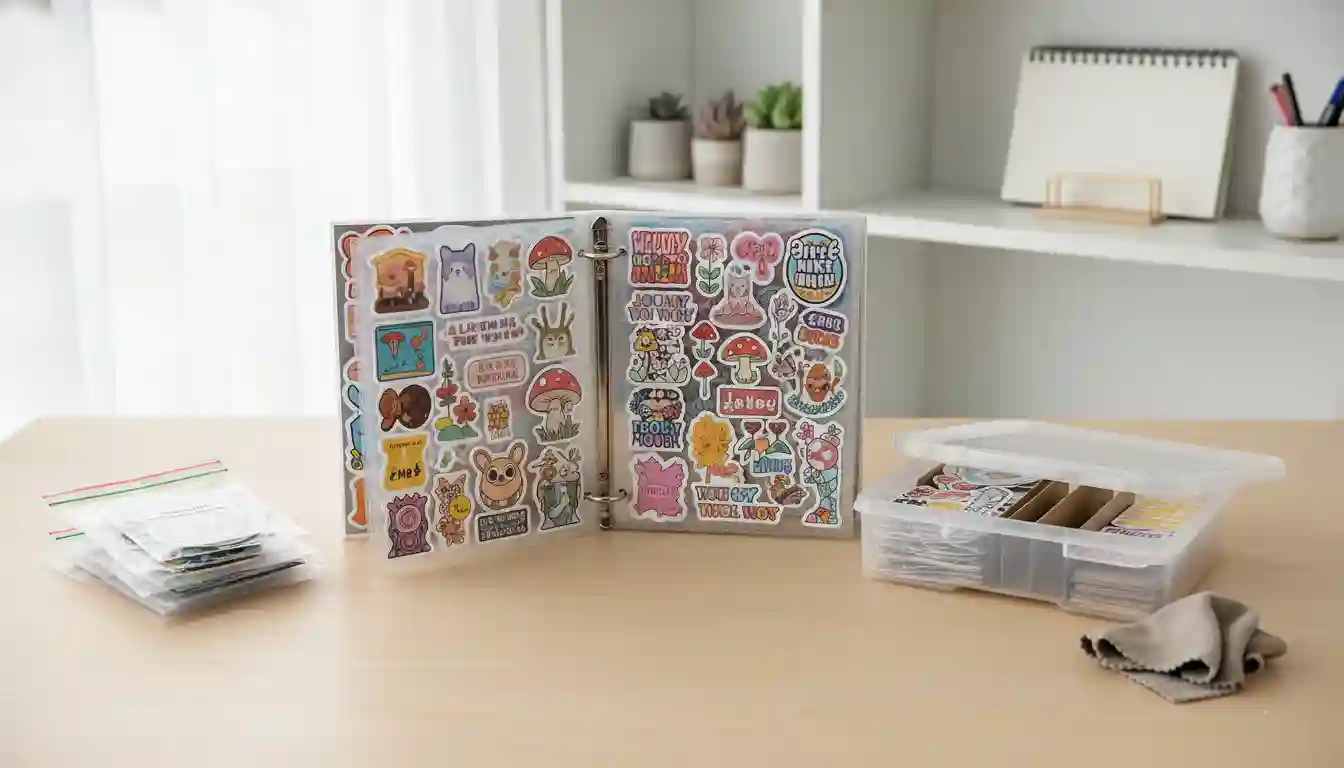
For those who are serious about collecting, creating a dedicated sticker album is a fantastic way to organize and display your saved treasures. You can purchase sticker collecting books specifically designed for this purpose, or create your own using a binder with clear plastic sheet protectors. Storing your saved stickers in an album protects them from dust, moisture, and creasing, keeping them in pristine condition.
Thinking about home organization and projects can put one in a creative mindset. While planning your craft space for sticker preservation, you might even consider other home updates. Tackling a project like a bathroom remodel can seem daunting, but understanding the details, such as figuring out the Lowe’s vanity installation cost, makes it manageable, much like breaking down the steps to save a sticker.
A Deeper Dive: Understanding Sticker Materials for Better Preservation
Not all stickers are created equal, and understanding their composition can significantly improve your chances of saving them. Vinyl, the most common material for durable stickers, is a type of plastic that is inherently water-resistant and flexible. This makes it resilient to the heat and gentle scraping methods used in removal.
Paper stickers are more challenging. Often coated with a thin gloss or matte finish, the paper itself is susceptible to tearing and moisture damage. When using solvents like alcohol or oil, it’s crucial to apply them sparingly to the edges to avoid soaking and weakening the paper. A successful paper sticker removal often requires more patience and a slower peeling process.
Foil and holographic stickers present their own unique challenges. The metallic layer is often very thin and can be easily scratched or creased. Using a plastic scraper instead of a metal one is highly recommended to avoid marring the reflective surface. Heat should also be used cautiously, as excessive temperatures can warp the foil material.
| Removal Method | Best For Surfaces | Sticker Type | Pros | Cons/Risks |
|---|---|---|---|---|
| Hair Dryer (Low Heat) | Glass, Metal, Plastic, Laptops | Vinyl, Foil | Non-invasive, safe for most surfaces, highly effective. | Can damage very sensitive plastics or finishes if held too close for too long. |
| Rubbing Alcohol | Glass, Metal, Ceramics | Most Types | Effectively dissolves stubborn adhesive. Dries quickly. | Can damage painted, varnished, or finished wood surfaces. Test on a small area first. |
| Cooking/Mineral Oil | Wood, Painted Surfaces, Plastic | Paper, Vinyl | Gentle and safe for delicate surfaces. Conditions wood. | Can be messy. Requires thorough cleaning afterward to remove oily residue. |
| Plastic Scraper/Credit Card | All Surfaces (with care) | All Types | Provides mechanical leverage to lift edges without scratching. | Can still cause scratches if used too aggressively on soft surfaces. |
| Parchment/Wax Paper Storage | Temporary Storage | All Types | Preserves adhesive, allows for easy removal and reuse. | Not a permanent display solution. |
The Long-Term Collector: Curating Your Saved Stickers
Transforming saved stickers into a curated collection adds a new level of enjoyment to the process. Once your stickers are safely stored on release paper, consider how you want to organize them. Grouping by theme, color, artist, or the place you got them from can turn a simple pile of stickers into a meaningful archive.
For a more dynamic display, consider creating a sticker journal. This can be a simple notebook where you stick your saved items and write a brief note about their origin or significance. It becomes a visual diary of your experiences, travels, and interests. This is particularly rewarding for stickers that represent concerts, events, or special memories.
Digitizing your collection is another powerful preservation technique. Taking high-quality photos or scans of your stickers before you store or re-stick them creates a permanent digital backup. This not only safeguards against physical loss but also allows you to share your collection with others online. This digital archive can be a fun way to track how your tastes and collection evolve over time.
Managing a collection, much like managing a home project, requires good organization. When you’re tackling bigger jobs, like finishing a basement, knowing the full scope is key. Understanding the basement HVAC cost from the start helps you budget properly, just as knowing your sticker types helps you choose the right preservation method.
Final Thoughts: Give Your Stickers a Second Life
Saving a sticker is more than just a practical hack; it’s an act of preservation. Each sticker tells a small story, and learning how to move it from one chapter to the next is a rewarding skill. By understanding the materials you’re working with and approaching the task with patience, you can successfully rescue almost any sticker.
From the careful application of heat to the final placement in a curated collection, you have the power to extend the life of these small pieces of art. Never again will you have to say goodbye to a favorite sticker. Armed with these techniques, you can confidently peel, restore, and preserve them, ensuring they continue to bring you joy for years to come.