How to Resheath a House: Your Ultimate Guide to a Stronger Home
Is your home’s exterior looking tired, worn, or showing signs of damage? The problem might be more than skin deep. The sheathing beneath your siding is a critical component of your home’s structure, and when it fails, it can lead to a host of expensive and dangerous problems.
Many homeowners don’t think about their wall sheathing until it’s too late. Understanding when and how to resheath a house can save you from costly repairs down the road and significantly improve your home’s durability, energy efficiency, and overall value. This comprehensive guide will walk you through everything you need to know.
You'll Learn About
Why Resheathing Your House is Critically Important
Exterior wall sheathing is the unsung hero of your home’s construction. It’s a layer of board or panel material installed over the wall studs that serves several vital functions. It provides structural integrity, acts as a barrier against wind and rain, and creates a solid surface for attaching your siding.
Think of sheathing as the skeleton that holds your walls together. It prevents the frame from twisting or bending under pressure from wind or even the settling of the house. Without proper sheathing, your home is vulnerable to serious structural issues.
Signs Your Home Needs Resheathing
How do you know if your sheathing is failing? While it’s hidden behind your siding, there are several tell-tale signs that can indicate a problem. Ignoring these warnings can lead to more extensive and expensive damage.
Visible Water Damage: Water is the number one enemy of house sheathing. Look for signs of water infiltration inside your home, such as stained or sagging ceilings and walls. These can indicate that moisture has penetrated your siding and is damaging the sheathing underneath.
Rotting Wood: Persistent moisture can cause the wood sheathing to rot, severely weakening its structural integrity. If you notice soft spots or crumbling wood on your exterior walls, it’s a clear sign that the sheathing needs to be replaced.
Increased Energy Bills: Damaged sheathing can create gaps and cracks in your home’s envelope, allowing conditioned air to escape and outside air to enter. If you’ve noticed a sudden and unexplained spike in your heating and cooling costs, failing sheathing could be the culprit.
Choosing the Right Sheathing Material for Your Home
When it comes to resheathing your house, you have several material options, each with its own set of advantages and disadvantages. The best choice for your home will depend on your budget, climate, and specific structural needs. The most common materials are Plywood and Oriented Strand Board (OSB).
Plywood is known for its strength and durability, while OSB is a more budget-friendly option. Understanding the differences is key to making an informed decision.
Plywood vs. OSB: A Head-to-Head Comparison
Plywood is made from thin layers of wood veneer glued together. This cross-graining technique gives it excellent strength and stability. It holds up well against moisture, swelling more uniformly and returning closer to its original shape as it dries. This makes it a great choice for areas with high humidity or frequent rain.
Oriented Strand Board (OSB) is an engineered wood product made from compressed wood strands and adhesives. It’s generally more affordable than plywood and offers comparable structural performance in many applications. However, OSB is more susceptible to moisture damage, especially on its cut edges, and can swell permanently if it gets wet.
Other Sheathing Options
While plywood and OSB are the most common choices, other materials are available for specific needs. Structural fiberboard offers some insulating properties, while foam board is primarily used for non-structural applications to improve energy efficiency. Gypsum sheathing provides fire resistance, making it a good option for certain exterior walls.
| Material | Pros | Cons | Best For |
|---|---|---|---|
| Plywood | Excellent strength, good moisture resistance, holds fasteners well. | More expensive than OSB. | Areas with high wind or moisture, projects requiring maximum durability. |
| OSB (Oriented Strand Board) | Cost-effective, structurally sound, consistent quality. | Susceptible to edge swelling from moisture. | Budget-conscious projects in drier climates. |
| Structural Fiberboard | Provides some insulation, more permeable to vapor. | Not as strong as plywood or OSB, may require extra bracing. | Older homes or when breathability is a concern. |
| Foam Board (Non-Structural) | Excellent insulation, reduces thermal bridging. | No structural strength, must be used with structural sheathing. | Improving energy efficiency in conjunction with other sheathing. |
| Gypsum Sheathing | Fire-resistant, good sound barrier. | Can be damaged by moisture if not properly protected. | Exterior walls requiring a fire rating. |
The Step-by-Step Guide to Resheathing Your House
Resheathing a house is a significant undertaking, but with the right tools and a systematic approach, it can be a manageable DIY project for a skilled homeowner. However, always prioritize safety and consider consulting a professional if you’re unsure about any step.
Step 1: Preparation and Siding Removal
The first step is to carefully remove the existing siding to expose the old sheathing. This is a good time to inspect for any hidden damage. Be methodical and try to keep the siding intact if you plan to reuse it, although new siding is often recommended during a resheathing project.
Before you start, ensure you have the necessary safety gear, including gloves and safety glasses. This initial stage can be labor-intensive, and you might find that the process of removing old materials is more complex than you think, especially with older homes. For instance, if you encounter a stubborn pull cord on your equipment, like with a snow blower, it’s a reminder that even simple mechanisms can have hidden issues. A similar principle applies here; what seems straightforward can reveal deeper problems. For tips on dealing with stuck cords, you might find this guide on what to do when a snow blower pull cord is stuck useful.
Step 2: Removing the Old Sheathing
Once the siding is off, you can begin removing the old, damaged sheathing. Use a pry bar to carefully pull the panels away from the wall studs. Take care not to damage the underlying framing. This is also the perfect opportunity to inspect the wall cavity for any signs of mold, pests, or water damage.
You may need to cut the sheathing into smaller, more manageable sections with a circular saw. Always set the saw blade depth to the thickness of the sheathing to avoid cutting into the studs. This process can be dusty, so consider ways to manage the debris. Learning how to turn off the blower on a shop vac can be surprisingly helpful for cleanup during a messy demolition job.
Step 3: Inspecting and Repairing the Wall Frame
With the sheathing removed, you have a clear view of your home’s framing. Thoroughly inspect the studs, sill plate, and top plate for any signs of rot, insect damage, or structural issues. Any compromised framing members must be repaired or replaced before you can install the new sheathing.
This is a critical step that shouldn’t be rushed. The integrity of your new sheathing depends on a solid, sound frame. This is also a good time to consider other upgrades, like updating insulation or even assessing older systems. For example, if you notice your water heater is aging, it might be a good time to consider if you should replace a 30-year-old water heater while the walls are open.
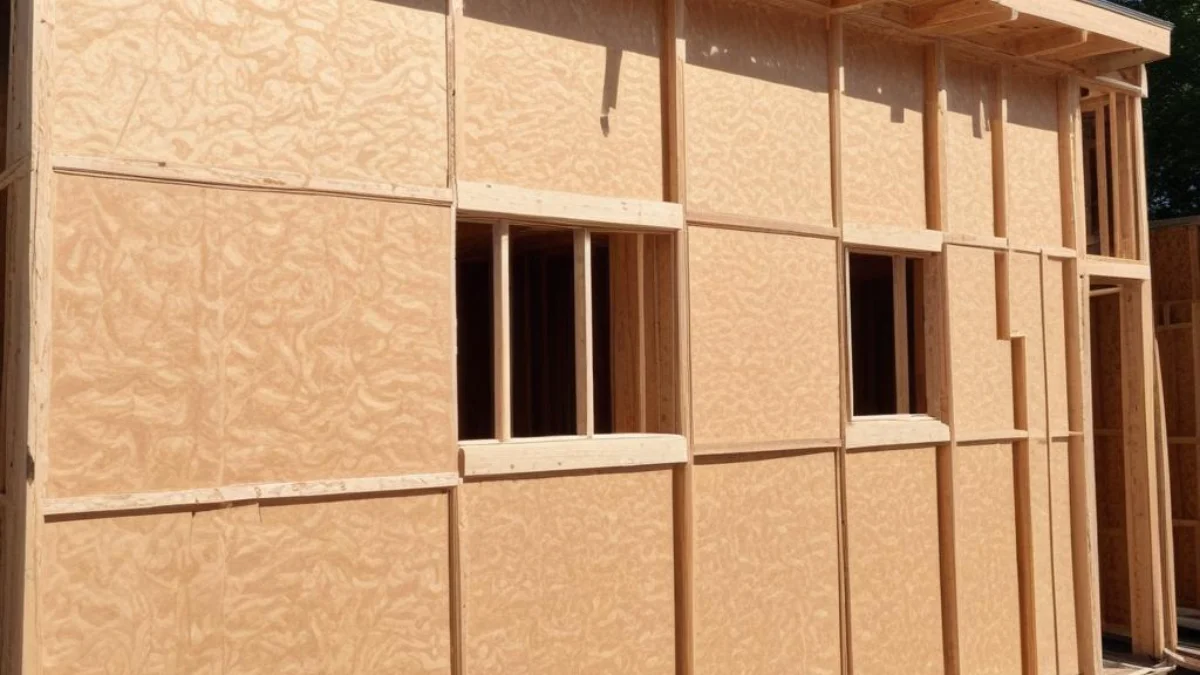
Step 4: Installing the New Sheathing Panels
Now it’s time to install the new sheathing. Start at one corner of the wall, ensuring the first panel is perfectly plumb and level. The panels can be installed either vertically or horizontally, but it’s crucial to stagger the seams between rows for added strength.
Use the correct fasteners and follow the proper nailing schedule. Typically, this involves placing nails every 6 inches along the edges of the panels and every 12 inches in the field (into the studs). Always leave a 1/8-inch gap between panels to allow for expansion and contraction with changes in humidity.
Step 5: Cutting Openings and Sealing Seams
As you install the panels, you’ll need to cut openings for windows and doors. The easiest way to do this is to install the panel over the opening and then cut it out from the inside using a reciprocating saw or router.
After all the panels are installed, it’s important to seal the seams between them with a high-quality flashing tape. This creates a continuous air and moisture barrier, improving your home’s energy efficiency and protecting the sheathing from water infiltration.
Step 6: Installing a Weather-Resistant Barrier
The final step before reinstalling your siding is to apply a weather-resistant barrier, often called house wrap. This material is installed over the sheathing and acts as a secondary line of defense against wind and water, while still allowing water vapor to escape from the wall cavity.
Properly installing the house wrap, with all seams lapped correctly and taped, is crucial for the long-term performance of your exterior walls. This protective layer ensures that any moisture that gets behind your siding won’t reach and damage your new sheathing.
Protecting Your Investment
Resheathing your house is a significant investment in its long-term health and durability. By understanding the signs of sheathing failure, choosing the right materials, and following the correct installation procedures, you can ensure your home remains strong, safe, and energy-efficient for years to come.
Whether you tackle this project yourself or hire a professional, the result will be a more resilient and valuable home. Don’t underestimate the importance of what lies beneath your siding; a properly sheathed house is a well-protected house.