How to Remove Carpet Tack Strips Without Damaging Hardwood Floors: The Ultimate Guide
You’ve pulled up the old, dated carpet, filled with dreams of revealing pristine hardwood floors beneath. But then you see them: the menacing lines of carpet tack strips stubbornly nailed around the perimeter of your room. Suddenly, a wave of panic sets in. How do you remove these without gouging, scratching, or otherwise ruining the beautiful wood you’ve just uncovered?
This is a common fear for many homeowners, but with the right tools, technique, and a little patience, you can remove carpet tack strips like a pro. This guide will walk you through every step of the process, ensuring your hardwood floors remain flawless.
You'll Learn About
Understanding the Challenge: What Are Tack Strips?
Before diving into the removal process, it’s essential to understand what you’re up against. Carpet tack strips, also known as gripper rods, are thin pieces of wood, typically plywood, with sharp, angled pins pointing upwards. These strips are nailed into the subfloor, and their purpose is to grip the carpet and hold it in place. The nails used to secure these strips to hardwood are often strong and can be difficult to remove without the proper approach.
The primary challenge lies in prying up these strips without the leverage of your tools damaging the soft surface of the hardwood. A slip of a pry bar or the wrong angle of force can lead to deep scratches, dents, or even splintering of the wood. The goal is a clean removal of both the strip and the nails holding it down.
The Importance of Preparation and Safety
Like any home improvement project, preparation is key to success. Before you begin, take the time to clear the room of all furniture and obstacles. You’ll also want to ensure you have adequate lighting to see what you’re doing clearly. Safety should always be your top priority. The pins on the tack strips are extremely sharp, so wearing thick work gloves is non-negotiable. It’s also wise to wear safety glasses to protect your eyes from flying debris.
Remember that even with careful work, there might be some minor imperfections left behind. Often, after removing carpeting, you might notice other issues like a frayed carpet in a doorway leading to another room that also needs attention. Tackling these small repairs at the same time can streamline your flooring project.
Gathering the Right Tools for the Job
Using the right tools is half the battle won. Attempting this job with inadequate tools will not only make it more difficult but also significantly increase the risk of damaging your floors. Here’s a list of essential tools and materials you’ll need for a clean and successful removal.
Having the right equipment on hand will make the process smoother and more efficient. It prevents you from having to stop mid-project to search for a tool you don’t have. Taking the time to assemble everything you need beforehand will pay off in the long run.
| Tool | Primary Use | Expert Tip |
|---|---|---|
| Pry Bar (or Wonder Bar) | Lifting the tack strips. | A smaller pry bar offers better control and is less likely to cause damage. |
| 6-in-1 Painter’s Tool or Putty Knife | Creating an initial gap and protecting the floor. | The stiff blade is ideal for gently getting under the strip without bending. |
| Hammer | Tapping the pry bar and removing stubborn nails. | A standard claw hammer works well for both tapping and pulling nails. |
| Pliers (Needle-Nose or Lineman’s) | Removing any nails left behind. | Pliers provide a good grip for pulling out nails without breaking them. |
| Thick Work Gloves | Protecting hands from sharp tacks. | Leather or other heavy-duty gloves are recommended. |
| Safety Glasses | Protecting eyes from flying debris. | Always wear eye protection when using striking tools. |
| Scrap Piece of Wood or Cardboard | Protecting the floor from the pry bar. | This simple item is crucial for preventing dents and scratches. |
The Step-by-Step Guide to Flawless Tack Strip Removal
Now that you’re prepared and have your tools ready, it’s time to begin the removal process. Follow these steps carefully for the best results. Patience is your best friend here; rushing through the process is a surefire way to cause damage.
Step 1: Create an Initial Gap
Start in a corner or at the end of a tack strip. Take your 6-in-1 painter’s tool or a stiff putty knife and place the edge against the tack strip, near one of the nails holding it to the floor. Gently tap the end of the tool’s handle with your hammer to wedge it underneath the strip. Your goal is to create a small gap between the tack strip and the hardwood floor.
Do not try to pry the entire strip up with this tool. Its purpose is simply to create enough space for your pry bar to fit. Forcing it can cause the tool to slip and scratch the floor.
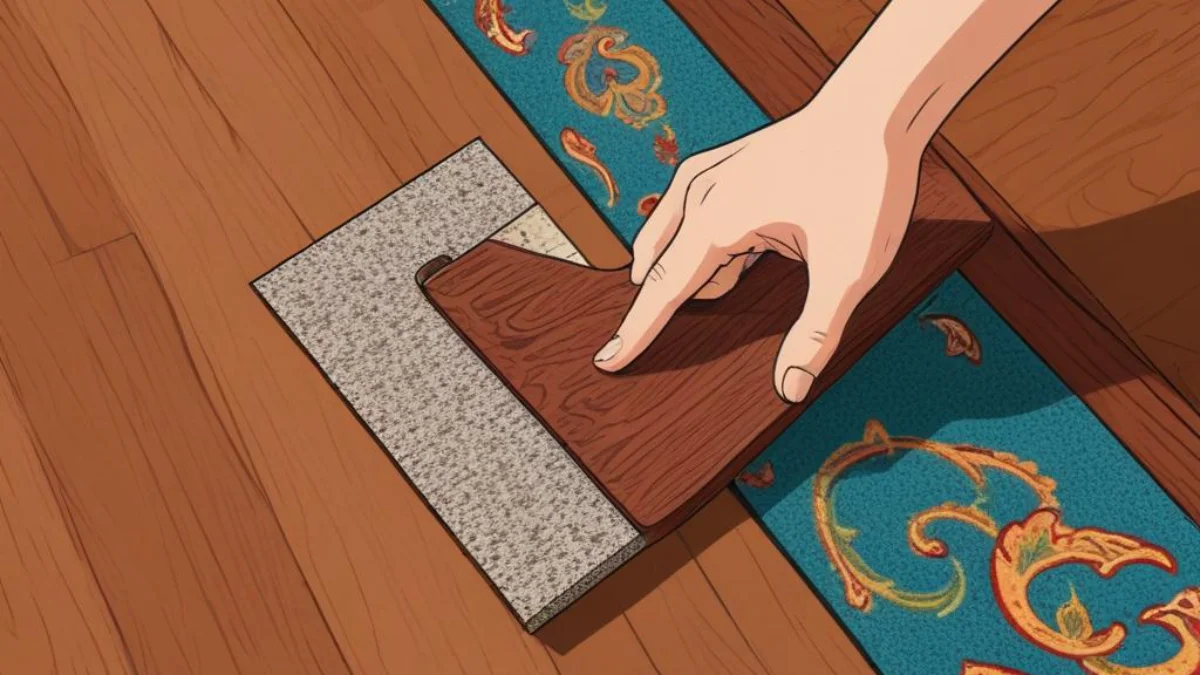
Step 2: Protect Your Hardwood
Once you have a small gap, slide your piece of scrap wood or heavy cardboard underneath the area where you will place your pry bar. This will act as a buffer, distributing the pressure and preventing the pry bar from denting the hardwood as you apply leverage. This is a critical step that should not be skipped.
Using a protective barrier ensures that any force exerted is absorbed by the scrap material, not your precious floors. It’s a simple yet highly effective way to prevent damage.
Step 3: Pry Up the Tack Strip
Insert the claw of your pry bar into the gap you created, resting it on top of your protective scrap wood. Position the claw as close to one of the nails as possible. Gently apply downward pressure on the handle of the pry bar to lift the tack strip. You should feel the nail begin to loosen and pull out of the floor.
Work your way down the strip, repeating this process at each nail. With each nail you loosen, the strip will become easier to lift. If a strip breaks, don’t worry; simply start the process again on the broken piece.
Step 4: Remove Any Remaining Nails
Occasionally, a nail will pull through the tack strip and remain in the floor. If this happens, use the claw of your hammer or a pair of pliers to remove it. If you’re struggling to get a good grip, you can use your pry bar with the protective scrap wood to gently lift the nail enough to grab it with the pliers.
Be sure to pull the nails straight up to avoid widening the hole or splintering the wood around it. After all, dealing with leftover fasteners is a common part of many flooring projects, much like the need to remove carpet staples from stairs if you were working in that area.
Step 5: Clean Up and Inspect
Once all the tack strips are removed, it’s time to clean up. Sweep or vacuum the entire area thoroughly to remove any dust, wood splinters, or stray nails. A clean workspace is a safe workspace. After cleaning, carefully inspect the perimeter of the room for any damage and the small nail holes that will be left behind.
Don’t be alarmed by the nail holes. These are an unavoidable part of the process and can be easily addressed in the next stage of your flooring project.
Dealing with the Aftermath: Repairing Nail Holes
After the tack strips are gone, you’ll be left with a series of small nail holes around the edge of your room. While they may seem unsightly at first, they are relatively easy to fix. The best method for repairing these holes depends on your future plans for the floor.
If You Plan to Refinish the Floors
If you’re planning to sand and refinish the entire floor, your job is much simpler. The sanding process will smooth out the area around the holes. After sanding, you can fill the holes with a wood filler that is designed to accept stain. Your flooring professional will typically handle this as part of the refinishing process.
Discussing your options with a professional can be beneficial. In some cases, you might even find you can negotiate flooring prices for the refinishing work, especially if you’ve done the prep work yourself.
If You’re Keeping the Existing Finish
If the floors are in good condition and you don’t plan to refinish them, you’ll want to be more meticulous with your repairs. You can purchase a color-matched wood putty or filler from your local hardware store. Choose a color that closely matches your floor’s finish. Apply a small amount of the putty to each hole, using a putty knife to press it in and smooth the surface. Wipe away any excess with a clean cloth before it dries.
For a seamless repair, you can even blend two different shades of putty to achieve the perfect match. Take your time with this step, as a well-done repair will be virtually invisible.
Common Mistakes to Avoid
While the process is straightforward, there are a few common mistakes that can lead to damaged floors. Being aware of these pitfalls can help you avoid them.
- Not using a protective barrier: This is the most common cause of dents and scratches. Always use a piece of scrap wood or cardboard under your pry bar.
- Prying in the wrong spot: Always position your pry bar as close to the nails as possible. Prying in the middle of the strip can cause it to snap and splinter.
- Rushing the process: Take your time and work methodically. Rushing leads to mistakes and potential damage to your floors.
- Using the wrong tools: A screwdriver is not a substitute for a pry bar. Using the right tools will make the job easier and safer.
By following these guidelines and taking your time, you can successfully remove carpet tack strips and reveal the beautiful hardwood floors you’ve been dreaming of. With a little care and attention to detail, you can achieve professional-quality results and take pride in a job well done.