Staple Nightmare? Here’s How to Remove Carpet Staples From Stairs
You’ve finally ripped up that old, dated carpet from your staircase, dreaming of beautifully finished hardwood treads. But your excitement quickly turns to frustration as you stare at a seemingly endless minefield of tiny, stubborn metal staples left behind. This is the moment many DIY home renovation projects screech to a halt, as the tedious, back-breaking task of removing hundreds, if not thousands, of carpet staples begins.
These small but mighty fasteners, often driven deep into the wood by powerful pneumatic staple guns, are the primary culprits behind a time-consuming and often painful process. Carpet installers are notorious for being generous with staples to ensure the padding and carpet don’t budge, leaving you with a staircase that looks more like a metallic pincushion than a future design feature.
The problem is compounded by staples that are flush with the wood, rusted, or break apart during removal. This comprehensive guide will walk you through the most effective methods and tools to conquer this common renovation challenge, ensuring you can move on to the satisfying part: refinishing your beautiful stairs.
You'll Learn About
First Things First: Safety and Preparation
Before you even think about pulling the first staple, it’s crucial to prepare your workspace and prioritize safety. Carpet removal exposes sharp tack strips and stray staples that can cause nasty cuts and punctures. Protect yourself and make the job easier by following these initial steps.
Start by equipping yourself with the right personal protective equipment (PPE). Heavy-duty work gloves are non-negotiable to protect your hands from sharp metal edges. Safety goggles are also essential to shield your eyes from staples that can unexpectedly fly out during removal.
With your safety gear on, the next step is to clear the area. If you haven’t already, remove the carpet tack strips using a pry bar and hammer. Be methodical and dispose of these sharp strips immediately to prevent accidental injury. Once the tack strips are gone, thoroughly vacuum the stairs to remove all remaining carpet fibers, dust, and debris, which will make spotting every last staple much easier.
Dealing with Different Types of Staples
Not all staples are created equal. You will likely encounter two main types: wider, shorter staples used for the carpet padding and narrower, longer staples for the carpet itself. Padding staples are generally easier to remove, while the carpet staples can be more deeply embedded and prone to breaking.
Identifying the types of staples you’re dealing with can help you choose the most effective removal tool and technique from the start. Some staples may also be rusted or bent, requiring a bit more patience and a combination of tools to extract without causing significant damage to the wood underneath.
The Best Tools for Removing Carpet Staples
Having the right tools is the single most important factor in making this job manageable instead of miserable. While you might be tempted to grab a simple flathead screwdriver and a pair of pliers, investing in a few specialized tools will save you an immense amount of time, effort, and frustration. Here’s a breakdown of the most effective tools for the job.
Must-Have Tools for Efficient Staple Removal
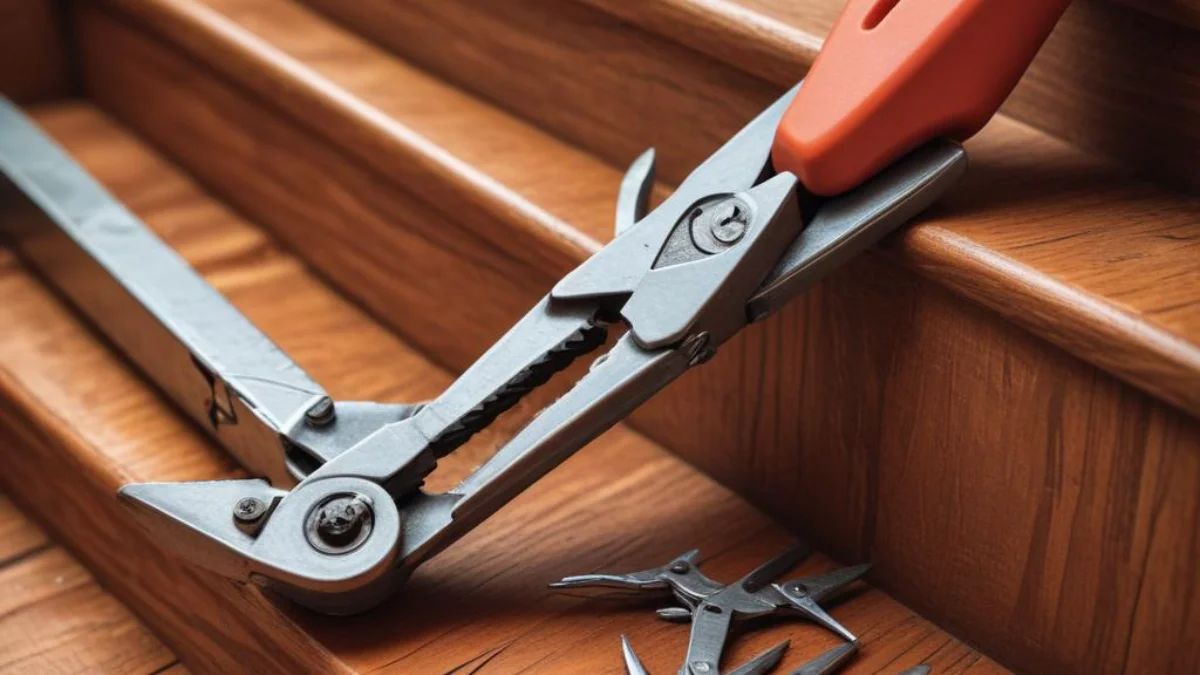
For most situations, a combination of a few key tools will be your best bet. A dedicated staple puller, often designed with a sharp, pointed tip and a rocker head for leverage, is excellent for getting under flush staples without gouging the wood. Diagonal cutting pliers (or “dikes”) are another fantastic option; their sharp jaws can grip staples tightly, and the curved head allows you to “roll” the staple out with leverage, minimizing damage.
Needle-nose pliers are indispensable for gripping and pulling out staples that are already partially raised or for extracting the broken legs of a staple that snaps. Finally, a small pry bar or a 6-in-1 painter’s tool can be useful for tackling particularly stubborn staples or for getting under those that are deeply embedded in corners or along the risers.
Comparing Staple Removal Tools
To help you decide which tools are right for your project, here is a quick comparison of the most popular options. Each has its own set of advantages and is best suited for slightly different scenarios.
| Tool | Best For | Pros | Cons |
|---|---|---|---|
| Staple Puller | Flush staples; minimizing wood damage | Excellent leverage; designed not to gouge wood | May not grip broken or thin staples well |
| Diagonal Cutting Pliers | General purpose; grabbing and rolling staples out | Strong grip; rolling action provides great leverage | Can cut through staples if too much pressure is applied |
| Needle-Nose Pliers | Partially raised staples; broken staple legs | Precise grip; great for tight spaces | Requires significant hand strength; poor leverage |
| Pry Bar / 6-in-1 Tool | Deeply embedded or stubborn staples | Maximum leverage for tough situations | High risk of denting or scratching the wood if not used carefully |
Step-by-Step Guide to Removing Staples Like a Pro
With your workspace prepped and your tools assembled, it’s time to get down to business. Following a systematic approach will make the process more efficient and help ensure you don’t miss any staples. Remember, patience is key to a clean, damage-free result.
Find a comfortable position, perhaps using a kneeling pad or a small stool, as you’ll be spending a lot of time close to the stairs. Good lighting is also crucial, so consider using a headlamp or a portable work light to illuminate your work area and make those tiny staples easier to see.
The “Slide and Rock” Technique
The most effective method for removing the majority of staples involves a simple “slide and rock” motion. Using a staple puller or diagonal pliers, slide the tip of the tool directly under the crown of the staple. Once you have a secure position, gently rock the tool back, using its curved head as a fulcrum to leverage the staple out of the wood.
This rolling motion minimizes the force needed and greatly reduces the likelihood of damaging the stair tread. For staples that are flush with the wood, you may need to gently tap the back of your tool with a hammer to wedge the tip underneath before you can apply leverage. Pulling staples straight up requires much more force and is more likely to break the staple or dent the wood.
Handling Broken and Stubborn Staples
Inevitably, you will encounter staples that break, leaving one or both legs embedded in the wood. This is where your needle-nose pliers become invaluable. Grip the remaining piece of the staple as close to the wood as possible and pull it straight out. If it won’t budge, try gently wiggling it back and forth to loosen it first.
For extremely stubborn staples that refuse to be pried up, you have a couple of options. You can try to drive a small, sharp tool like an awl or a nail set next to the staple leg to loosen the wood’s grip. As a last resort for a staple that has broken off flush with or below the surface, use a nail set and hammer to tap it slightly deeper into the wood. The tiny hole can then be easily filled with wood putty before you begin refinishing. Wondering if your electrical setup is sufficient for a new appliance? Sometimes home projects reveal other areas that need attention, like figuring out if 200 amp service is enough for a tankless water heater.
Prepping Your Stairs for Their New Look
Once every last staple has been removed, you’re on the home stretch. The final preparation phase is crucial for achieving a professional-looking finish on your newly liberated wooden stairs. This involves filling holes, sanding, and cleaning to create the perfect canvas for paint or stain.
Begin by filling all the tiny holes left by the staples, as well as any small gouges or dents that may have occurred during removal. Use a high-quality, stainable wood filler and a flexible putty knife to apply it, making sure to press the filler firmly into each hole. Once the filler is completely dry according to the manufacturer’s instructions, it’s time to sand.
Start with medium-grit sandpaper (around 120-grit) to sand the entire stair tread and riser, paying special attention to the filled spots to make them smooth and level with the surrounding wood. Progress to a finer grit (such as 220-grit) for a final, smooth finish. After sanding, vacuum thoroughly one last time, followed by a wipe-down with a tack cloth to remove any lingering dust. Your stairs are now perfectly prepped and ready for the stain or paint of your choice, transforming them into the stunning centerpiece of your home. Sometimes, home improvement extends beyond the stairs, like dealing with pests in your yard or even something as specific as figuring out how to get rid of Carolina wrens if they become a nuisance. Each project has its unique challenges, just like tackling a difficult exterior finish such as stucco without sheathing.