How to Remove a Single Paving Slab Without a Huge Headache
A pristine patio or walkway can be the pride of any homeowner, but a single cracked, sunken, or stained paving slab can ruin the entire effect. This common problem can be more than just an eyesore; it can also be a dangerous trip hazard. You might think you need to call in a professional for such a surgical extraction, but with the right tools and techniques, you can tackle this job yourself.
Removing just one slab from a sea of interlocking pavers might seem impossible without causing a domino effect of damage. The good news is that it’s entirely achievable. This guide will walk you through the process step-by-step, ensuring you can restore your paved surface to its former glory without a major demolition project.
You'll Learn About
Why Would You Need to Remove a Single Paving Slab?
Before diving into the “how,” let’s explore the “why.” Understanding the root cause of the problem can help prevent it from happening again in the future. There are several common reasons why a single paving slab might need to be removed and replaced.
Perhaps the most obvious reason is physical damage. A heavy object dropped on the surface can easily cause a crack or a chip. Over time, weathering and temperature fluctuations can also take their toll, leading to surface deterioration. A compromised slab isn’t just ugly; it can be unsafe for walking on.
Another frequent issue is sinking or unevenness. This is often a sign of problems with the base layer beneath the slab. Improper compaction of the sand or gravel foundation can lead to settling over time, causing one slab to sit lower than its neighbors. Tree roots encroaching from underneath can also push slabs upward, creating an uneven and hazardous surface.
Accessing Utilities and Making Repairs
Sometimes, the need to remove a slab has nothing to do with the slab itself. Underground utilities like water pipes, electrical conduits, or irrigation lines may run beneath your patio. If a repair or inspection is needed, carefully removing a single slab is far preferable to digging up an entire section.
This is where understanding your home’s systems can be beneficial. For instance, knowing the general layout of your plumbing, including issues like how fragile water heaters are, can give you a clue about where important pipes might be located. A leak or a necessary upgrade, such as an AHS water heater replacement, might require this kind of precise access.
Preparing for the Job: Tools and Safety
Having the right equipment on hand will make the removal process smoother and safer. Attempting to pry up a heavy slab with inadequate tools can lead to frustration, damage to surrounding pavers, and even personal injury. Safety should always be your first priority.
Always wear sturdy gloves to protect your hands and safety glasses to shield your eyes from flying debris, especially if you need to chip away at old mortar. If you’re working with larger, heavier slabs, consider asking for help to avoid straining your back. Proper lifting technique—bending at the knees, not the waist—is crucial.
Essential Toolkit for Paving Slab Removal
The tools you’ll need will depend on how your paving slabs were originally installed—whether they are set in sand or secured with mortar. Here is a breakdown of the essentials for each scenario.
| Tool | Use Case: Sand-Set Slabs | Use Case: Mortar-Set Slabs |
|---|---|---|
| Safety Goggles & Gloves | Essential for all jobs | Essential for all jobs |
| Two Flathead Screwdrivers or Putty Knives | Prying up the slab from tight joints. | Can help clean out joints, but less effective for prying. |
| Crowbar or Pry Bar | Provides leverage to lift the slab. | Essential for levering up the slab after breaking the mortar seal. |
| Rubber Mallet | Tapping adjacent slabs to loosen the target one. | Gently tapping the new slab into place. |
| Club Hammer & Cold Chisel/Bolster | Not typically needed. | Crucial for chipping away old mortar from the joints and base. |
| Paver Extractor Tool | A specialized tool for a clean lift, ideal for tightly packed pavers. | Not effective on mortared slabs. |
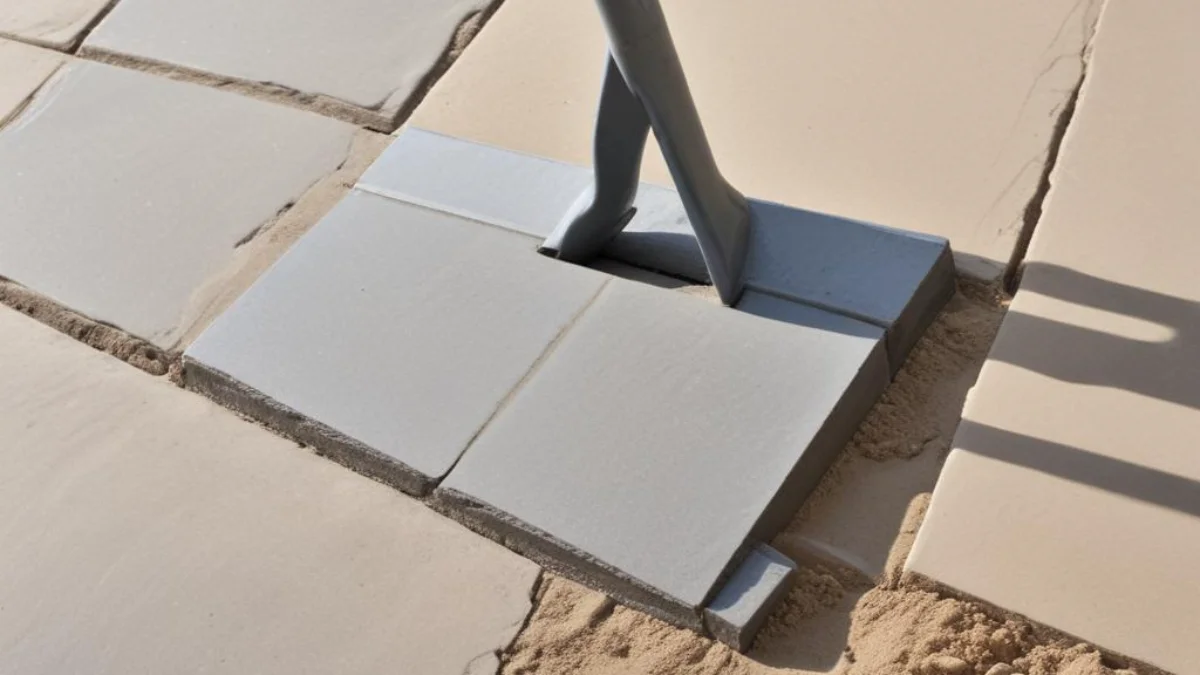
Step-by-Step Guide: Removing a Sand-Set Paving Slab
Paving slabs set on a bed of sand are the most common and the easiest to remove. The process relies on breaking the friction lock created by the jointing sand between the slabs. Patience is key to avoiding damage.
First, clear the area of any furniture, planters, or debris. Then, focus on clearing out the joints around the target slab. Use a thin tool like a putty knife or an old screwdriver to scrape out as much of the jointing sand as you can. This will relieve the pressure holding the slab in place.
Creating Leverage and Lifting the Slab
Once the joints are clear, you need to create a gap to lift the slab. Insert two sturdy, flathead screwdrivers or stiff putty knives into the joints on opposite sides of the paver. Wiggle them back and forth gently, prying upwards. The goal is to lift the slab just enough to get your fingers or a larger tool underneath.
If the slab is stubborn, try tapping the surrounding pavers with a rubber mallet. This vibration can help loosen the grip of the remaining sand. Once you have a small gap, you can switch to a crowbar for more leverage, being careful to protect the adjacent slabs with a piece of wood to prevent chipping. Lift the slab straight up and out.
How to Tackle a Mortar-Set Paving Slab
Removing a slab set in mortar is a more involved process that requires more force, but the principle is the same: isolate the slab before you try to lift it. You will need to break the mortar bond completely.
Wearing your safety goggles, use a club hammer and a cold chisel or bolster to carefully chip away the mortar in the joints around the slab you want to remove. Work slowly and methodically to avoid striking and damaging the neighboring slabs. Once all the surrounding mortar is removed, you can attempt to lift the slab.
Breaking the Bed and Releasing the Slab
Often, the slab will also be sitting on dabs of mortar. If it doesn’t lift easily after clearing the joints, you may need to break the slab itself to remove it. If you need to preserve the slab, this method won’t work. However, if you are replacing a broken slab, this is the most direct approach.
Use a hammer and chisel to break the damaged slab into smaller, manageable pieces. This will relieve the tension and allow you to remove the fragments without disturbing the surrounding pavers. Once the pieces are out, you can then chip away the old mortar bed to create a clean base for the new slab.
After the Removal: Preparing for Replacement
With the old slab out, your job is only half done. Proper preparation of the base is critical to ensure the new slab sits level and doesn’t sink in the future. For sand-set pavers, this means inspecting the sand bed. Remove any rocks or debris and add new paving sand to bring the level up slightly higher than the base of the surrounding slabs. This allows for compaction.
For mortar-set slabs, you must remove all the old mortar from the base. A clean, solid foundation is necessary for the new mortar to adhere properly. Taking shortcuts here will only lead to problems down the road, similar to how poor home maintenance can lead to bigger issues like needing to figure out a side of door draft fix to improve insulation.
Laying the New Slab
To lay a new sand-set slab, carefully lower it into position. It should sit slightly proud of the other pavers. Use a rubber mallet and a piece of timber (to spread the impact) to gently tap it down until it is flush with the surrounding surface. Check with a spirit level to ensure it’s even.
For a mortar-set slab, mix a fresh batch of mortar (typically a 4:1 sand to cement ratio). Apply a full bed of mortar to the base, then carefully lower the new slab into place. Use the rubber mallet to tap it down to the correct height, checking with a spirit level in all directions. Once the slab is set, you can fill the surrounding joints with fresh mortar to finish the job.