How to Measure a Garage Door Belt Correctly? Stop Guessing!
A garage door opener is a convenience many of us take for granted until it stops working. Often, the culprit is a worn-out or broken belt. But before you can replace it, you need to know exactly what size to get. Guessing can lead to multiple trips to the hardware store and a lot of frustration. Measuring your garage door belt is a straightforward process, but it requires precision.
This guide will walk you through the essential steps to accurately measure your garage door opener belt, ensuring you purchase the correct replacement part the first time. Understanding this process can save you both time and money. A correctly sized belt is crucial for the smooth, quiet, and reliable operation of your garage door.
You'll Learn About
Why Accurate Measurement is Critical
An improperly sized garage door belt can cause a host of problems. If the belt is too short, it will create excessive tension, straining the motor and other components of the opener. This can lead to premature wear and tear and potentially costly repairs. A belt that is too long will sag, causing it to slip and preventing the door from opening or closing properly. This can also be a safety hazard. Therefore, taking the time to measure correctly is not just about convenience; it’s about maintaining the longevity and safety of your garage door system.
Before you begin, it’s important to identify the signs of a failing belt. You might hear unusual noises like squeaking or grinding during operation. The door’s movement may become jerky or inconsistent. A visual inspection might reveal cracks, fraying, or visible sagging in the belt. If you notice any of these signs, it’s time to measure for a replacement.
Safety First: Preparing for the Measurement
Before you start any work on your garage door opener, safety should be your top priority. Always disconnect the power to the garage door opener by unplugging it from the electrical outlet. This will prevent the door from accidentally activating while you are working on it. It’s also a good idea to wear safety glasses and gloves to protect yourself from any debris or sharp edges.
You will need a few basic tools to get the job done: a sturdy ladder, a tape measure, and possibly a wrench or socket set to loosen the tension on the old belt. Having these tools ready will make the process much smoother and safer.
Step-by-Step Guide to Measuring Your Garage Door Belt
Measuring your garage door belt can be done in a couple of ways, depending on whether the old belt is still intact or has already broken. We will cover both scenarios to ensure you can get an accurate measurement no matter the condition of your current belt.
Method 1: Measuring an Intact (But Worn) Belt
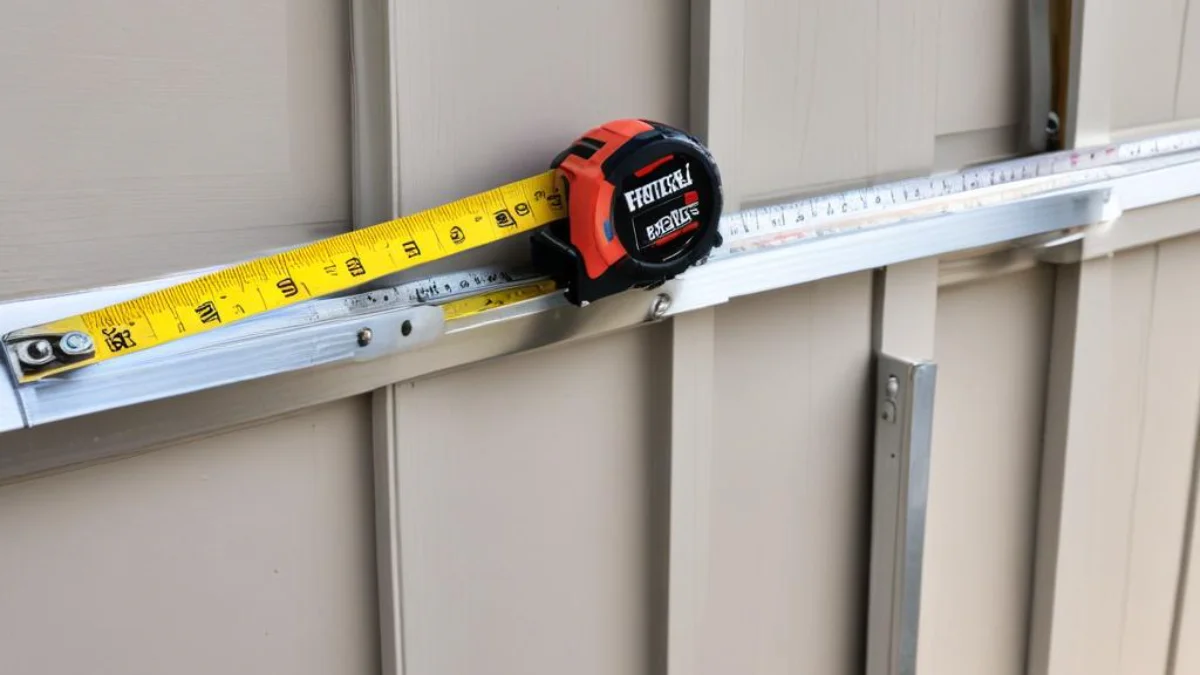
If your belt is still on the opener, you have two options for measuring it. The most accurate method involves removing the belt completely. To do this, you will need to release the tension. Look for the tensioner assembly on the rail, which usually consists of a spring and a threaded nut. Loosening this nut will slacken the belt, allowing you to remove it from the pulleys.
Once the belt is removed, lay it flat on the ground in a straight line. Use your tape measure to determine its total length from one end to the other. This total length is the most critical measurement you will need when purchasing a new belt. It’s also a good idea to count the number of grooves or teeth within a specific length (e.g., 6 inches) to ensure you get a belt with the correct tooth pattern, as this can vary between models.
Method 2: Measuring a Broken Belt
If your belt has already snapped, the process is even simpler. Gather both pieces of the broken belt and lay them end-to-end on a flat surface. Be sure to align the broken ends as closely as possible to get an accurate total length. Measure the combined length of the two pieces to determine the original size of the belt. This method is quite reliable, provided you have all the pieces of the broken belt.
An alternative if you can’t remove the belt or it’s broken is to measure the distance between the front pulley and the rear pulley on the opener rail. Measure this distance and then multiply it by two. This will give you a very close approximation of the required belt length.
Understanding Belt Sizes and Door Height
Garage door opener belts are typically sold based on the height of the garage door they are designed for, such as a 7-foot or 8-foot door. However, it is crucial to measure the belt itself rather than relying solely on the door height. Sometimes, an installer might use a longer rail and belt assembly on a shorter door for various reasons, such as clearance issues. For instance, an 8-foot opener rail might be installed on a 7-foot door.
By measuring the physical belt, you eliminate any guesswork and ensure you are buying the correct part for your specific opener setup. If you can’t measure the belt, the next best option is to find the model number of your garage door opener. You can usually find this on the motor unit. A quick search online with the model number should provide the correct replacement belt part number and its corresponding length.
| Garage Door Height | Typical Rail Length | Approximate Belt Length |
|---|---|---|
| 7 feet | ~116 inches | ~233-237 inches |
| 8 feet | ~128 inches | ~255-261 inches |
| 10 feet | ~152 inches | ~305-308 inches |
What to Do After You Have the Measurement
Once you have the accurate length of your garage door belt, you can confidently purchase a replacement. You can find replacement belts at most home improvement stores, online retailers, or from the manufacturer of your garage door opener. When purchasing, double-check that the new belt’s length and tooth pattern match your old one.
Installing the new belt is essentially the reverse of the removal process. If you’re looking for guidance on other home maintenance tasks, you might find our articles on topics like whether you should replace a 30 years old water heater or understanding insulation retainer clip uses helpful.
Final Thoughts on a Job Well Done
Taking the time to properly measure your garage door belt is a small effort that pays off significantly. It ensures you get the right part, which leads to a smoother installation and a reliably functioning garage door. A well-maintained opener is not only convenient but also a key component of your home’s security and safety. While tasks like learning how to drive PVC pipe into the ground may seem unrelated, the principle of careful preparation and measurement applies to all successful DIY projects.
If after all this you feel the job is too complex, or if you encounter other issues with your opener, it might be time to call a professional. Understanding how much does Sears charge for a service call can give you an idea of professional repair costs. However, with the right measurements and a little patience, replacing a garage door belt is a very manageable DIY project.
Frequently Asked Questions
What is the easiest way to measure a garage door belt?
The simplest method is to first check your garage door opener for a model number. You can then search online for the belt length specific to that model. If you cannot find the model number, you can measure the old belt if it has been removed.
How do I measure the belt if it’s still on the opener?
If the belt is still installed, you can measure the distance from the front pulley to the back pulley gear. Once you have this measurement, multiply it by two to get an approximate length of the entire belt.
Does the height of my garage door matter?
Yes, the height of your garage door is a crucial factor in determining the correct belt length. Belts are sized based on the door’s height, which is typically 7 or 8 feet. Always measure your door’s height to ensure you purchase the correct belt for your system.
How can I tell if I have an older or newer style of belt?
To determine the version of your belt, you can measure a 6-inch section of your existing belt and count the number of ridges or grooves. Newer versions, typically made after 2002, will have around 20 grooves in a 6-inch span. Older versions will have fewer grooves in the same length.
Can I use a string to find the belt’s length?
Yes, another effective method is to wrap a string around the entire path of the belt. After marking where the string meets, you can remove it and measure the marked length to find the required belt size.
What information do I need to buy a replacement belt?
Before purchasing a new belt, you should know the height of your garage door and the make and model of your opener. It’s also helpful to have the overall length of your old belt and to know whether you have a newer or older style of belt.