Transform Your Home: How to Make French Doors Out of Regular Doors
Do you love the elegant, light-filled look of French doors but cringe at the hefty price tag? You’re not alone. Many homeowners dream of adding that classic charm to their homes but are deterred by the cost and complexity of a full replacement. What if you could achieve that same sophisticated aesthetic using the doors you already have? It’s a common desire: to upgrade a space, invite more natural light, and create a seamless flow between rooms without a major renovation.
The problem often lies in the perceived difficulty of such a project. The idea of cutting into a perfectly good door can be intimidating. Questions about structural integrity, the right tools for the job, and achieving a professional finish can quickly turn a spark of inspiration into a daunting task. This guide is here to demystify the process and empower you to take on this transformative DIY project with confidence.
This article will provide a comprehensive, step-by-step solution, guiding you through the entire process of converting standard solid doors into beautiful, light-enhancing French doors. We’ll cover everything from selecting the right doors for conversion to the final touches that will make your project indistinguishable from a high-end installation. Get ready to unlock the potential of your existing doors and flood your home with style and sunlight.
You'll Learn About
Is This Project Right for You? Evaluating Your Existing Doors
Before you start gathering your tools, it’s crucial to determine if your current doors are suitable candidates for this conversion. The success of this project largely depends on the type and condition of the doors you’re working with. A little upfront evaluation will save you time, effort, and potential frustration down the line.
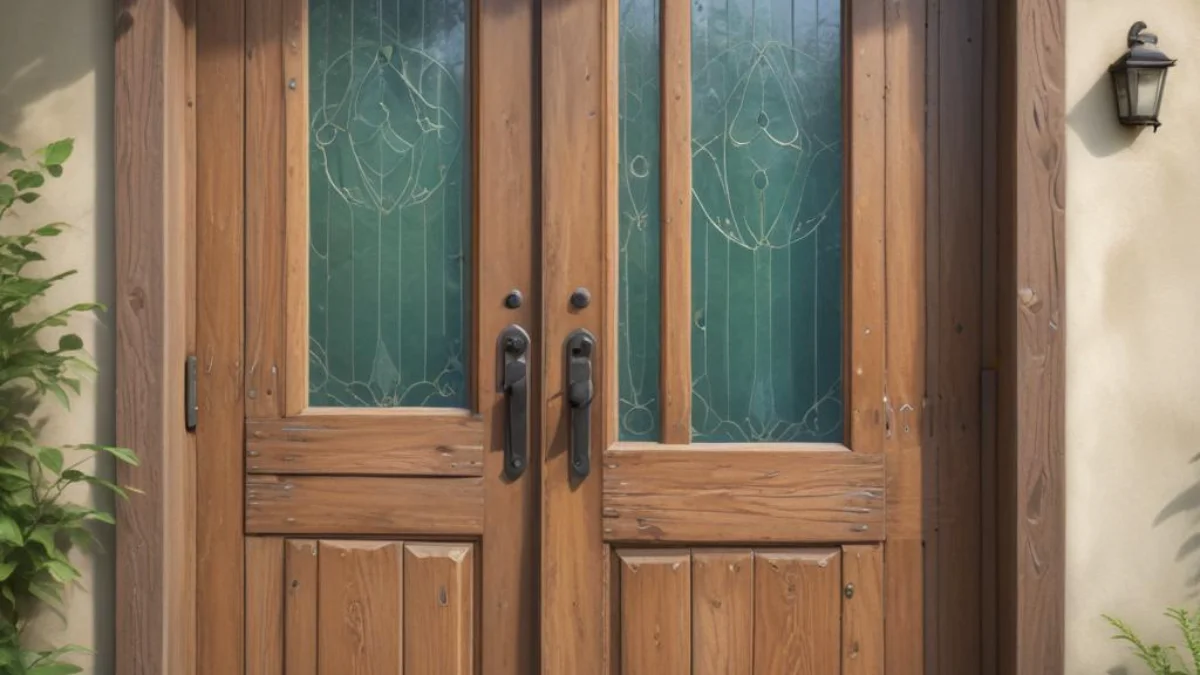
The best doors for this project are solid wood panel doors. Their construction, with distinct stiles, rails, and panels, provides a natural framework for inserting glass. The panels can be removed without compromising the door’s overall structural integrity. Hollow core doors, on the other hand, are generally not suitable for this type of modification as they lack the internal structure needed to support glass panes.
Carefully inspect your doors for any signs of damage, such as warping, cracking, or rot. A door that is already compromised may not withstand the cutting and retrofitting process. Also, consider the door’s thickness; a standard thickness of 1-3/8 inches to 1-3/4 inches is ideal for accommodating glass and the necessary molding.
Understanding the Anatomy of a Panel Door
To confidently tackle this project, it’s helpful to understand the basic components of a panel door. The vertical members are called stiles, and the horizontal members are the rails. The sections in between are the panels, which are the parts you will be removing. The decorative molding that holds the panel in place is key to this process.
Some doors have panels held in by separate pieces of molding that can be carefully pried off. Others have the molding routed directly into the stiles and rails as one solid piece. Identifying which type you have will determine your method for removing the panel. Gently probing the seam between the molding and the stile with a utility knife can help you determine if it’s a separate piece.
Gathering Your Tools and Materials
Having the right tools and materials on hand before you begin is essential for a smooth and successful project. A well-prepared workspace will allow you to work efficiently and safely. Here’s a rundown of what you’ll need to transform your regular doors into stunning French doors.
Proper preparation is key to a professional-looking result. Ensure you have a clean, well-lit area to work in, with sawhorses to support the doors. Safety should always be your top priority, so don’t forget your protective gear. This project involves cutting and handling glass, so taking precautions is a must.
This isn’t just a simple paint job; it’s a modification that can add significant value and character to your home. Taking the time to gather the correct supplies will pay off in the final product. Just as you wouldn’t want to deal with a water heater popping noise by ignoring it, you don’t want to cut corners on your tool and material prep for this project.
Essential Supplies for Your DIY French Door Conversion
Your shopping list will include both tools for the modification and materials for finishing. Investing in quality tools will not only make this project easier but will also be useful for future DIY endeavors. The materials you choose for the glass and molding will define the final look of your new French doors.
The choice of glass is particularly important. For safety, especially in high-traffic areas, tempered or laminated glass is highly recommended. Plexiglass is a lighter and less expensive alternative, though it can scratch more easily. Consider the style of your home when selecting the molding that will hold the glass in place; a simple, clean profile works well for modern aesthetics, while a more ornate design can complement traditional decor.
Remember to measure carefully for your glass panels. A common rule of thumb is to have the glass cut approximately 1/8 inch smaller than the opening on all sides to allow for expansion and contraction of the wood. This small detail can prevent issues later on.
| Category | Tool/Material | Purpose |
|---|---|---|
| Safety Gear | Safety Glasses, Gloves, Dust Mask | Essential for protecting eyes, hands, and lungs. |
| Measuring & Marking | Tape Measure, Carpenter’s Square, Pencil | For precise and accurate layout. |
| Cutting Tools | Circular Saw or Jigsaw, Router with Rabbeting Bit, Chisel | For removing panels and creating a recess for the glass. |
| Assembly & Fastening | Drill, Screwdrivers, Nail Gun or Hammer & Nail Set | For securing molding and hardware. |
| Core Materials | Tempered Glass or Plexiglass Panels | The new “windows” for your doors. |
| Wood Molding/Stops | To hold the glass panels securely in place. | |
| Finishing Supplies | Sandpaper, Wood Filler, Primer, Paint or Stain | For a professional, polished final appearance. |
| Silicone Caulk | To seal the glass and prevent rattling. |
The Step-by-Step Conversion Process
Now that you’ve confirmed your doors are suitable and you’ve gathered your supplies, it’s time to begin the transformation. This process requires patience and precision. Work slowly and methodically, and you’ll be rewarded with a beautiful set of custom French doors.
Breaking the project down into manageable steps will make it feel less overwhelming. From preparing the door to installing the final piece of hardware, each stage is critical to the overall success. Double-check your measurements at every step to ensure a perfect fit.
Step 1: Preparation and Panel Removal
Begin by removing the doors from their hinges and taking off all hardware, including doorknobs and locksets. Place the door on a stable pair of sawhorses. This will provide a comfortable and secure working height.
Next, carefully mark the cut lines for the panel you intend to remove. Use a carpenter’s square to ensure your lines are perfectly straight and your corners are 90 degrees. Once marked, you can proceed with cutting out the panel. A circular saw can be used for the straight cuts, finishing the corners with a handsaw or jigsaw for precision. Take your time during this step to ensure clean, straight cuts.
Step 2: Creating the Glass Rabbet
With the panel removed, you need to create a recess, or rabbet, for the glass to sit in. This is most easily accomplished with a router and a rabbeting bit. The depth of the rabbet should be about half the thickness of your door. This creates a lip for the glass to rest against.
Set the depth of your router bit carefully. You want the rabbet to be uniform all the way around the opening. After routing, use a sharp chisel to square up the corners that the router bit will have rounded. A clean, well-defined rabbet is the foundation for a secure glass installation.
Step 3: Measuring for and Installing the Glass
With the rabbet cut, you can now take the final measurements for your glass panels. Measure the height and width of the opening from the inside edges of the rabbet. As mentioned earlier, subtract about 1/4 inch from both the height and width to allow for a 1/8 inch gap on all sides.
Once you have your custom-cut glass, apply a thin bead of clear silicone caulk into the corner of the rabbet. This will create a cushion for the glass and help to seal it against drafts and rattling. Carefully set the glass panel into the opening against the caulk. Handle the glass with care, wearing gloves to avoid fingerprints and potential injury.
Step 4: Securing the Glass with Molding
The glass is held in place by wood molding, often called glass stops. Cut your molding to fit snugly around the perimeter of the glass on the other side of the door. Miter the corners at a 45-degree angle for a professional, picture-frame look.
Apply another bead of caulk between the glass and the molding before securing it. Fasten the molding in place with a brad nailer or by hand with small finishing nails. Use a nail set to sink the nail heads slightly below the surface of the wood. This will allow you to fill the holes for a seamless finish.
Finishing Touches and Reinstallation
With the glass securely installed, the most challenging part of the project is complete. Now it’s time for the finishing touches that will bring your new French doors to life. This is where you can truly customize the look to match your home’s decor.
Proper finishing will not only make your doors look great but will also protect them for years to come. Don’t rush this final stage. A well-executed paint or stain job is the hallmark of quality craftsmanship. Much like the satisfaction of finally getting rid of a troublesome old fixture, perhaps similar to the process of learning how to remove a cast iron fireplace insert, completing this final step well is incredibly rewarding.
Sanding, Filling, and Painting
Fill all the nail holes from the molding with a quality wood filler. Once the filler is dry, sand the entire door, including the new molding, to create a smooth surface for painting or staining. Start with a medium-grit sandpaper and finish with a fine-grit for the best results.
Wipe the door clean of all dust before applying your primer. A good quality primer is essential for paint adhesion and a uniform final color. Apply one or two coats of your chosen paint or stain, allowing adequate drying time between coats. Lightly sand between coats for an extra-smooth finish.
Reinstalling the Doors and Hardware
Once the paint or stain is fully cured, it’s time to reinstall your beautifully transformed doors. Reattach the hinges, hang the doors back in their frame, and install your doorknobs and any other hardware. You may need a helper for this step, as the doors will be heavier with the addition of the glass.
Check the swing of the doors and make sure they meet evenly in the middle. You may need to make minor adjustments to the hinges. For a pair of French doors, you can install a ball catch at the top of one door to keep it securely closed, or an astragal—a vertical molding strip—to cover the gap between the two doors. It’s always a good idea to ensure all your home fixtures are in working order, from your new doors to your fireplace. If you’ve ever had trouble with home systems, you know the frustration when you did you lose your fireplace remote heres what to do. Attention to detail in all areas makes a home run smoothly.
Embrace Your New, Brighter Space
Congratulations! You have successfully transformed your standard doors into elegant French doors. This project not only enhances the beauty and value of your home but also brings in more natural light, making your space feel larger and more inviting. It’s a testament to what a little creativity and DIY spirit can achieve.
By repurposing your existing doors, you’ve completed a cost-effective and sustainable home improvement project. You’ve learned new skills and added a personal touch to your home that you can be proud of for years to come. Enjoy the new sense of openness and the classic charm that your custom French doors bring to your living space.