Stop! Installing Purlins on Edge Can Go Wrong Fast—Here’s How
You’re staring at a pile of lumber or steel, looking up at your roof trusses, and a critical question hits you: should the purlins be installed flat or on edge? It’s a decision that seems minor but has massive implications for your building’s strength, longevity, and even your safety during construction. Many builders default to laying purlins flat because it offers a wider target for fasteners, but this shortcut can lead to significant problems down the road.
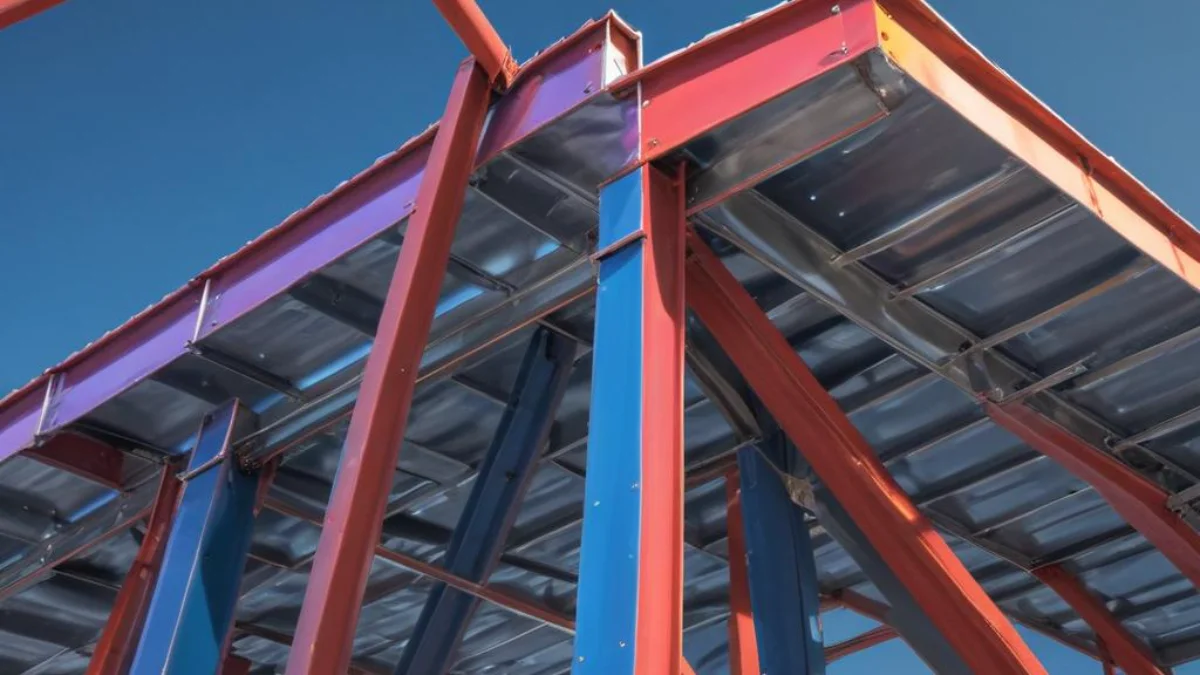
Installing purlins on edge provides substantially more strength and rigidity, preventing the sag and flex that can plague a roof over time. However, this superior method comes with its own set of challenges. The primary issue is rotational instability; a purlin set on its narrow edge is prone to rolling or twisting under load, which could compromise the entire roof system. This guide will walk you through the correct, safe, and structurally sound way to install purlins on edge.
You'll Learn About
Why Purlin Orientation Matters More Than You Think
The decision to install purlins flat or on edge is fundamentally about structural integrity. A simple 2×4 is dramatically stronger when oriented vertically (on edge) compared to lying horizontally (flat). This is because its strength in bending is proportional to its height cubed—making the on-edge orientation vastly superior for carrying loads over a span.
When purlins are laid flat, they are more susceptible to sagging under the weight of roofing materials, snow, and wind loads. This can lead to a wavy, uneven roof surface and potential leaks. By installing them on edge, you create a much stiffer and more robust framework, ensuring your roof remains straight and secure for years to come.
The main challenge with on-edge installation is preventing the purlins from rolling over. This rotational force is a serious concern, both during construction when workers are walking on the framework and after the roof is completed. Without proper bracing and connection techniques, an on-edge purlin can fail, leading to significant structural damage.
The Problem with Common On-Edge Installation Shortcuts
In post-frame construction, one common but flawed method for installing purlins on edge involves “paddle blocks.” These are short 2×6 blocks nailed between trusses, and the purlins are then nailed to these blocks. However, this technique is prone to failure as numerous large nails are driven into a small block, often causing it to split over time.
Another shortcut is simply toe-nailing the purlins to the top of the trusses. While quick, toe-nailing provides a weak connection that is insufficient to resist the rotational forces and uplift from wind. These shortcuts might save time initially but create a weaker, less reliable roof structure in the long run.
These methods fail to adequately address the primary risk: purlin roll. A structurally sound installation requires a system that locks the purlins in place, preventing any twisting or rotation. This is where proper blocking and specialized connectors become essential.
Pre-Installation: Planning for Success
Before you lift a single purlin, careful planning is crucial. Always consult your building’s engineering plans for the specified purlin size, spacing, and connection details. These specifications are calculated based on your local snow loads, wind speeds, and the type of roofing material you’ll be using.
Gathering the right materials and tools is the next step. You will need the purlins themselves (wood or steel), appropriate fasteners like structural screws or nails, and potentially specialized hardware like joist hangers or purlin anchors. Using the correct fastener is critical; structural screws often provide superior holding power and are less likely to damage the wood compared to large nails.
Proper layout is also key. Mark the purlin locations on your trusses or rafters according to the plan, typically 24 inches on center for most metal roofing applications. Use a chalk line to ensure your layout is straight and consistent across the entire roof span. Any inaccuracies here can lead to problems with roofing panel alignment later on.
The Solution: Step-by-Step Guide to Installing Purlins on Edge Securely
Properly installing purlins on edge involves more than just placing them and driving a fastener. The key is to create a rigid system that resists rotational forces. Here are the most effective methods to achieve a secure and long-lasting installation.
Method 1: Solid Blocking Between Purlins
This is one of the most effective and widely recommended methods. It involves fitting solid wood blocks between the purlins, directly over the trusses. These blocks are cut to match the spacing between the purlins and are fastened securely, creating a rigid, interconnected grid.
First, install a purlin and fasten it to the truss. Then, measure and cut a block from the same dimension lumber as the purlins. Fit this block snugly against the first purlin and fasten it through the side of the purlin and also down into the truss. Repeat this process for each purlin, effectively creating a solid line of wood that prevents any rotation.
Method 2: Using Joist Hangers
Another excellent option is to nest the purlins between the trusses using joist hangers. This method is often considered the strongest and most stable, as it physically seats the purlin within a metal connector. This approach creates a flush surface with the tops of the trusses, which can be beneficial for certain roofing systems.
To use this method, you first need to install the appropriate size joist hangers on the sides of your trusses at the correct height. The purlins are then cut to fit snugly between the trusses and dropped into the hangers. Fasten the purlins securely through the hanger’s designated nail or screw holes. While highly effective, this method is more labor-intensive and costly due to the additional hardware required.
Method 3: Specialized Purlin Anchors and Straps
For some applications, engineered metal connectors like purlin anchors or hurricane straps offer a robust solution. These connectors are designed specifically to tie purlins to trusses and resist both uplift and rotational forces. Companies like Simpson Strong-Tie offer a variety of connectors suitable for this purpose.
Installation involves placing the purlin on edge atop the truss and then securing it with the anchor. The anchor is fastened to both the side of the purlin and the top or side of the truss, creating a very strong connection. Always follow the manufacturer’s instructions for the specific connector you are using, including the type and number of fasteners required.
Key Considerations for a Professional Installation
Regardless of the method you choose, several key details will ensure a professional and durable result. Proper spacing is paramount; incorrect spacing can weaken the entire structure. The typical spacing for purlins under metal roofing is 24 inches on center, but this can vary, so always defer to your building plans.
When joining purlins end-to-end, it’s best to have the joint occur over a truss. Overlapping the purlins by at least one to two feet over the truss creates a much stronger, continuous line than simply butting the ends together. This practice enhances the overall rigidity of the roof diaphragm.
Finally, consider the safety of everyone on the job site. Walking on purlins installed on edge before they are fully braced is extremely dangerous. Ensure that all blocking or bracing is installed progressively as you move across the roof to maintain a safe working platform.
Comparing Purlin Installation Methods
Choosing the right installation technique depends on your specific project, budget, and engineering requirements. To help you decide, here is a comparison of the primary methods for installing purlins on edge.
| Method | Pros | Cons | Best For |
|---|---|---|---|
| Solid Blocking | Excellent rotational stability, uses common materials, cost-effective. | Labor-intensive due to cutting and fitting many blocks. | Most standard post-frame and residential metal roof applications. |
| Joist Hangers | Superior strength and stability, creates a flush roof plane. | Higher material cost, more time-consuming installation. | Buildings requiring maximum strength or a flush interior ceiling. |
| Purlin Anchors | Engineered for specific loads, strong connection, can be faster than blocking. | Can be expensive, requires specific hardware. | High-wind areas or when specified by an engineer. |
| Toe-Nailing / Paddle Blocks | Fast and requires no extra hardware. | Structurally weak, high risk of failure and purlin roll. | Not recommended for any structural application. |
Final Checks and Best Practices
Once your purlins are installed, take the time to inspect the entire framework. Check for proper alignment and ensure all fasteners are correctly installed and tightened. A well-installed purlin system should feel solid and rigid, with no noticeable flex or movement.
Remember that a solid roof structure is the backbone of your building, protecting it from the elements. While the thought of a leak is concerning, a more pressing issue could be the system that’s supposed to prevent it. Ensuring you know how to caulk gutter to fascia board step by step is just as crucial as the main roof installation. Similarly, internal systems matter; for instance, understanding Richmond water heater gas valve problems can prevent major headaches inside the home you’ve just protected from the outside.
By taking the time to install your purlins on edge using a secure, well-braced method, you are making a vital investment in the structural integrity and longevity of your building. This commitment to quality craftsmanship ensures your roof will stand strong against whatever nature throws its way. In the long run, just like optimizing your home’s systems with a tankless water heater timer, doing the job right the first time always pays off.