How to Glue Trim to a Bathtub and Banish Gaps Forever!
That unsightly gap between your bathtub and the wall is more than just a cosmetic issue. It’s an open invitation for water damage, mold, and mildew, which can lead to costly repairs down the line. Many homeowners find that their bathtub trim is peeling, cracking, or has yellowed over time, completely ruining the look of their bathroom.
You’ve probably tried to fix it with a tube of caulk, only to watch it fail within months. The constant expansion and contraction from temperature changes, combined with moisture, creates a challenging environment where only the right materials and techniques will succeed. This guide will show you how to permanently glue trim to your bathtub for a waterproof, professional-looking seal that lasts.
You'll Learn About
Why Traditional Caulk Fails and Trim Loosens
The primary reason bathtub trim and caulk fail is movement. The joint between your bathtub and the wall is not static. Tubs, especially acrylic and fiberglass models, can flex slightly when filled with water and a person’s weight. This constant, subtle movement puts stress on the sealant.
Additionally, poor surface preparation is a major culprit. If the old caulk, soap scum, and grime are not completely removed, the new adhesive won’t create a strong, lasting bond. Moisture is the final enemy; applying sealant to a damp surface is a guarantee for failure. These factors work together to break the seal, allowing water to seep behind the trim and walls.
Understanding these failure points is the first step toward a successful installation. It’s not just about applying a new layer of glue; it’s about creating a clean, stable, and completely dry foundation for the new trim and adhesive to bond to effectively. This preparation is the most critical part of the entire process.
Gathering Your Tools and Materials for a Perfect Seal
Before you begin, assembling the right tools and materials will make the job smoother and ensure a professional-quality result. Having everything on hand means you won’t have to stop mid-project. A little preparation goes a long way.
You will need more than just the trim and the adhesive. Proper removal of old material and thorough cleaning are non-negotiable steps for a seal that won’t leak. Don’t be tempted to take shortcuts here, as they will almost certainly lead to premature failure and having to do the job all over again.
Essential Shopping List:
- Plastic Bathtub Trim Kit: Choose a kit that matches your bathtub’s style and dimensions. These are often made of PVC, which is flexible and waterproof.
- 100% Silicone Sealant or High-Quality Tub & Tile Adhesive Caulk: Do not use acrylic latex caulk. Silicone offers superior flexibility and water resistance.
- Caulking Gun: For applying the sealant smoothly and evenly.
- Utility Knife or Caulk Removal Tool: Essential for cutting away the old, failed caulk and trim.
- Scraper Tool (Plastic): To scrape away residue without scratching your tub or tiles.
- Denatured Alcohol or Mineral Spirits: For cleaning the surfaces and removing all soap scum and silicone residue.
- Painter’s Tape: To create clean, straight caulk lines for a professional finish.
- Paper Towels or Clean Rags: For cleaning and wiping away excess sealant.
- Protective Gloves: To keep your hands clean and protected from chemicals.
- Hairdryer or Heat Gun (Optional): This can help soften old caulk, making it easier to remove.
A Flawless Installation: Your Step-by-Step Guide to Gluing Trim to Your Bathtub
With your materials gathered, it’s time to tackle the project. Follow these steps carefully for a waterproof seal that will stand the test of time. Patience during the preparation phase will pay off immensely with the final result.
Step 1: Remove the Old Trim and Caulk (The Most Important Step)
This is where the real work begins. You must remove every trace of the old caulk and any existing trim. Use a utility knife to carefully cut along the top and bottom edges of the old trim or caulk line. Be cautious not to scratch the bathtub surface or the wall tile.
Once you’ve made the cuts, use a caulk removal tool or a plastic putty knife to pry and scrape away the old material. A hairdryer can be used on a low setting to gently heat and soften stubborn caulk, making it easier to peel off. This step is critical; new silicone will not adhere to old silicone.
Step 2: Deep Clean the Surface Area for Maximum Adhesion
After removing all the old material, the next crucial step is to deep clean the joint. Any remaining soap scum, mildew, or silicone residue will prevent the new adhesive from bonding properly. Scrub the area with a bathroom cleaner that is effective against mildew.
Once scrubbed, wipe the entire area down with denatured alcohol or mineral spirits on a clean rag. This will dissolve any remaining soap film and silicone oils. The surface must be perfectly clean and completely dry before you proceed. Allow it to air dry for at least an hour, or use a hairdryer to speed up the process.
Step 3: Measure and Dry-Fit the New Trim
Measure the length of each side of the bathtub where the trim will be installed. Cut your new PVC trim pieces to size using a miter box and saw for clean, 45-degree corner cuts. This will ensure a professional-looking, seamless corner joint.
Before applying any adhesive, perform a “dry fit.” Place the cut trim pieces into position to ensure they fit snugly against the tub and wall. Make any necessary adjustments now. This step helps you avoid surprises once the sticky adhesive is involved.
Step 4: Apply the Adhesive to the Trim
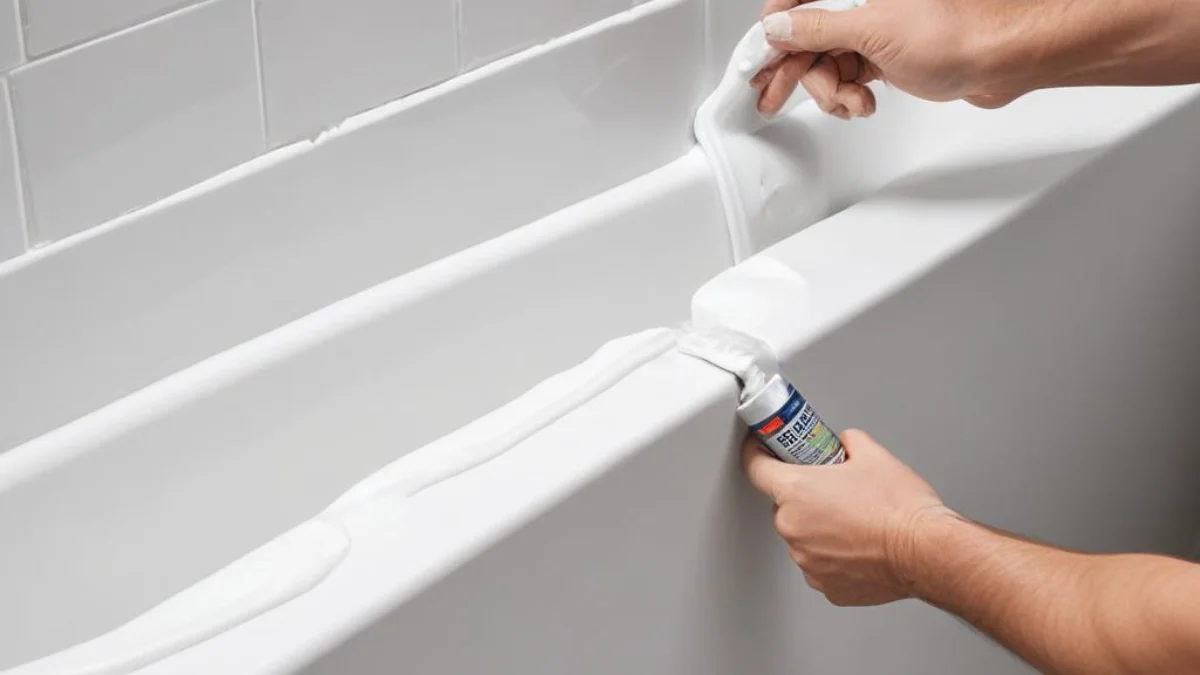
Load your 100% silicone sealant or adhesive into the caulking gun. Cut the tip of the nozzle at a 45-degree angle, making sure the opening is about 1/4-inch wide. You want a consistent bead of adhesive that is not too thick or too thin.
Apply a continuous bead of the adhesive along the back of the trim piece—the part that will contact the wall and the tub deck. Apply the adhesive in a slight zigzag pattern to ensure good coverage across the entire width of the trim. Don’t be shy with the adhesive, but avoid excessive amounts that will squeeze out everywhere.
Step 5: Press the Trim Firmly into Place
Carefully position the adhesive-backed trim piece into the corner, pressing it firmly against both the wall and the bathtub. Apply even pressure along the entire length of the trim to ensure it makes solid contact and the adhesive spreads out to create a strong bond.
Use painter’s tape to hold the trim securely in place while the adhesive cures. Place strips of tape every 6-8 inches, running from the wall, over the trim, and onto the bathtub. This prevents the trim from slipping or pulling away from the wall as the glue sets.
Step 6: Tool the Caulk Lines for a Professional Finish
After the trim is secured, you’ll need to apply a final bead of silicone caulk along the top edge (where the trim meets the wall) and the bottom edge (where it meets the tub). This provides a final waterproof seal. Apply a thin, consistent bead along these joints.
To “tool” the caulk line, wet your finger with denatured alcohol or use a caulk finishing tool and run it smoothly along the fresh bead of caulk. This presses the silicone into the joint and removes the excess, creating a clean, concave line. Wipe away any excess immediately with a paper towel.
Step 7: Allow Adequate Curing Time (Don’t Rush It!)
This is a step where many people go wrong. The adhesive and caulk need time to cure fully to become waterproof and achieve maximum strength. Check the manufacturer’s instructions, but most 100% silicone sealants require at least 24 hours to cure completely.
During this time, do not use the shower or bathtub. Any exposure to water or moisture before it has fully cured will compromise the seal and lead to failure. It is also important to ensure good ventilation in the bathroom to help the curing process. Just as you wouldn’t want rain right after a new roof is installed, you don’t want water interfering with your new seal. You can learn more about the importance of curing times when working on home projects by reading about what to do if it rains right after a new roof installation.
Choosing the Right Adhesive: A Comparison
The success of your project hinges on using the right type of glue. The bathroom is a high-moisture environment with fluctuating temperatures, so you need an adhesive that is waterproof, flexible, and contains mildewcide. Here is a breakdown of your best options.
Not all “glues” are created equal. Using a standard construction adhesive or an incorrect type of caulk will result in a bond that fails quickly when exposed to the daily rigors of a bathroom environment.
| Adhesive Type | Pros | Cons | Best For |
|---|---|---|---|
| 100% Silicone Sealant | Excellent flexibility, completely waterproof, strong adhesion, contains mildewcide. | Cannot be painted, can be messy to apply, requires mineral spirits for cleanup. | The best all-around choice for sealing bathtub trim. Offers the most durable and long-lasting waterproof seal. |
| Hybrid Polymer Sealant (MS Polymer) | Extremely strong bond, waterproof, flexible, often paintable. | More expensive, can be harder to find than silicone. | An excellent, high-performance alternative to silicone, especially if you need a paintable finish. |
| Tub & Tile Adhesive Caulk | Specifically formulated for bathrooms, easy to apply and tool, water cleanup (for siliconized acrylic). | Less flexible than 100% silicone, may shrink over time, can be prone to cracking with significant tub movement. | A good option for tubs with very little flex and for homeowners who prioritize ease of application and cleanup. |
| Construction Adhesive (e.g., Loctite Power Grab) | Very high initial tack, strong bond. | Often not flexible enough for tub joints, may not be fully waterproof, can become brittle over time. | Generally not recommended for bathtub trim due to lack of flexibility, but can be used to initially hold the trim in place before sealing the edges with silicone. |
Pro Tips for a Flawless, Long-Lasting Finish
Beyond the basic steps, a few professional tricks can elevate your project from good to great. These tips address common issues and help ensure your new trim looks fantastic for years to come.
Small details, like how you fill the tub or the direction you tool the caulk, can make a surprising difference in the longevity of your seal. It’s about working smarter, not harder.
Fill the Bathtub Before Caulking
For tubs that flex, especially fiberglass or acrylic models, it’s a great idea to fill the tub with water before you apply the final caulk beads along the edges of the trim. This weighs the tub down, opening the joint to its widest point. When you caulk it in this position, the sealant cures while the gap is at its maximum. Then, when the tub is empty, the sealant will be under slight compression, rather than tension, making it far less likely to pull away or tear over time. This technique is similar to ensuring stability when you drive PVC pipe into the ground; you want to account for environmental stresses from the start.
Use Painter’s Tape for Perfect Lines
For razor-sharp, perfectly straight caulk lines, apply two strips of painter’s tape. Place one strip on the wall, about 1/8 inch above the joint, and another on the bathtub, 1/8 inch below the joint. Apply your bead of caulk in the channel you’ve created. After tooling the bead, remove the tape immediately (while the caulk is still wet) by pulling it away from the joint at a 45-degree angle. This technique leaves you with a flawless, professional-looking line every time.
Cut the Caulk Nozzle Correctly
The size and shape of your caulk bead are determined by how you cut the nozzle. Don’t just snip the tip off. For the best results, cut the nozzle at a sharp 45-degree angle. The size of the opening should be slightly smaller than the gap you intend to fill. This allows you to force the caulk into the gap, rather than just laying it on top, creating a much stronger seal.
Maintaining Your New Bathtub Trim
Your new trim and sealant will last for years with a little routine care. The key is to prevent the buildup of soap scum and mildew, which can degrade the silicone over time. A little prevention is worth a pound of cure.
Regular cleaning also gives you a chance to inspect the seal. Catching a small problem early, like a tiny crack or separation, is much easier to fix than dealing with the water damage that can result from a failed seal. It’s part of regular home maintenance, much like inspecting your roof for issues after major work, a process not unlike removing dormers from a roof where post-job checks are vital.
Cleaning and Inspection
Clean the trim and caulk lines weekly using a pH-neutral or non-abrasive bathroom cleaner. Avoid using harsh chemicals, bleach, or abrasive scouring pads, as these can damage the silicone and shorten its lifespan. After showering, using a squeegee on the walls and trim area can help it dry faster, further discouraging mildew growth.
Once every few months, do a close inspection of the caulk lines. Look for any signs of peeling, cracking, or discoloration. If you spot a small area of failure, you can often perform a spot repair. Cut out the failed section, clean the area thoroughly with denatured alcohol, and apply a fresh bead of 100% silicone, making sure to tool it to blend with the existing caulk line.
Frequently Asked Questions (FAQ)
Here are answers to some of the most common questions homeowners have when gluing trim to a bathtub.
Can I just put new caulk over the old caulk?
Absolutely not. This is the single most common mistake and the number one reason for caulk failure. New silicone caulk will not adhere to cured silicone. You must completely remove every trace of the old caulk for the new application to bond properly and create a waterproof seal.
How long do I have to wait before using my shower?
You must wait for the caulk to fully cure. While it may be dry to the touch in a few hours, a full cure typically takes a minimum of 24 hours. Some high-performance silicones or adhesives may require up to 48 hours. Always read and follow the specific manufacturer’s instructions on the product you are using. Exposing it to water prematurely will ruin the seal.
What is the best material for bathtub trim?
PVC (polyvinyl chloride) trim is the most popular and practical choice. It is completely waterproof, flexible enough to conform to slight curves, easy to cut, and resistant to mold and mildew. It provides a clean, finished look that is easy to maintain.
My bathtub moves slightly when I get in. Will the trim crack?
This is precisely why using 100% silicone sealant as your adhesive and sealant is so important. Silicone is extremely flexible and is designed to accommodate movement. It can stretch and compress without breaking the seal. If you have a tub with significant flex, using the pro tip of filling the tub with water before caulking is highly recommended to ensure the longevity of the seal.